trigger calculate on Item__c (after insert, after update, after delete) {

// Use a map because it doesn't allow duplicate values

Map<ID, Shipping_Invoice__C> updateMap = new Map<ID, Shipping_Invoice__C>();

// Set this integer to -1 if we are deleting
Integer subtract ;

// Populate the list of items based on trigger type
List<Item__c> itemList;
    if(trigger.isInsert || trigger.isUpdate){
        itemList = Trigger.new;
        subtract = 1;
    }
    else if(trigger.isDelete)
    {
        // Note -- there is no trigger.new in delete
        itemList = trigger.old;
        subtract = -1;
    }

// Access all the information we need in a single query
// rather than querying when we need it.
// This is a best practice for bulkifying requests

set<Id> AllItems = new set<id>();

for(item__c i :itemList){
// Assert numbers are not negative.
// None of the fields would make sense with a negative value

System.assert(i.quantity__c > 0, 'Quantity must be positive');
System.assert(i.weight__c >= 0, 'Weight must be non-negative');
System.assert(i.price__c >= 0, 'Price must be non-negative');

// If there is a duplicate Id, it won't get added to a set
AllItems.add(i.Shipping_Invoice__C);
}

// Accessing all shipping invoices associated with the items in the trigger
List<Shipping_Invoice__C> AllShippingInvoices = [SELECT Id, ShippingDiscount__c,
                   SubTotal__c, TotalWeight__c, Tax__c, GrandTotal__c
                   FROM Shipping_Invoice__C WHERE Id IN :AllItems];

// Take the list we just populated and put it into a Map.
// This will make it easier to look up a shipping invoice
// because you must iterate a list, but you can use lookup for a map,
Map<ID, Shipping_Invoice__C> SIMap = new Map<ID, Shipping_Invoice__C>();

for(Shipping_Invoice__C sc : AllShippingInvoices)
{
    SIMap.put(sc.id, sc);
}

// Process the list of items
    if(Trigger.isUpdate)
    {
        // Treat updates like a removal of the old item and addition of the
        // revised item rather than figuring out the differences of each field
        // and acting accordingly.
        // Note updates have both trigger.new and trigger.old
        for(Integer x = 0; x < Trigger.old.size(); x++)
        {
            Shipping_Invoice__C myOrder;
            myOrder = SIMap.get(trigger.old[x].Shipping_Invoice__C);

            // Decrement the previous value from the subtotal and weight.
            myOrder.SubTotal__c -= (trigger.old[x].price__c *
                                    trigger.old[x].quantity__c);
            myOrder.TotalWeight__c -= (trigger.old[x].weight__c *
                                       trigger.old[x].quantity__c);

            // Increment the new subtotal and weight.
            myOrder.SubTotal__c += (trigger.new[x].price__c *
                                    trigger.new[x].quantity__c);
            myOrder.TotalWeight__c += (trigger.new[x].weight__c *
                                       trigger.new[x].quantity__c);
        }

        for(Shipping_Invoice__C myOrder : AllShippingInvoices)
        {

            // Set tax rate to 9.25%  Please note, this is a simple example.
            // Generally, you would never hard code values.
            // Leveraging Custom Settings for tax rates is a best practice.
            // See Custom Settings in the Apex Developer Guide
            // for more information.
            myOrder.Tax__c = myOrder.Subtotal__c * .0925;

            // Reset the shipping discount
            myOrder.ShippingDiscount__c = 0;

            // Set shipping rate to 75 cents per pound.
            // Generally, you would never hard code values.
            // Leveraging Custom Settings for the shipping rate is a best practice.
            // See Custom Settings in the Apex Developer Guide
            // for more information.
            myOrder.Shipping__c = (myOrder.totalWeight__c * .75);
            myOrder.GrandTotal__c = myOrder.SubTotal__c + myOrder.tax__c +
                                    myOrder.Shipping__c;
            updateMap.put(myOrder.id, myOrder);
         }
    }
    else
    {
        for(Item__c itemToProcess : itemList)
        {
            Shipping_Invoice__C myOrder;

            // Look up the correct shipping invoice from the ones we got earlier
            myOrder = SIMap.get(itemToProcess.Shipping_Invoice__C);
            myOrder.SubTotal__c += (itemToProcess.price__c *
                                    itemToProcess.quantity__c * subtract);
            myOrder.TotalWeight__c += (itemToProcess.weight__c *
                                       itemToProcess.quantity__c * subtract);
        }

        for(Shipping_Invoice__C myOrder : AllShippingInvoices)
        {

             // Set tax rate to 9.25%  Please note, this is a simple example.
             // Generally, you would never hard code values.
             // Leveraging Custom Settings for tax rates is a best practice.
             // See Custom Settings in the Apex Developer Guide
             // for more information.
             myOrder.Tax__c = myOrder.Subtotal__c * .0925;

             // Reset shipping discount
             myOrder.ShippingDiscount__c = 0;

            // Set shipping rate to 75 cents per pound.
            // Generally, you would never hard code values.
            // Leveraging Custom Settings for the shipping rate is a best practice.
            // See Custom Settings in the Apex Developer Guide
            // for more information.
            myOrder.Shipping__c = (myOrder.totalWeight__c * .75);
            myOrder.GrandTotal__c = myOrder.SubTotal__c + myOrder.tax__c +
                                    myOrder.Shipping__c;

            updateMap.put(myOrder.id, myOrder);

         }
     }

     // Only use one DML update at the end.
     // This minimizes the number of DML requests generated from this trigger.
     update updateMap.values();
}
运费折扣 触发
trigger ShippingDiscount on Shipping_Invoice__C (before update) {
    // Free shipping on all orders greater than $100

    for(Shipping_Invoice__C myShippingInvoice : Trigger.new)
    {
        if((myShippingInvoice.subtotal__c >= 100.00) &&
           (myShippingInvoice.ShippingDiscount__c == 0))
        {
            myShippingInvoice.ShippingDiscount__c =
                         myShippingInvoice.Shipping__c * -1;
            myShippingInvoice.GrandTotal__c += myShippingInvoice.ShippingDiscount__c;
        }
    }
}
运输发票 测试
@IsTest
private class TestShippingInvoice{

    // Test for inserting three items at once
    public static testmethod void testBulkItemInsert(){
        // Create the shipping invoice. It's a best practice to either use defaults
        // or to explicitly set all values to zero so as to avoid having
        // extraneous data in your test.
        Shipping_Invoice__C order1 = new Shipping_Invoice__C(subtotal__c = 0,
                          totalweight__c = 0, grandtotal__c = 0,
                          ShippingDiscount__c = 0, Shipping__c = 0, tax__c = 0);

        // Insert the order and populate with items
        insert Order1;
        List<Item__c> list1 = new List<Item__c>();
        Item__c item1 = new Item__C(Price__c = 10, weight__c = 1, quantity__c = 1,
                                    Shipping_Invoice__C = order1.id);
        Item__c item2 = new Item__C(Price__c = 25, weight__c = 2, quantity__c = 1,
                                    Shipping_Invoice__C = order1.id);
        Item__c item3 = new Item__C(Price__c = 40, weight__c = 3, quantity__c = 1,
                                    Shipping_Invoice__C = order1.id);
        list1.add(item1);
        list1.add(item2);
        list1.add(item3);
        insert list1;

        // Retrieve the order, then do assertions
        order1 = [SELECT id, subtotal__c, tax__c, shipping__c, totalweight__c,
                  grandtotal__c, shippingdiscount__c
                  FROM Shipping_Invoice__C
                  WHERE id = :order1.id];

        System.assert(order1.subtotal__c == 75,
                'Order subtotal was not $75, but was '+ order1.subtotal__c);
        System.assert(order1.tax__c == 6.9375,
                'Order tax was not $6.9375, but was ' + order1.tax__c);
        System.assert(order1.shipping__c == 4.50,
                'Order shipping was not $4.50, but was ' + order1.shipping__c);
        System.assert(order1.totalweight__c == 6.00,
                'Order weight was not 6 but was ' + order1.totalweight__c);
        System.assert(order1.grandtotal__c == 86.4375,
                'Order grand total was not $86.4375 but was '
                 + order1.grandtotal__c);
        System.assert(order1.shippingdiscount__c == 0,
                'Order shipping discount was not $0 but was '
                + order1.shippingdiscount__c);
    }

    // Test for updating three items at once
    public static testmethod void testBulkItemUpdate(){

        // Create the shipping invoice. It's a best practice to either use defaults
        // or to explicitly set all values to zero so as to avoid having
        // extraneous data in your test.
        Shipping_Invoice__C order1 = new Shipping_Invoice__C(subtotal__c = 0,
                          totalweight__c = 0, grandtotal__c = 0,
                          ShippingDiscount__c = 0, Shipping__c = 0, tax__c = 0);

        // Insert the order and populate with items.
        insert Order1;
        List<Item__c> list1 = new List<Item__c>();
        Item__c item1 = new Item__C(Price__c = 1, weight__c = 1, quantity__c = 1,
                                    Shipping_Invoice__C = order1.id);
        Item__c item2 = new Item__C(Price__c = 2, weight__c = 2, quantity__c = 1,
                                    Shipping_Invoice__C = order1.id);
        Item__c item3 = new Item__C(Price__c = 4, weight__c = 3, quantity__c = 1,
                                    Shipping_Invoice__C = order1.id);
        list1.add(item1);
        list1.add(item2);
        list1.add(item3);
        insert list1;

        // Update the prices on the 3 items
        list1[0].price__c = 10;
        list1[1].price__c = 25;
        list1[2].price__c = 40;
        update list1;

        // Access the order and assert items updated
        order1 = [SELECT id, subtotal__c, tax__c, shipping__c, totalweight__c,
                  grandtotal__c, shippingdiscount__c
                  FROM Shipping_Invoice__C
                  WHERE Id = :order1.Id];

        System.assert(order1.subtotal__c == 75,
                       'Order subtotal was not $75, but was '+ order1.subtotal__c);
        System.assert(order1.tax__c == 6.9375,
                       'Order tax was not $6.9375, but was ' + order1.tax__c);
        System.assert(order1.shipping__c == 4.50,
                       'Order shipping was not $4.50, but was '
                       + order1.shipping__c);
        System.assert(order1.totalweight__c == 6.00,
                       'Order weight was not 6 but was ' + order1.totalweight__c);
        System.assert(order1.grandtotal__c == 86.4375,
                       'Order grand total was not $86.4375 but was '
                       + order1.grandtotal__c);
        System.assert(order1.shippingdiscount__c == 0,
                       'Order shipping discount was not $0 but was '
                       + order1.shippingdiscount__c);

    }

    // Test for deleting items
    public static testmethod void testBulkItemDelete(){

        // Create the shipping invoice. It's a best practice to either use defaults
        // or to explicitly set all values to zero so as to avoid having
        // extraneous data in your test.
        Shipping_Invoice__C order1 = new Shipping_Invoice__C(subtotal__c = 0,
                          totalweight__c = 0, grandtotal__c = 0,
                          ShippingDiscount__c = 0, Shipping__c = 0, tax__c = 0);

        // Insert the order and populate with items
        insert Order1;
        List<Item__c> list1 = new List<Item__c>();
        Item__c item1 = new Item__C(Price__c = 10, weight__c = 1, quantity__c = 1,
                                    Shipping_Invoice__C = order1.id);
        Item__c item2 = new Item__C(Price__c = 25, weight__c = 2, quantity__c = 1,
                                    Shipping_Invoice__C = order1.id);
        Item__c item3 = new Item__C(Price__c = 40, weight__c = 3, quantity__c = 1,
                                    Shipping_Invoice__C = order1.id);
        Item__c itemA = new Item__C(Price__c = 1, weight__c = 3, quantity__c = 1,
                                    Shipping_Invoice__C = order1.id);
        Item__c itemB = new Item__C(Price__c = 1, weight__c = 3, quantity__c = 1,
                                    Shipping_Invoice__C = order1.id);
        Item__c itemC = new Item__C(Price__c = 1, weight__c = 3, quantity__c = 1,
                                    Shipping_Invoice__C = order1.id);
        Item__c itemD = new Item__C(Price__c = 1, weight__c = 3, quantity__c = 1,
                                    Shipping_Invoice__C = order1.id);
        list1.add(item1);
        list1.add(item2);
        list1.add(item3);
        list1.add(itemA);
        list1.add(itemB);
        list1.add(itemC);
        list1.add(itemD);
        insert list1;

        // Seven items are now in the shipping invoice.
       // The following deletes four of them.
        List<Item__c> list2 = new List<Item__c>();
        list2.add(itemA);
        list2.add(itemB);
        list2.add(itemC);
        list2.add(itemD);
        delete list2;

        // Retrieve the order and verify the deletion
        order1 = [SELECT id, subtotal__c, tax__c, shipping__c, totalweight__c,
                  grandtotal__c, shippingdiscount__c
                  FROM Shipping_Invoice__C
                  WHERE Id = :order1.Id];

        System.assert(order1.subtotal__c == 75,
                      'Order subtotal was not $75, but was '+ order1.subtotal__c);
        System.assert(order1.tax__c == 6.9375,
                      'Order tax was not $6.9375, but was ' + order1.tax__c);
        System.assert(order1.shipping__c == 4.50,
                      'Order shipping was not $4.50, but was ' + order1.shipping__c);
        System.assert(order1.totalweight__c == 6.00,
                      'Order weight was not 6 but was ' + order1.totalweight__c);
        System.assert(order1.grandtotal__c == 86.4375,
                      'Order grand total was not $86.4375 but was '
                      + order1.grandtotal__c);
        System.assert(order1.shippingdiscount__c == 0,
                      'Order shipping discount was not $0 but was '
                      + order1.shippingdiscount__c);
    }
    // Testing free shipping
    public static testmethod void testFreeShipping(){

        // Create the shipping invoice. It's a best practice to either use defaults
        // or to explicitly set all values to zero so as to avoid having
        // extraneous data in your test.
        Shipping_Invoice__C order1 = new Shipping_Invoice__C(subtotal__c = 0,
                          totalweight__c = 0, grandtotal__c = 0,
                          ShippingDiscount__c = 0, Shipping__c = 0, tax__c = 0);

        // Insert the order and populate with items.
        insert Order1;
        List<Item__c> list1 = new List<Item__c>();
        Item__c item1 = new Item__C(Price__c = 10, weight__c = 1,
                                 quantity__c = 1, Shipping_Invoice__C = order1.id);
        Item__c item2 = new Item__C(Price__c = 25, weight__c = 2,
                                 quantity__c = 1, Shipping_Invoice__C = order1.id);
        Item__c item3 = new Item__C(Price__c = 40, weight__c = 3,
                                 quantity__c = 1, Shipping_Invoice__C = order1.id);
        list1.add(item1);
        list1.add(item2);
        list1.add(item3);
        insert list1;

        // Retrieve the order and verify free shipping not applicable
        order1 = [SELECT id, subtotal__c, tax__c, shipping__c, totalweight__c,
                  grandtotal__c, shippingdiscount__c
                  FROM Shipping_Invoice__C
                  WHERE Id = :order1.Id];

        // Free shipping not available on $75 orders
        System.assert(order1.subtotal__c == 75,
                      'Order subtotal was not $75, but was '+ order1.subtotal__c);
        System.assert(order1.tax__c == 6.9375,
                      'Order tax was not $6.9375, but was ' + order1.tax__c);
        System.assert(order1.shipping__c == 4.50,
                      'Order shipping was not $4.50, but was ' + order1.shipping__c);
        System.assert(order1.totalweight__c == 6.00,
                      'Order weight was not 6 but was ' + order1.totalweight__c);
        System.assert(order1.grandtotal__c == 86.4375,
                      'Order grand total was not $86.4375 but was '
                      + order1.grandtotal__c);
        System.assert(order1.shippingdiscount__c == 0,
                      'Order shipping discount was not $0 but was '
                      + order1.shippingdiscount__c);

        // Add items to increase subtotal
        item1 = new Item__C(Price__c = 25, weight__c = 20, quantity__c = 1,
                            Shipping_Invoice__C = order1.id);
        insert item1;

        // Retrieve the order and verify free shipping is applicable
        order1 = [SELECT id, subtotal__c, tax__c, shipping__c, totalweight__c,
                  grandtotal__c, shippingdiscount__c
                  FROM Shipping_Invoice__C
                  WHERE Id = :order1.Id];

        // Order total is now at $100, so free shipping should be enabled
        System.assert(order1.subtotal__c == 100,
                      'Order subtotal was not $100, but was '+ order1.subtotal__c);
        System.assert(order1.tax__c == 9.25,
                      'Order tax was not $9.25, but was ' + order1.tax__c);
        System.assert(order1.shipping__c == 19.50,
                      'Order shipping was not $19.50, but was '
                      + order1.shipping__c);
        System.assert(order1.totalweight__c == 26.00,
                      'Order weight was not 26 but was ' + order1.totalweight__c);
        System.assert(order1.grandtotal__c == 109.25,
                      'Order grand total was not $86.4375 but was '
                      + order1.grandtotal__c);
        System.assert(order1.shippingdiscount__c == -19.50,
                      'Order shipping discount was not -$19.50 but was '
                      + order1.shippingdiscount__c);
    }

     // Negative testing for inserting bad input
    public static testmethod void testNegativeTests(){

        // Create the shipping invoice. It's a best practice to either use defaults
        // or to explicitly set all values to zero so as to avoid having
        // extraneous data in your test.
        Shipping_Invoice__C order1 = new Shipping_Invoice__C(subtotal__c = 0,
                          totalweight__c = 0, grandtotal__c = 0,
                          ShippingDiscount__c = 0, Shipping__c = 0, tax__c = 0);

        // Insert the order and populate with items.
        insert Order1;
        Item__c item1 = new Item__C(Price__c = -10, weight__c = 1, quantity__c = 1,
                                    Shipping_Invoice__C = order1.id);
        Item__c item2 = new Item__C(Price__c = 25, weight__c = -2, quantity__c = 1,
                                    Shipping_Invoice__C = order1.id);
        Item__c item3 = new Item__C(Price__c = 40, weight__c = 3, quantity__c = -1,
                                    Shipping_Invoice__C = order1.id);
        Item__c item4 = new Item__C(Price__c = 40, weight__c = 3, quantity__c = 0,
                                    Shipping_Invoice__C = order1.id);

        try{
            insert item1;
        }
        catch(Exception e)
        {
            system.assert(e.getMessage().contains('Price must be non-negative'),
                         'Price was negative but was not caught');
        }

        try{
            insert item2;
        }
        catch(Exception e)
        {
            system.assert(e.getMessage().contains('Weight must be non-negative'),
                         'Weight was negative but was not caught');
        }

        try{
            insert item3;
        }
        catch(Exception e)
        {
            system.assert(e.getMessage().contains('Quantity must be positive'),
                         'Quantity was negative but was not caught');
        }

        try{
            insert item4;
        }
        catch(Exception e)
        {
            system.assert(e.getMessage().contains('Quantity must be positive'),
                         'Quantity was zero but was not caught');
        }
    }
}
您必须编辑的示例 build.properties 文件, 指定您的凭据,以便在 build.xml 中运行示例 Ant 任务
一个示例 build.xml 文件,用于执行 和 API 调用deployretrieve
Ant 迁移工具使用 ant-salesforce.jar 文件 分发.zip文件。如果您安装了该工具的早期版本,并且 将 ant-salesforce.jar 复制到 Ant lib 目录,删除之前的 jar 文件。lib 目录位于 Ant 的根文件夹中 安装。您无需将新的 jar 文件复制到 Ant lib 目录。
进入。这将使用示例类和 Account 运行 API 调用 触发器随 Ant 迁移工具提供。ant deployCodedeploy调用 build.xml 文件中命名的 Ant 目标。ant deployCodedeploy<!-- Shows deploying code & running tests for package 'codepkg' --> <target name="deployCode"> <!-- Upload the contents of the "codepkg" package, running the tests for just 1 class --> <sf:deploy username="${sf.username}" password="${sf.password}" serverurl="${sf.serverurl}" deployroot="codepkg"> <runTest>SampleDeployClass</runTest> </sf:deploy> </target>有关详细信息,请参阅了解部署。
若要从现有组织中检索类和触发器, 使用检索 Ant 任务,如示例构建目标所示:ant retrieveCode
<target name="retrieveCode">
   <!-- Retrieve the contents listed in the file codepkg/package.xml into the codepkg directory -->
   <sf:retrieve username="${sf.username}" password="${sf.password}"
        serverurl="${sf.serverurl}" retrieveTarget="codepkg" unpackaged="codepkg/package.xml"/>
</target>
trigger oppValidation on Opportunity (before insert, before update) {

    for (Opportunity o : Trigger.new){

        // Add a new validation to the package
        // Applies to versions of the managed package greater than 1.0
        if (System.requestVersion().compareTo(new Version(1,0)) > 0) {
            if (o.Probability >= 50 && o.Description == null) {
                o.addError('All deals over 50% require a description');
            }
        }

        // Validation applies to all versions of the managed package.
        if (o.IsWon == true && o.LeadSource == null) {
            o.addError('A lead source must be provided for all Closed Won deals');
        }
    }
}
有关使用包版本的方法的完整列表,请参阅 Version 类和 System Class 中的方法。System.requestVersion
trigger oppValidation on Opportunity (before insert, before update) {

    for (Opportunity o : Trigger.new){

        // Add a new validation to the package
        // Applies to versions of the managed package greater than 1.0
        if (System.requestVersion().compareTo(new Version(1,0)) > 0) {
            if (o.Probability >= 50 && o.Description == null) {
                o.addError('All deals over 50% require a description');
            }
        }

        // Validation applies to all versions of the managed package.
        if (o.IsWon == true && o.LeadSource == null) {
            o.addError('A lead source must be provided for all Closed Won deals');
        }
    }
}
以下测试类使用该方法验证触发器的行为(有和没有) 特定版本:runAs
@isTest
private class OppTriggerTests{

   static testMethod void testOppValidation(){

      // Set up 50% opportunity with no description
      Opportunity o = new Opportunity();
      o.Name = 'Test Job';
      o.Probability = 50;
      o.StageName = 'Prospect';
      o.CloseDate = System.today();

      // Test running as latest package version
      try{
          insert o;
      }
      catch(System.DMLException e){
          System.assert(
              e.getMessage().contains(
                'All deals over 50% require a description'),
                  e.getMessage());
      }

      // Run test as managed package version 1.0
      System.runAs(new Version(1,0)){
          try{
              insert o;
          }
          catch(System.DMLException e){
              System.assert(false, e.getMessage());
          }
      }

      // Set up a closed won opportunity with no lead source
      o = new Opportunity();
      o.Name = 'Test Job';
      o.Probability = 50;
      o.StageName = 'Prospect';
      o.CloseDate = System.today();
      o.StageName = 'Closed Won';

      // Test running as latest package version
      try{
          insert o;
      }
      catch(System.DMLException e){
          System.assert(
            e.getMessage().contains(
              'A lead source must be provided for all Closed Won deals'),
                e.getMessage());
      }

      // Run test as managed package version 1.0
      System.runAs(new Version(1,0)){
          try{
              insert o;
          }
          catch(System.DMLException e){
              System.assert(
                  e.getMessage().contains(
                    'A lead source must be provided for all Closed Won deals'),
                        e.getMessage());
          }
      }
   }
}
使用 Stub API 构建模拟框架 Apex 提供了一个用于实现模拟框架的存根 API 。模拟框架有很多好处。它可以简化和改进测试,并帮助您创建更快、更可靠的测试。您可以使用它来单独测试类,这对于单元测试非常重要。使用存根 API 构建模拟框架也是有益的,因为存根对象是在运行时生成的。由于这些对象是动态生成的,因此不必打包和部署测试类。您可以构建自己的模拟框架,也可以使用其他人构建的模拟框架。
public class VisibleSampleClass {
    // Private member variables
    @TestVisible private Integer recordNumber = 0;
    @TestVisible private String areaCode = '(415)';
    // Public member variable
    public Integer maxRecords = 1000;

    // Private inner class
    @TestVisible class Employee {
        String fullName;
        String phone;

        // Constructor
        @TestVisible Employee(String s, String ph) {
            fullName = s;
            phone = ph;
        }
    }

    // Private method
    @TestVisible private String privateMethod(Employee e) {
        System.debug('I am private.');
        recordNumber++;
        String phone = areaCode + ' ' + e.phone;
        String s = e.fullName + '\'s phone number is ' + phone;
        System.debug(s);
        return s;
    }

    // Public method
    public void publicMethod() {
        maxRecords++;
        System.debug('I am public.');
    }

    // Private custom exception class
    @TestVisible private class MyException extends Exception {}
}
// Test class for VisibleSampleClass
@isTest
private class VisibleSampleClassTest {

    // This test method can access private members of another class
    // that are annotated with @TestVisible.
    static testmethod void test1() {
        VisibleSampleClass sample = new VisibleSampleClass ();

        // Access private data members and update their values
        sample.recordNumber = 100;
        sample.areaCode = '(510)';

        // Access private inner class
        VisibleSampleClass.Employee emp =
            new VisibleSampleClass.Employee('Joe Smith', '555-1212');

        // Call private method
        String s = sample.privateMethod(emp);

        // Verify result
        System.assert(
            s.contains('(510)') &&
            s.contains('Joe Smith') &&
            s.contains('555-1212'));
    }

    // This test method can throw private exception defined in another class
    static testmethod void test2() {
        // Throw private exception.
        try {
            throw new VisibleSampleClass.MyException('Thrown from a test.');
        } catch(VisibleSampleClass.MyException e) {
            // Handle exception
        }
    }

    static testmethod void test3() {
        // Access public method.
        // No @TestVisible is used.
        VisibleSampleClass sample = new VisibleSampleClass ();
        sample.publicMethod();
    }

}
当您 升级 Salesforce API 包含混合测试代码和非测试代码的现有类的版本。因为测试 从 API 版本 28.0 开始,非测试类中不允许使用方法,您必须 升级 API 版本 时,将测试方法从旧类移动到新的测试类(用 批注的类) 你的班级。在访问私有方法或 原始类的成员变量。在这种情况下,只需注释这些私有 具有 .TestVisibleisTestTestVisible
通过用 注释类,可以允许测试方法访问所有组织记录。这 但是,最佳做法是使用 .取决于 API 版本 您正在使用时,默认注释可能会有所不同。@isTest(SeeAllData=true)@isTest(SeeAllData=false)此示例演示如何使用注释定义测试类。所有 此类中的测试方法可以访问 组织。
@IsTest(SeeAllData=true)
// All test methods in this class can access all data.
@IsTest(SeeAllData=true)
public class TestDataAccessClass {

    // This test accesses an existing account.
    // It also creates and accesses a new test account.
    @IsTest
    static void myTestMethod1() {
        // Query an existing account in the organization.
        Account a = [SELECT Id, Name FROM Account WHERE Name='Acme' LIMIT 1];
        System.assert(a != null);

        // Create a test account based on the queried account.
        Account testAccount = a.clone();
        testAccount.Name = 'Acme Test';
        insert testAccount;

        // Query the test account that was inserted.
        Account testAccount2 = [SELECT Id, Name FROM Account
                                WHERE Name='Acme Test' LIMIT 1];
        System.assert(testAccount2 != null);
    }


    // Like the previous method, this test method can also access all data
    // because the containing class is annotated with @IsTest(SeeAllData=true).
    @IsTest
    static void myTestMethod2() {
        // Can access all data in the organization.
   }

}
// This class contains test methods with different data access levels.
@IsTest
private class ClassWithDifferentDataAccess {

    // Test method that has access to all data.
    @IsTest(SeeAllData=true)
    static void testWithAllDataAccess() {
        // Can query all data in the organization.
    }

    // Test method that has access to only the data it creates
    // and organization setup and metadata objects.
    @IsTest
    static void testWithOwnDataAccess() {
        // This method can still access the User object.
        // This query returns the first user object.
        User u = [SELECT UserName,Email FROM User LIMIT 1];
        System.debug('UserName: ' + u.UserName);
        System.debug('Email: ' + u.Email);

        // Can access the test account that is created here.
        Account a = new Account(Name='Test Account');
        insert a;
        // Access the account that was just created.
        Account insertedAcct = [SELECT Id,Name FROM Account
                                WHERE Name='Test Account'];
        System.assert(insertedAcct != null);
    }
}
创建一个包含测试记录数据的 .csv 文件。此示例 .csv 文件有三个 帐户记录。您可以使用此示例内容创建 .csv 文件。Name,Website,Phone,BillingStreet,BillingCity,BillingState,BillingPostalCode,BillingCountry sForceTest1,http://www.sforcetest1.com,(415) 901-7000,The Landmark @ One Market,San Francisco,CA,94105,US sForceTest2,http://www.sforcetest2.com,(415) 901-7000,The Landmark @ One Market Suite 300,San Francisco,CA,94105,US sForceTest3,http://www.sforcetest3.com,(415) 901-7000,1 Market St,San Francisco,CA,94105,US
为 .csv 文件创建静态资源:
在“设置”中,输入“快速查找”框,然后选择“静态资源”。Static Resources
单击“新建”。
将静态资源命名为 。testAccounts
选择您创建的文件。
点击保存。
呼入 用于填充测试帐户的测试方法。Test.loadData@isTest private class DataUtil { static testmethod void testLoadData() { // Load the test accounts from the static resource List<sObject> ls = Test.loadData(Account.sObjectType, 'testAccounts'); // Verify that all 3 test accounts were created System.assert(ls.size() == 3); // Get first test account Account a1 = (Account)ls[0]; String acctName = a1.Name; System.debug(acctName); // Perform some testing using the test records } }
@IsTest
public class TestDataFactory {
    public static void createTestRecords(Integer numAccts, Integer numContactsPerAcct) {
        List<Account> accts = new List<Account>();

        for(Integer i=0;i<numAccts;i++) {
            Account a = new Account(Name='TestAccount' + i);
            accts.add(a);
        }
        insert accts;

        List<Contact> cons = new List<Contact>();
        for (Integer j=0;j<numAccts;j++) {
            Account acct = accts[j];
            // For each account just inserted, add contacts
            for (Integer k=numContactsPerAcct*j;k<numContactsPerAcct*(j+1);k++) {
                cons.add(new Contact(firstname='Test'+k,
                                     lastname='Test'+k,
                                     AccountId=acct.Id));
            }
        }
        // Insert all contacts for all accounts
        insert cons;
    }
}
@isTest
private class CommonTestSetup {

    @testSetup static void setup() {
        // Create common test accounts
        List<Account> testAccts = new List<Account>();
        for(Integer i=0;i<2;i++) {
            testAccts.add(new Account(Name = 'TestAcct'+i));
        }
        insert testAccts;
    }

    @isTest static void testMethod1() {
        // Get the first test account by using a SOQL query
        Account acct = [SELECT Id FROM Account WHERE Name='TestAcct0' LIMIT 1];
        // Modify first account
        acct.Phone = '555-1212';
        // This update is local to this test method only.
        update acct;

        // Delete second account
        Account acct2 = [SELECT Id FROM Account WHERE Name='TestAcct1' LIMIT 1];
        // This deletion is local to this test method only.
        delete acct2;

        // Perform some testing
    }

    @isTest static void testMethod2() {
        // The changes made by testMethod1() are rolled back and
        // are not visible to this test method.
        // Get the first account by using a SOQL query
        Account acct = [SELECT Phone FROM Account WHERE Name='TestAcct0' LIMIT 1];
        // Verify that test account created by test setup method is unaltered.
        System.assertEquals(null, acct.Phone);

        // Get the second account by using a SOQL query
        Account acct2 = [SELECT Id FROM Account WHERE Name='TestAcct1' LIMIT 1];
        // Verify test account created by test setup method is unaltered.
        System.assertNotEquals(null, acct2);

        // Perform some testing
    }

}
测试设置方法注意事项
测试设置方法仅支持 测试类的默认数据隔离模式。如果测试类或测试 方法可以使用注释访问组织数据, 此类不支持测试设置方法。因为数据隔离 for tests 可用于 API 版本 24.0 及更高版本的测试设置方法 也仅适用于这些版本。@isTest(SeeAllData=true)
public class TestUtil {

    // Enqueue all classes ending in "Test".
    public static ID enqueueTests() {
        ApexClass[] testClasses =
           [SELECT Id FROM ApexClass
            WHERE Name LIKE '%Test'];
        if (testClasses.size() > 0) {
            ApexTestQueueItem[] queueItems = new List<ApexTestQueueItem>();
            for (ApexClass cls : testClasses) {
                queueItems.add(new ApexTestQueueItem(ApexClassId=cls.Id));
            }

            insert queueItems;

            // Get the job ID of the first queue item returned.
            ApexTestQueueItem item =
               [SELECT ParentJobId FROM ApexTestQueueItem
                WHERE Id=:queueItems[0].Id LIMIT 1];
            return item.parentjobid;
        }
        return null;
    }

    // Get the status and pass rate for each class
    // whose tests were run by the job.
    // that correspond to the specified job ID.
    public static void checkClassStatus(ID jobId) {
        ApexTestQueueItem[] items =
           [SELECT ApexClass.Name, Status, ExtendedStatus
            FROM ApexTestQueueItem
            WHERE ParentJobId=:jobId];
        for (ApexTestQueueItem item : items) {
            String extStatus = item.extendedstatus == null ? '' : item.extendedStatus;
            System.debug(item.ApexClass.Name + ': ' + item.Status + extStatus);
        }
    }

    // Get the result for each test method that was executed.
    public static void checkMethodStatus(ID jobId) {
        ApexTestResult[] results =
           [SELECT Outcome, ApexClass.Name, MethodName, Message, StackTrace
            FROM ApexTestResult
            WHERE AsyncApexJobId=:jobId];
        for (ApexTestResult atr : results) {
            System.debug(atr.ApexClass.Name + '.' + atr.MethodName + ': ' + atr.Outcome);
            if (atr.message != null) {
                System.debug(atr.Message + '\n at ' + atr.StackTrace);
            }
        }
    }
}
@isTest
private class TestRunAs {
   public static testMethod void testRunAs() {
        // Setup test data
        // Create a unique UserName
        String uniqueUserName = 'standarduser' + DateTime.now().getTime() + '@testorg.com';
        // This code runs as the system user
        Profile p = [SELECT Id FROM Profile WHERE Name='Standard User'];
        User u = new User(Alias = 'standt', Email='standarduser@testorg.com',
        EmailEncodingKey='UTF-8', LastName='Testing', LanguageLocaleKey='en_US',
        LocaleSidKey='en_US', ProfileId = p.Id,
        TimeZoneSidKey='America/Los_Angeles',
         UserName=uniqueUserName);

        System.runAs(u) {
              // The following code runs as user 'u'
              System.debug('Current User: ' + UserInfo.getUserName());
              System.debug('Current Profile: ' + UserInfo.getProfileId());
          }
    }
}
可以嵌套多个方法。为 例:runAs
@isTest
private class TestRunAs2 {

   public static testMethod void test2() {

      Profile p = [SELECT Id FROM Profile WHERE Name='Standard User'];
      User u2 = new User(Alias = 'newUser', Email='newuser@testorg.com',
         EmailEncodingKey='UTF-8', LastName='Testing', LanguageLocaleKey='en_US',
         LocaleSidKey='en_US', ProfileId = p.Id,
         TimeZoneSidKey='America/Los_Angeles', UserName='newuser@testorg.com');

      System.runAs(u2) {
         // The following code runs as user u2.
         System.debug('Current User: ' + UserInfo.getUserName());
         System.debug('Current Profile: ' + UserInfo.getProfileId());

         // The following code runs as user u3.
         User u3 = [SELECT Id FROM User WHERE UserName='newuser@testorg.com'];
         System.runAs(u3) {
            System.debug('Current User: ' + UserInfo.getUserName());
            System.debug('Current Profile: ' + UserInfo.getProfileId());
         }

         // Any additional code here would run as user u2.
      }
   }
}
为确保测试方法始终以可预测的方式运行,任何 Salesforce 对象 添加到 Apex 测试方法的搜索语言 (SOSL) 查询将返回一组空的 测试方法执行时的搜索结果。如果您不希望查询返回 结果列表为空,您可以使用系统方法定义记录 ID 列表,该 由搜索返回。稍后在测试方法中发生的所有 SOSL 查询 返回方法指定的记录 ID 列表。此外,测试方法可以多次调用 为不同的 SOSL 查询定义不同的结果集。如果未在测试方法中调用该方法,或者 如果在未指定记录 ID 列表的情况下调用此方法,则任何 SOSL 查询 place later in the test 方法返回一个空的结果列表。Test.setFixedSearchResultsTest.setFixedSearchResultsTest.setFixedSearchResultsTest.setFixedSearchResults
该方法指定的记录 ID 列表将替换通常 如果 SOSL 查询不受任何 OR 子句的约束,则由 SOSL 查询返回。如果这些 子句存在于 SOSL 查询中,它们应用于固定搜索结果列表。为 例:Test.setFixedSearchResultsWHERELIMIT
@isTest
private class SoslFixedResultsTest1 {

    public static testMethod void testSoslFixedResults() {
       Id [] fixedSearchResults= new Id[1];
       fixedSearchResults[0] = '001x0000003G89h';
       Test.setFixedSearchResults(fixedSearchResults);
       List<List<SObject>> searchList = [FIND 'test'
                                         IN ALL FIELDS RETURNING
                                            Account(id, name WHERE name = 'test' LIMIT 1)];
    }
}
让我们看一个示例来说明存根 API 的工作原理。此示例不是故意的 来演示模拟框架的广泛可能用途。它 有意简单专注于使用 Apex 存根 API 的机制。
假设我们想在下面的类中测试格式化方法。
public class DateFormatter {
    // Method to test
    public String getFormattedDate(DateHelper helper) {
        return 'Today\'s date is ' + helper.getTodaysDate();
    }
}
通常,当我们调用此方法时,我们会传入一个帮助程序类,该类具有一个方法 返回今天的日期。
public class DateHelper {
    // Method to stub
    public String getTodaysDate() {
        return Date.today().format();
    }
}
下面的代码调用该方法。
DateFormatter df = new DateFormatter();
DateHelper dh = new DateHelper();
String dateStr = df.getFormattedDate(dh);
@isTest
public class MockProvider implements System.StubProvider {

    public Object handleMethodCall(Object stubbedObject, String stubbedMethodName,
        Type returnType, List<Type> listOfParamTypes, List<String> listOfParamNames,
        List<Object> listOfArgs) {

        // The following debug statements show an example of logging
        // the invocation of a mocked method.

        // You can use the method name and return type to determine which method was called.
        System.debug('Name of stubbed method: ' + stubbedMethodName);
        System.debug('Return type of stubbed method: ' + returnType.getName());

        // You can also use the parameter names and types to determine which method
        // was called.
        for (integer i =0; i < listOfParamNames.size(); i++) {
            System.debug('parameter name: ' + listOfParamNames.get(i));
            System.debug('  parameter type: ' + listOfParamTypes.get(i).getName());
        }

        // This shows the actual parameter values passed into the stubbed method at runtime.
        System.debug('number of parameters passed into the mocked call: ' +
            listOfArgs.size());
        System.debug('parameter(s) sent into the mocked call: ' + listOfArgs);

        // This is a very simple mock provider that returns a hard-coded value
        // based on the return type of the invoked.
        if (returnType.getName() == 'String')
            return '8/8/2016';
        else
            return null;
    }
}
public class MockUtil {
    private MockUtil(){}

    public static MockProvider getInstance() {
        return new MockProvider();
    }

     public static Object createMock(Type typeToMock) {
        // Invoke the stub API and pass it our mock provider to create a
        // mock class of typeToMock.
        return Test.createStub(typeToMock, MockUtil.getInstance());
    }
}
@isTest
public class DateFormatterTest {
    @isTest
    public static void testGetFormattedDate() {
        // Create a mock version of the DateHelper class.
        DateHelper mockDH = (DateHelper)MockUtil.createMock(DateHelper.class);
        DateFormatter df = new DateFormatter();

        // Use the mocked object in the test.
        System.assertEquals('Today\'s date is 8/8/2016', df.getFormattedDate(mockDH));
    }
}
try {
  // Try block
 code_block
} catch (exceptionType variableName) {
  // Initial catch block.
  // At least the catch block or the finally block must be present.
 code_block
} catch (Exception e) {
  // Optional additional catch statement for other exception types.
  // Note that the general exception type, 'Exception',
  // must be the last catch block when it is used.
 code_block
} finally {
  // Finally block.
  // At least the catch block or the finally block must be present.
 code_block
}
System.DmlException: Insert failed. First exception on row 0; first error: REQUIRED_FIELD_MISSING, Required fields are missing: [Description, Price, Total Inventory]: [Description, Price, Total Inventory]接下来,在开发者控制台中执行此代码段。它基于前面的示例,但 包括一个 try-catch 块。
try {
Merchandise__c m = new Merchandise__c();
insert m;
} catch(DmlException e) {
System.debug('The following exception has occurred: ' + e.getMessage());
}
请注意,开发者控制台中的请求状态现在报告成功。这是因为 代码处理异常。
在异常之后发生的 try 块中的任何语句都是 跳过,不执行。例如,如果添加语句 之后,此语句 不会被执行。执行以下命令:insert m;
try {
Merchandise__c m = new Merchandise__c();
insert m;
// This doesn't execute since insert causes an exception
System.debug('Statement after insert.');
} catch(DmlException e) {
System.debug('The following exception has occurred: ' + e.getMessage());
}
在新的调试日志条目中,请注意,您没有看到 的调试消息。这是因为此调试语句发生在异常之后 由插入引起,并且永远不会被执行。继续执行 的代码语句,将语句放在 在 try-catch 块之后。执行这个修改后的代码片段,然后 请注意,调试日志现在具有 的调试消息。Statement after insertStatement after insert
try {
    Merchandise__c m = new Merchandise__c();
    insert m;
} catch(DmlException e) {
    System.debug('The following exception has occurred: ' + e.getMessage());
}
// This will get executed
System.debug('Statement after insert.');
try {
    Merchandise__c m = new Merchandise__c();
    insert m;
} catch(DmlException e) {
    System.debug('The following exception has occurred: ' + e.getMessage());
}

try {
    System.debug('Statement after insert.');
    // Insert other records
}
catch (Exception e) {
    // Handle this exception here
}
// Declare the variable outside the try-catch block
// so that it will be in scope for all blocks.
XmlStreamWriter w = null;
try {
    w = new XmlStreamWriter();
    w.writeStartDocument(null, '1.0');
    w.writeStartElement(null, 'book', null);
    w.writeCharacters('This is my book');
    w.writeEndElement();
    w.writeEndDocument();

    // Perform some other operations
    String s;
    // This causes an exception because
    // the string hasn't been assigned a value.
    Integer i = s.length();
} catch(Exception e) {
    System.debug('An exception occurred: ' + e.getMessage());
} finally {
    // This gets executed after the exception is handled
    System.debug('Closing the stream writer in the finally block.');
    // Close the stream writer
    w.close();
}
前面的代码片段创建一个 XML 流编写器,并将 一些 XML 元素。接下来,由于访问 null 字符串变量。这 catch 块处理此异常。然后执行 finally 块。 它写入调试消息并关闭流编写器,从而释放 任何关联的资源。检查调试日志中的调试输出。 异常后,你将看到调试消息 错误。这告诉您,在异常之后执行的 finally 块 被抓住了。sClosing the stream writer in the finally block.
try {
    Merchandise__c m = new Merchandise__c();
    insert m;
} catch(DmlException e) {
    System.debug('The following exception has occurred: ' + e.getMessage());
}
列表异常列表的任何问题,例如尝试访问超出 边界。此示例创建一个列表并向其添加一个元素。然后,进行尝试 访问两个元素,一个位于索引 0(存在),另一个位于索引 1(其中 导致引发 ListException,因为此索引处不存在任何元素。 此异常在 catch 块中被捕获。catch 块中的语句将以下内容写入 调试日志:。System.debugThe following exception has occurred: List index out of bounds: 1
try {
    List<Integer> li = new List<Integer>();
    li.add(15);
    // This list contains only one element,
    // but we're attempting to access the second element
    // from this zero-based list.
    Integer i1 = li[0];
    Integer i2 = li[1]; // Causes a ListException
} catch(ListException le) {
    System.debug('The following exception has occurred: ' + le.getMessage());
}
NullPointerException取消引用变量的任何问题。null此示例创建一个名为 String 的变量,但我们不将其初始化为值,因此它是 null。 在我们的 null 上调用该方法 变量导致 NullPointerException。例外情况在我们的捕获中被发现 块,这是写入调试日志的内容:。scontainsThe following exception has occurred: Attempt to de-reference a null object
try {
    String s;
    Boolean b = s.contains('abc'); // Causes a NullPointerException
} catch(NullPointerException npe) {
    System.debug('The following exception has occurred: ' + npe.getMessage());
}
查询异常SOQL 查询的任何问题,例如分配不返回任何记录的查询 或多条记录到一个单一实例 sObject 变量。此示例中的第二个 SOQL 查询会导致 QueryException。示例 将 Merchandise 对象分配给从查询返回的内容。请注意在查询中使用。这确保了 从数据库中最多返回一个对象,因此我们可以将其分配给 单个对象,而不是列表。但是,在这种情况下,我们没有 商品名为 XYZ,因此不会返回任何内容,并且尝试将 单个对象的返回值会导致 QueryException。例外情况是 捕获到我们的 catch 块中,这就是您将在调试日志中看到的内容:.LIMIT 1The following exception has occurred: List has no rows for assignment to SObject
try {
    // This statement doesn't cause an exception, even though
    // we don't have a merchandise with name='XYZ'.
    // The list will just be empty.
    List<Merchandise__c> lm = [SELECT Name FROM Merchandise__c WHERE Name = 'XYZ'];
    // lm.size() is 0
    System.debug(lm.size());

    // However, this statement causes a QueryException because
    // we're assiging the return value to a Merchandise__c object
    // but no Merchandise is returned.
    Merchandise__c m = [SELECT Name FROM Merchandise__c WHERE Name = 'XYZ' LIMIT 1];
} catch(QueryException qe) {
    System.debug('The following exception has occurred: ' + qe.getMessage());
}
SObjectExceptionsObject 记录的任何问题,例如尝试更改语句中的字段,该字段只能是 期间更改。updateinsert此示例在 try 块中生成 SObjectException,该块在 catch 块。该示例查询发票对帐单,并仅选择其 名称字段。然后,它尝试获取查询的 Description__c 字段 sObject,它不可用,因为它不在 在 SELECT 语句中查询的字段。这会导致 SObjectException。 这个异常在我们的 catch 块中被捕获,这就是你将看到的 在调试日志中:。The following exception has occurred: SObject row was retrieved via SOQL without querying the requested field: Invoice_Statement__c.Description__c
try {
    Invoice_Statement__c inv = new Invoice_Statement__c(
        Description__c='New Invoice');
    insert inv;

    // Query the invoice we just inserted
    Invoice_Statement__c v = [SELECT Name FROM Invoice_Statement__c WHERE Id = :inv.Id];
    // Causes an SObjectException because we didn't retrieve
    // the Description__c field.
    String s = v.Description__c;
} catch(SObjectException se) {
    System.debug('The following exception has occurred: ' + se.getMessage());
}
try {
    Merchandise__c m = [SELECT Name FROM Merchandise__c LIMIT 1];
    // Causes an SObjectException because we didn't retrieve
    // the Total_Inventory__c field.
    Double inventory = m.Total_Inventory__c;
} catch(Exception e) {
    System.debug('The following exception has occurred: ' + e.getMessage());
}
第二个 catch 块参数的类型为 SObjectException,其 与我们的异常匹配,因此此块被执行并执行以下 消息将写入调试日志:。SObjectException caught: SObject row was retrieved via SOQL without querying the requested field: Merchandise__c.Total_Inventory__c
最后一个 catch 块被忽略,因为一个 catch 块已经 执行。
最后一个 catch 块很方便,因为它可以捕获任何异常 类型,从而捕获上一个未捕获的任何异常 catch 块。假设我们修改了上面的代码以导致 NullPointerException 要抛出,此异常将在最后一个 catch 块中捕获。 执行此修改后的示例。你将看到以下调试You’ll see the following debug 消息:。Exception caught: Attempt to de-reference a null object
public class ExceptionExample {
    public virtual class BaseException extends Exception {}
    public class OtherException extends BaseException {}

    public static void testExtendedException() {
        try {
            Integer i=0;
            // Your code here
            if (i < 5) throw new OtherException('This is bad');
        } catch (BaseException e) {
            // This catches the OtherException
            System.debug(e.getMessage());
        }
    }
}
您可以通过以下几种方式创建异常对象,然后可以抛出这些对象。您可以构造异常:
没有 参数:new MyException();
使用指定错误的单个 String 参数 消息:new MyException('This is bad');
同时显示 String 错误消息和链式异常原因 任何堆栈 跟踪:new MyException('This is bad', e);
重新引发异常和内部异常
在 catch 块中捕获异常后,您可以选择重新抛出 捕获异常变量。如果方法被另一个方法调用,这将非常有用 并且您希望将异常的处理委托给调用方方法。您可以 将捕获的异常作为内部异常重新抛出,并具有 main 方法捕获自定义异常类型。
下面的示例演示如何将异常重新引发为内部异常。这 example 定义了两个自定义异常和 ,并生成一个堆栈跟踪,其中包含有关两者的信息。My1ExceptionMy2Exception
// Define two custom exceptions
public class My1Exception extends Exception {}
public class My2Exception extends Exception {}

try {
    // Throw first exception
    throw new My1Exception('First exception');
} catch (My1Exception e) {
    // Throw second exception with the first
    // exception variable as the inner exception
    throw new My2Exception('Thrown with inner exception', e);
}
这是运行上述代码后生成的堆栈跟踪的样子:
15:52:21:073 EXCEPTION_THROWN [7]|My1Exception: First exception
15:52:21:077 EXCEPTION_THROWN [11]|My2Exception: Throw with inner exception
15:52:21:000 FATAL_ERROR AnonymousBlock: line 11, column 1
15:52:21:000 FATAL_ERROR Caused by
15:52:21:000 FATAL_ERROR AnonymousBlock: line 7, column 1
检查调试日志输出。您应该看到类似于 以后:18:12:34:928 USER_DEBUG [6]|DEBUG|Message: Merchandise item could not be inserted.18:12:34:929 USER_DEBUG [7]|DEBUG|Cause: System.DmlException: Insert failed. First exception on row 0; first error: REQUIRED_FIELD_MISSING, Required fields are missing: [Description, Price, Total Inventory]: [Description, Price, Total Inventory]18:12:34:929 USER_DEBUG [8]|DEBUG|Line number: 2218:12:34:930 USER_DEBUG [9]|DEBUG|Stack trace: Class.EmployeeUtilityClass.insertMerchandise: line 22, column 1一些感兴趣的项目:
37.0 APEX_CODE,FINEST;APEX_PROFILING,INFO;CALLOUT,INFO;DB,INFO;SYSTEM,DEBUG;
    VALIDATION,INFO;VISUALFORCE,INFO;WORKFLOW,INFO
Execute Anonymous: System.debug('Hello World!');
16:06:58.18 (18043585)|USER_INFO|[EXTERNAL]|005D0000001bYPN|devuser@example.org|
    Pacific Standard Time|GMT-08:00
16:06:58.18 (18348659)|EXECUTION_STARTED
16:06:58.18 (18383790)|CODE_UNIT_STARTED|[EXTERNAL]|execute_anonymous_apex
16:06:58.18 (23822880)|HEAP_ALLOCATE|[72]|Bytes:3
16:06:58.18 (24271272)|HEAP_ALLOCATE|[77]|Bytes:152
16:06:58.18 (24691098)|HEAP_ALLOCATE|[342]|Bytes:408
16:06:58.18 (25306695)|HEAP_ALLOCATE|[355]|Bytes:408
16:06:58.18 (25787912)|HEAP_ALLOCATE|[467]|Bytes:48
16:06:58.18 (26415871)|HEAP_ALLOCATE|[139]|Bytes:6
16:06:58.18 (26979574)|HEAP_ALLOCATE|[EXTERNAL]|Bytes:1
16:06:58.18 (27384663)|STATEMENT_EXECUTE|[1]
16:06:58.18 (27414067)|STATEMENT_EXECUTE|[1]
16:06:58.18 (27458836)|HEAP_ALLOCATE|[1]|Bytes:12
16:06:58.18 (27612700)|HEAP_ALLOCATE|[50]|Bytes:5
16:06:58.18 (27768171)|HEAP_ALLOCATE|[56]|Bytes:5
16:06:58.18 (27877126)|HEAP_ALLOCATE|[64]|Bytes:7
16:06:58.18 (49244886)|USER_DEBUG|[1]|DEBUG|Hello World!
16:06:58.49 (49590539)|CUMULATIVE_LIMIT_USAGE
16:06:58.49 (49590539)|LIMIT_USAGE_FOR_NS|(default)|
  Number of SOQL queries: 0 out of 100
  Number of query rows: 0 out of 50000
  Number of SOSL queries: 0 out of 20
  Number of DML statements: 0 out of 150
  Number of DML rows: 0 out of 10000
  Maximum CPU time: 0 out of 10000
  Maximum heap size: 0 out of 6000000
  Number of callouts: 0 out of 100
  Number of Email Invocations: 0 out of 10
  Number of future calls: 0 out of 50
  Number of queueable jobs added to the queue: 0 out of 50
  Number of Mobile Apex push calls: 0 out of 10

16:06:58.49 (49590539)|CUMULATIVE_LIMIT_USAGE_END

16:06:58.18 (52417923)|CODE_UNIT_FINISHED|execute_anonymous_apex
16:06:58.18 (54114689)|EXECUTION_FINISHED
订阅 ID、订阅实例 ID、引用数据(如 进程 API 名称)、激活或停用订阅的用户的 ID 和事件 消息数据
工作流程
FINER 及以上
EVENT_SERVICE_SUB_END
事件类型和操作(订阅或取消订阅)
工作流程
INFO 及以上
EXCEPTION_THROWN
行号、异常类型和消息
Apex 代码
INFO 及以上
EXECUTION_FINISHED
没有
Apex 代码
ERROR 及以上
EXECUTION_STARTED
没有
Apex 代码
ERROR 及以上
FATAL_ERROR
异常类型、消息和堆栈跟踪
Apex 代码
ERROR 及以上
FLOW_ACTIONCALL_DETAIL
采访 ID、元素名称、操作类型、操作枚举或 ID,无论是操作调用 成功,并显示错误消息
工作流程
FINER 及以上
FLOW_ASSIGNMENT_DETAIL
采访 ID、引用、运算符和值
工作流程
FINER 及以上
FLOW_BULK_ELEMENT_BEGIN
采访 ID 和元素类型
工作流程
FINE 及以上
FLOW_BULK_ELEMENT_DETAIL
采访 ID、元素类型、元素名称、记录数
工作流程
FINER 及以上
FLOW_BULK_ELEMENT_END
采访 ID、元素类型、元素名称、记录数和执行 时间
工作流程
FINE 及以上
FLOW_BULK_ELEMENT_LIMIT_USAGE
将使用量递增,以达到此批量元素的限制。每个事件都显示使用情况 对于以下限制之一:SOQL queries SOQL query rows SOSL queries DML statements DML rows CPU time in ms Heap size in bytes Callouts Email invocations Future calls Jobs in queue Push notifications
工作流程
FINER 及以上
FLOW_BULK_ELEMENT_NOT_SUPPORTED
不支持批量操作的操作、元素名称和实体名称
工作流程
INFO 及以上
FLOW_CREATE_INTERVIEW_BEGIN
组织 ID、定义 ID 和版本 ID
工作流程
INFO 及以上
FLOW_CREATE_INTERVIEW_END
面试 ID 和流名称
工作流程
INFO 及以上
FLOW_CREATE_INTERVIEW_ERROR
消息、组织 ID、定义 ID 和版本 ID
工作流程
ERROR 及以上
FLOW_ELEMENT_BEGIN
采访 ID、元素类型和元素名称
工作流程
FINE 及以上
FLOW_ELEMENT_DEFERRED
元素类型和元素名称
工作流程
FINE 及以上
FLOW_ELEMENT_END
采访 ID、元素类型和元素名称
工作流程
FINE 及以上
FLOW_ELEMENT_ERROR
消息、元素类型和元素名称(流运行时异常)
工作流程
ERROR 及以上
FLOW_ELEMENT_ERROR
消息、元素类型和元素名称(未找到 spark)
工作流程
ERROR 及以上
FLOW_ELEMENT_ERROR
消息、元素类型和元素名称(设计器例外)
工作流程
ERROR 及以上
FLOW_ELEMENT_ERROR
消息、元素类型和元素名称(超出设计器限制)
工作流程
ERROR 及以上
FLOW_ELEMENT_ERROR
消息、元素类型和元素名称(设计器运行时异常)
工作流程
ERROR 及以上
FLOW_ELEMENT_FAULT
消息、元素类型和元素名称(采用的错误路径)
工作流程
警告及以上
FLOW_ELEMENT_LIMIT_USAGE
将使用量递增,以达到此元素的限制。每个事件都显示 这些限制之一。SOQL queries SOQL query rows SOSL queries DML statements DML rows CPU time in ms Heap size in bytes Callouts Email invocations Future calls Jobs in queue Push notifications
工作流程
FINER 及以上
FLOW_INTERVIEW_FINISHED_LIMIT_USAGE
Usage toward a limit when the interview finishes. Each event displays the usage for one of these limits.SOQL queries SOQL query rows SOSL queries DML statements DML rows CPU time in ms Heap size in bytes Callouts Email invocations Future calls Jobs in queue Push notifications
工作流程
FINER 及以上
FLOW_INTERVIEW_PAUSED
采访 ID、流名称以及用户暂停的原因
工作流程
INFO 及以上
FLOW_INTERVIEW_RESUMED
面试 ID 和流名称
工作流程
INFO 及以上
FLOW_LOOP_DETAIL
访谈 ID、索引和值索引是集合变量中的位置 对于循环正在操作的项。
工作流程
FINER 及以上
FLOW_RULE_DETAIL
面试 ID、规则名称和结果
工作流程
FINER 及以上
FLOW_START_INTERVIEW_BEGIN
面试 ID 和流名称
工作流程
INFO 及以上
FLOW_START_INTERVIEW_END
面试 ID 和流名称
工作流程
INFO 及以上
FLOW_START_INTERVIEWS_BEGIN
请求
工作流程
INFO 及以上
FLOW_START_INTERVIEWS_END
请求
工作流程
INFO 及以上
FLOW_START_INTERVIEWS_ERROR
消息、采访 ID 和流名称
工作流程
ERROR 及以上
FLOW_START_INTERVIEW_LIMIT_USAGE
在面试开始时达到限制的使用量。每个事件都显示 以下限制之一:SOQL queries SOQL query rows SOSL queries DML statements DML rows CPU time in ms Heap size in bytes Callouts Email invocations Future calls Jobs in queue Push notifications
工作流程
FINER 及以上
FLOW_START_SCHEDULED_RECORDS
运行流的消息和记录数
工作流程
INFO 及以上
FLOW_SUBFLOW_DETAIL
采访 ID、姓名、定义 ID 和版本 ID
工作流程
FINER 及以上
FLOW_VALUE_ASSIGNMENT
面试 ID、键和值
工作流程
FINER 及以上
FLOW_WAIT_EVENT_RESUMING_DETAIL
采访 ID、元素名称、事件名称和事件类型
工作流程
FINER 及以上
FLOW_WAIT_EVENT_WAITING_DETAIL
采访 ID、元素名称、事件名称、事件类型以及条件是否 遇到
工作流程
FINER 及以上
FLOW_WAIT_RESUMING_DETAIL
采访 ID、元素名称和持久采访 ID
工作流程
FINER 及以上
FLOW_WAIT_WAITING_DETAIL
采访 ID、元素名称、元素正在等待的事件数,以及 持久化采访 ID
工作流程
FINER 及以上
HEAP_ALLOCATE
行号和字节数
Apex 代码
FINER 及以上
HEAP_DEALLOCATE
行号和释放的字节数
Apex 代码
FINER 及以上
IDEAS_QUERY_EXECUTE
行号
分贝
最好
LIMIT_USAGE_FOR_NS
命名空间和以下内容 限制:Number of SOQL queries Number of query rows Number of SOSL queries Number of DML statements Number of DML rows Number of code statements Maximum heap size Number of callouts Number of Email Invocations Number of fields describes Number of record type describes Number of child relationships describes Number of picklist describes Number of future calls Number of find similar calls Number of System.runAs() invocations
Apex 分析
最好
METHOD_ENTRY
行号、类的 Lightning 平台 ID 和方法签名(带有 命名空间(如果适用)
Apex 代码
FINE 及以上
METHOD_EXIT
行号、类的 Lightning 平台 ID 和方法签名(带有 命名空间(如果适用)对于构造函数,将记录以下信息: 行 编号和类名。
// Use generateAesKey to generate the private key
Blob cryptoKey = Crypto.generateAesKey(256);

// Generate the data to be encrypted.
Blob data = Blob.valueOf('Test data to encrypted');

// Encrypt the data and have Salesforce generate the initialization vector
Blob encryptedData = Crypto.encryptWithManagedIV('AES256', cryptoKey, data);

// Decrypt the data
Blob decryptedData = Crypto.decryptWithManagedIV('AES256', cryptoKey, encryptedData);
下面是为 和 Crypto 方法编写单元测试的示例。
encryptWithManagedIVdecryptWithManagedIV
@isTest
private class CryptoTest {
    static testMethod void testValidDecryption() {

        // Use generateAesKey to generate the private key
        Blob key = Crypto.generateAesKey(128);
        // Generate the data to be encrypted.
        Blob data = Blob.valueOf('Test data');
        // Generate an encrypted form of the data using base64 encoding
        String b64Data = EncodingUtil.base64Encode(data);
        // Encrypt and decrypt the data
        Blob encryptedData = Crypto.encryptWithManagedIV('AES128', key, data);
        Blob decryptedData = Crypto.decryptWithManagedIV('AES128', key, encryptedData);
        String b64Decrypted = EncodingUtil.base64Encode(decryptedData);
        // Verify that the strings still match
        System.assertEquals(b64Data, b64Decrypted);
    }
    static testMethod void testInvalidDecryption() {
        // Verify that you must use the same key size for encrypting data
        // Generate two private keys, using different key sizes
        Blob keyOne = Crypto.generateAesKey(128);
        Blob keyTwo = Crypto.generateAesKey(256);
        // Generate the data to be encrypted.
        Blob data = Blob.valueOf('Test data');
        // Encrypt the data using the first key
        Blob encryptedData = Crypto.encryptWithManagedIV('AES128', keyOne, data);
        try {
         // Try decrypting the data using the second key
            Crypto.decryptWithManagedIV('AES256', keyTwo, encryptedData);
            System.assert(false);
        } catch(SecurityException e) {
            System.assertEquals('Given final block not properly padded', e.getMessage());
        }
    }
}
// First, instantiate a new Pattern object "MyPattern"
Pattern MyPattern = Pattern.compile('a*b');

// Then instantiate a new Matcher object "MyMatcher"
Matcher MyMatcher = MyPattern.matcher('aaaaab');

// You can use the system static method assert to verify the match
System.assert(MyMatcher.matches());
如果只打算使用一次正则表达式,请使用 class 方法编译表达式 并在单个调用中将字符串与其匹配。例如 以下内容等效于上面的代码:Patternmatches
pattern myPattern = pattern.compile('(a(b)?)+');
matcher myMatcher = myPattern.matcher('aba');
System.assert(myMatcher.matches() && myMatcher.hitEnd());

// We have two groups: group 0 is always the whole pattern, and group 1 contains
// the substring that most recently matched--in this case, 'a'.
// So the following is true:

System.assert(myMatcher.groupCount() == 2 &&
              myMatcher.group(0) == 'aba' &&
              myMatcher.group(1) == 'a');

// Since group 0 refers to the whole pattern, the following is true:

System.assert(myMatcher.end() == myMatcher.end(0));

// Since the offset after the last character matched is returned by end,
// and since both groups used the last input letter, that offset is 3
// Remember the offset starts its count at 0. So the following is also true:

System.assert(myMatcher.end() == 3 &&
              myMatcher.end(0) == 3 &&
              myMatcher.end(1) == 3);
class normalizeEmailAddresses{

    public void hasDuplicatesByDomain(Lead[] leads) {
           // This pattern reduces the email address to 'john@smithco'
           // from 'john@*.smithco.com' or 'john@smithco.*'
        Pattern emailPattern = Pattern.compile('(?<=@)((?![\\w]+\\.[\\w]+$)
                                               [\\w]+\\.)|(\\.[\\w]+$)');
           // Define a set for emailkey to lead:
        Map<String,Lead> leadMap = new Map<String,Lead>();
                for(Lead lead:leads) {
                    // Ignore leads with a null email
                    if(lead.Email != null) {
                           // Generate the key using the regular expression
                       String emailKey = emailPattern.matcher(lead.Email).replaceAll('');
                           // Look for duplicates in the batch
                       if(leadMap.containsKey(emailKey))
                            lead.email.addError('Duplicate found in batch');
                       else {
                           // Keep the key in the duplicate key custom field
                            lead.Duplicate_Key__c = emailKey;
                            leadMap.put(emailKey, lead);
                       }
                 }
             }
                // Now search the database looking for duplicates
                for(Lead[] leadsCheck:[SELECT Id, duplicate_key__c FROM Lead WHERE
                duplicate_key__c IN :leadMap.keySet()]) {
               for(Lead lead:leadsCheck) {
               // If there's a duplicate, add the error.
                   if(leadMap.containsKey(lead.Duplicate_Key__c))
                      leadMap.get(lead.Duplicate_Key__c).email.addError('Duplicate found
                         in salesforce(Id: ' + lead.Id + ')');
            }
        }
    }
 }
为特定元素指定属性事件。例如 该元素具有属性:。<book>title<book title=”Salesforce.com for Dummies”>
start 元素事件是元素的开始标记,例如 。<book>
结束元素事件是元素的结束标记,例如 。</book>
开始文档事件是文档的开始标记。
结束文档事件是文档的结束标记。
实体引用是代码中的实体引用,例如 。!ENTITY title = “My Book Title”
字符事件是文本字符。
注释事件是 XML 文件中的注释。
使用 and 方法循环访问 XML 数据。使用 方法(如 the 方法)访问 XML 中的数据。nexthasNextgetgetNamespace
循环访问 XML 数据时,请始终在调用之前检查流数据是否可用,以避免尝试读取 XML 数据。hasNextnext
XmlStreamReader 示例
下面的示例处理一个 XML 字符串。
public class XmlStreamReaderDemo {

    // Create a class Book for processing
    public class Book {
        String name;
        String author;
    }

    public Book[] parseBooks(XmlStreamReader reader) {
        Book[] books = new Book[0];
        boolean isSafeToGetNextXmlElement = true;
        while(isSafeToGetNextXmlElement) {
            // Start at the beginning of the book and make sure that it is a book
            if (reader.getEventType() == XmlTag.START_ELEMENT) {
                if ('Book' == reader.getLocalName()) {
                    // Pass the book to the parseBook method (below)
                    Book book = parseBook(reader);
                    books.add(book);
                }
            }
            // Always use hasNext() before calling next() to confirm
            // that we have not reached the end of the stream
            if (reader.hasNext()) {
                reader.next();
            } else {
                isSafeToGetNextXmlElement = false;
                break;
            }
        }
        return books;
    }

    // Parse through the XML, determine the author and the characters
    Book parseBook(XmlStreamReader reader) {
        Book book = new Book();
        book.author = reader.getAttributeValue(null, 'author');
        boolean isSafeToGetNextXmlElement = true;
        while(isSafeToGetNextXmlElement) {
            if (reader.getEventType() == XmlTag.END_ELEMENT) {
                break;
            } else if (reader.getEventType() == XmlTag.CHARACTERS) {
                book.name = reader.getText();
            }
            // Always use hasNext() before calling next() to confirm
            // that we have not reached the end of the stream
            if (reader.hasNext()) {
                reader.next();
            } else {
                isSafeToGetNextXmlElement = false;
                break;
            }
        }
        return book;
    }
}
@isTest
private class XmlStreamReaderDemoTest {
    // Test that the XML string contains specific values
    static testMethod void testBookParser() {

        XmlStreamReaderDemo demo = new XmlStreamReaderDemo();

        String str = '<books><book author="Chatty">Alpha beta</book>' +
            '<book author="Sassy">Baz</book></books>';

        XmlStreamReader reader = new XmlStreamReader(str);
        XmlStreamReaderDemo.Book[] books = demo.parseBooks(reader);

        System.debug(books.size());

        for (XmlStreamReaderDemo.Book book : books) {
            System.debug(book);
        }
    }
}
使用流编写 XML
XmlStreamWriter 类方法允许编写 XML 数据。这些方法与 HTTP 标注结合使用以构造 要在标注请求中发送到外部服务的 XML 文档。 下面的示例演示如何实例化新的 XmlStreamReader 对象:
public class XmlWriterDemo {

     public String getXml() {
          XmlStreamWriter w = new XmlStreamWriter();
          w.writeStartDocument(null, '1.0');
          w.writeProcessingInstruction('target', 'data');
          w.writeStartElement('m', 'Library', 'http://www.book.com');
          w.writeNamespace('m', 'http://www.book.com');
          w.writeComment('Book starts here');
          w.setDefaultNamespace('http://www.defns.com');
          w.writeCData('<Cdata> I like CData </Cdata>');
          w.writeStartElement(null, 'book', null);
          w.writedefaultNamespace('http://www.defns.com');
          w.writeAttribute(null, null, 'author', 'Manoj');
          w.writeCharacters('This is my book');
          w.writeEndElement(); //end book
          w.writeEmptyElement(null, 'ISBN', null);
          w.writeEndElement(); //end library
          w.writeEndDocument();
          String xmlOutput = w.getXmlString();
          w.close();
          return xmlOutput;
        }
}
@isTest
private class XmlWriterDemoTest {
    static TestMethod void basicTest() {
        XmlWriterDemo demo = new XmlWriterDemo();
        String result = demo.getXml();
        String expected = '<?xml version="1.0"?><?target data?>' +
            '<m:Library xmlns:m="http://www.book.com">' +
            '<!--Book starts here-->' +
            '<![CDATA[<Cdata> I like CData </Cdata>]]>' +
'<book xmlns="http://www.defns.com" author="Manoj">This is my book</book><ISBN/></m:Library>';

        System.assert(result == expected);
    }
}
使用 DOM 读取和写入 XML
Apex 提供了使您能够使用 DOM 处理 XML 内容的类 (文档对象模型)。
DOM 类可帮助您解析或生成 XML 内容。您可以使用这些类来工作 替换为任何 XML 内容。一个常见的应用是使用类来生成正文 由 HttpRequest 创建的请求或解析 HttpResponse 访问的响应。The DOM 将 XML 文档表示为节点层次结构。某些节点可能是分支节点 并且有子节点,而其他节点是没有子节点的叶节点。您可以 分析嵌套的 XML 内容,该内容最多50节点 深。
DOM 类包含在命名空间中。Dom
使用 Document 类处理 XML 文档正文中的内容。
使用 XmlNode 类处理 XML 中的节点 公文。
使用 Document 类类处理 XML 内容。一个常见的应用是使用它 为 HttpRequest 创建请求的正文,或分析 HttpResponse 访问的响应。
XML 命名空间
XML 命名空间是由 URI 引用标识的名称集合,用于 XML 文档,用于唯一标识元素类型和属性名称。XML 中的名称 命名空间可能显示为限定名称,其中包含一个冒号,分隔 名称转换为命名空间前缀和本地部分。前缀,映射到 URI 引用,选择命名空间。通用管理 URI 的组合 命名空间和文档自己的命名空间生成通用的标识符 独特。
public class DomDocument {

    // Pass in the URL for the request
    // For the purposes of this sample,assume that the URL
    // returns the XML shown above in the response body
    public void parseResponseDom(String url){
        Http h = new Http();
        HttpRequest req = new HttpRequest();
        // url that returns the XML in the response body
        req.setEndpoint(url);
        req.setMethod('GET');
        HttpResponse res = h.send(req);
        Dom.Document doc = res.getBodyDocument();

        //Retrieve the root element for this document.
        Dom.XMLNode address = doc.getRootElement();

        String name = address.getChildElement('name', null).getText();
        String state = address.getChildElement('state', null).getText();
        // print out specific elements
        System.debug('Name: ' + name);
        System.debug('State: ' + state);

        // Alternatively, loop through the child elements.
        // This prints out all the elements of the address
        for(Dom.XMLNode child : address.getChildElements()) {
           System.debug(child.getText());
        }
    }
}
使用 XML 节点
使用该类处理 XML 文档。DOM 将 XML 文档表示为节点的层次结构。一些 节点可以是分支节点并具有子节点,而其他节点是没有子节点的叶节点 孩子。XmlNode
Apex 中有不同类型的 DOM 节点可用。 是这些不同类型的枚举。 这些值为:XmlNodeType
Contact con = [SELECT Id, LastName, AccountId FROM Contact LIMIT 1];
// Set additional field
con.FirstName = 'Joe';
String jsonstring = Json.serialize(con);
System.debug(jsonstring);
System.assert(jsonstring.contains('Joe') == true);
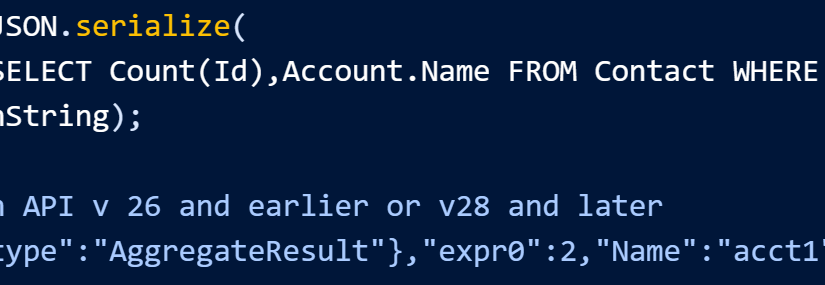
聚合查询结果字段的序列化对于使用 Salesforce API 版本 27.0 保存的 Apex,聚合结果 在以下情况下,查询不包括 SELECT 语句中的字段 使用该方法序列化。对于早期 API 版本或 API 版本 28.0 及更高版本, 序列化聚合查询结果包括 SELECT 中的所有字段 陈述。serialize此聚合查询返回两个字段:ID 字段计数和 帐户名称。
String jsonString = JSON.serialize(
    Database.query('SELECT Count(Id),Account.Name FROM Contact WHERE Account.Name != null GROUP BY Account.Name LIMIT 1'));
    System.debug(jsonString);

// Expected output in API v 26 and earlier or v28 and later
// [{"attributes":{"type":"AggregateResult"},"expr0":2,"Name":"acct1"}]
String jsonString = JSON.serialize(
                 [SELECT Id, Name, Website FROM Account WHERE Website = null LIMIT 1]);
System.debug(jsonString);

// In v27.0 and earlier, the string includes the null field and looks like the following.
// {"attributes":{...},"Id":"001D000000Jsm0WIAR","Name":"Acme","Website":null}

// In v28.0 and later, the string doesn’t include the null field and looks like
//  the following.
// {"attributes":{...},"Name":"Acme","Id":"001D000000Jsm0WIAR"}}
ID 序列化在 API 版本 34.0 及更早版本中,对于已通过 往返 JSON 序列化和反序列化。==
public class JSONGeneratorSample{

    public class A {
        String str;

        public A(String s) { str = s; }
    }

    static void generateJSONContent() {
        // Create a JSONGenerator object.
        // Pass true to the constructor for pretty print formatting.
        JSONGenerator gen = JSON.createGenerator(true);

        // Create a list of integers to write to the JSON string.
        List<integer> intlist = new List<integer>();
        intlist.add(1);
        intlist.add(2);
        intlist.add(3);

        // Create an object to write to the JSON string.
        A x = new A('X');

        // Write data to the JSON string.
        gen.writeStartObject();
        gen.writeNumberField('abc', 1.21);
        gen.writeStringField('def', 'xyz');
        gen.writeFieldName('ghi');
        gen.writeStartObject();

        gen.writeObjectField('aaa', intlist);

        gen.writeEndObject();

        gen.writeFieldName('Object A');

        gen.writeObject(x);

        gen.writeEndObject();

        // Get the JSON string.
        String pretty = gen.getAsString();

        System.assertEquals('{\n' +
        '  "abc" : 1.21,\n' +
        '  "def" : "xyz",\n' +
        '  "ghi" : {\n' +
        '    "aaa" : [ 1, 2, 3 ]\n' +
        '  },\n' +
        '  "Object A" : {\n' +
        '    "str" : "X"\n' +
        '  }\n' +
        '}', pretty);
    }
}
JSON解析
使用类方法进行解析 JSON 编码的内容。这些方法使你能够分析 JSON 格式的响应,该响应是 从对外部服务(如 Web 服务标注)的调用返回。
JSONParser
以下示例演示如何分析 JSON 字符串。
示例:解析来自 Web 服务标注的 JSON 响应
此示例使用方法分析 JSON 格式的响应。它对返回 JSON 格式的响应。接下来,解析响应以从 api 构建映射 版本号添加到版本标签中。JSONParser
public class JSONParserUtil {
    public static void parseJSONResponse() {

        // Create HTTP request to send.
        HttpRequest request = new HttpRequest();
        // Set the endpoint URL.
        String endpoint = URL.getOrgDomainUrl().toExternalForm() + '/services/data';
        request.setEndPoint(endpoint);
        // Set the HTTP verb to GET.
        request.setMethod('GET');
        // Set the request header for JSON content type
        request.setHeader('Accept', 'application/json');

        // Send the HTTP request and get the response.
        // The response is in JSON format.
        Http httpProtocol = new Http();
        HttpResponse response = httpProtocol.send(request);
        System.debug(response.getBody());
        /* The JSON response returned is the following:
            {"label":"Summer '14","url":"/services/data/v31.0","version":"31.0"},
            {"label":"Winter '15","url":"/services/data/v32.0","version":"32.0"},
            {"label":"Spring '15","url":"/services/data/v33.0","version":"33.0"},
        */
        // Parse JSON response to build a map from API version numbers to labels
        JSONParser parser = JSON.createParser(response.getBody());
        Map<double, string> apiVersionToReleaseNameMap = new Map<double, string>();

        string label = null;
        double version = null;

        while (parser.nextToken() != null) {

            if (parser.getCurrentToken() == JSONToken.FIELD_NAME) {
                switch on parser.getText() {
                    when 'label' {
                    // Advance to the label value.
                    parser.nextToken();
                        label = parser.getText();
                    }
                    when 'version' {
                        // Advance to the version value.
                        parser.nextToken();
                        version = Double.valueOf(parser.getText());
                    }
                }
            }

            if(version != null && String.isNotEmpty(label)) {
                apiVersionToReleaseNameMap.put(version, label);
                version = null;
                label = null;
            }
        }
        system.debug('Release with Rainbow logo = ' +
            apiVersionToReleaseNameMap.get(39.0D));
    }
}
public static void parseJSONString() {
    String jsonStr =
        '{"invoiceList":[' +
        '{"totalPrice":5.5,"statementDate":"2011-10-04T16:58:54.858Z","lineItems":[' +
            '{"UnitPrice":1.0,"Quantity":5.0,"ProductName":"Pencil"},' +
            '{"UnitPrice":0.5,"Quantity":1.0,"ProductName":"Eraser"}],' +
                '"invoiceNumber":1},' +
        '{"totalPrice":11.5,"statementDate":"2011-10-04T16:58:54.858Z","lineItems":[' +
            '{"UnitPrice":6.0,"Quantity":1.0,"ProductName":"Notebook"},' +
            '{"UnitPrice":2.5,"Quantity":1.0,"ProductName":"Ruler"},' +
            '{"UnitPrice":1.5,"Quantity":2.0,"ProductName":"Pen"}],"invoiceNumber":2}' +
        ']}';

    // Parse entire JSON response.
    JSONParser parser = JSON.createParser(jsonStr);
    while (parser.nextToken() != null) {
        // Start at the array of invoices.
        if (parser.getCurrentToken() == JSONToken.START_ARRAY) {
            while (parser.nextToken() != null) {
                // Advance to the start object marker to
                //  find next invoice statement object.
                if (parser.getCurrentToken() == JSONToken.START_OBJECT) {
                    // Read entire invoice object, including its array of line items.
                    Invoice inv = (Invoice)parser.readValueAs(Invoice.class);
                    system.debug('Invoice number: ' + inv.invoiceNumber);
                    system.debug('Size of list items: ' + inv.lineItems.size());
                    // For debugging purposes, serialize again to verify what was parsed.
                    String s = JSON.serialize(inv);
                    system.debug('Serialized invoice: ' + s);

                    // Skip the child start array and start object markers.
                    parser.skipChildren();
                }
            }
        }
    }
}

// Inner classes used for serialization by readValuesAs().

public class Invoice {
    public Double totalPrice;
    public DateTime statementDate;
    public Long invoiceNumber;
    List<LineItem> lineItems;

    public Invoice(Double price, DateTime dt, Long invNumber, List<LineItem> liList) {
        totalPrice = price;
        statementDate = dt;
        invoiceNumber = invNumber;
        lineItems = liList.clone();
    }
}

public class LineItem {
    public Double unitPrice;
    public Double quantity;
    public String productName;
}
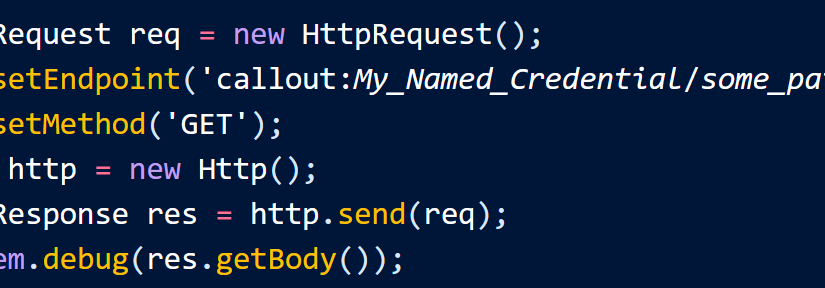
HttpRequest req = new HttpRequest();
req.setEndpoint('https://my_endpoint.example.com/some_path');
req.setMethod('GET');

// Because we didn't set the endpoint as a named credential,
// our code has to specify:
// - The required username and password to access the endpoint
// - The header and header information

String username = 'myname';
String password = 'mypwd';

Blob headerValue = Blob.valueOf(username + ':' + password);
String authorizationHeader = 'BASIC ' +
EncodingUtil.base64Encode(headerValue);
req.setHeader('Authorization', authorizationHeader);

// Create a new http object to send the request object
// A response object is generated as a result of the request

Http http = new Http();
HTTPResponse res = http.send(req);
System.debug(res.getBody());
  // Create the stub
  strikeironIplookup.DNSSoap dns = new strikeironIplookup.DNSSoap();

  // Set up the license header
  dns.LicenseInfo = new strikeiron.LicenseInfo();
  dns.LicenseInfo.RegisteredUser = new strikeiron.RegisteredUser();
  dns.LicenseInfo.RegisteredUser.UserID = 'you@company.com';
  dns.LicenseInfo.RegisteredUser.Password = 'your-password';

  // Make the Web service call
  strikeironIplookup.DNSInfo info = dns.DNSLookup('www.myname.com');
测试 Web 服务标注 生成的代码将另存为 Apex 类,其中包含可用于调用 Web 服务的方法。若要部署或打包此 Apex 类和其他随附代码,75% 的代码必须具有测试覆盖率,包括生成的类中的方法。默认情况下,测试方法不支持 Web 服务标注,并且执行 Web 服务标注的测试会失败。为了防止测试失败并增加代码覆盖率,Apex 提供了内置接口和方法。在测试方法中使用和接收虚假响应。WebServiceMockTest.setMockWebServiceMockTest.setMock
<wsdl:definitions xmlns:http="http://schemas.xmlsoap.org/wsdl/http/"
xmlns:soap="http://schemas.xmlsoap.org/wsdl/soap/"
xmlns:s="http://www.w3.org/2001/XMLSchema"
xmlns:soapenc="http://schemas.xmlsoap.org/soap/encoding/"
xmlns:tns="http://doc.sample.com/docSample"
targetNamespace="http://doc.sample.com/docSample"
xmlns:wsdl="http://schemas.xmlsoap.org/wsdl/">

<!-- Above, the schema targetNamespace maps to the Apex class name. -->


<!-- Below, the type definitions for the parameters are listed.
     Each complexType and simpleType parameteris mapped to an Apex class inside the parent class for the WSDL.  Then, each element in the complexType is mapped to a public field inside the class. -->

<wsdl:types>
<s:schema elementFormDefault="qualified"
targetNamespace="http://doc.sample.com/docSample">
<s:element name="EchoString">
<s:complexType>
<s:sequence>
<s:element minOccurs="0" maxOccurs="1" name="input" type="s:string" />
</s:sequence>
</s:complexType>
</s:element>
<s:element name="EchoStringResponse">
<s:complexType>
<s:sequence>
<s:element minOccurs="0" maxOccurs="1" name="EchoStringResult"
type="s:string" />
</s:sequence>
</s:complexType>
</s:element>
</s:schema>
</wsdl:types>

<!--The stub below defines operations. -->

<wsdl:message name="EchoStringSoapIn">
<wsdl:part name="parameters" element="tns:EchoString" />
</wsdl:message>
<wsdl:message name="EchoStringSoapOut">
<wsdl:part name="parameters" element="tns:EchoStringResponse" />
</wsdl:message>
<wsdl:portType name="DocSamplePortType">
<wsdl:operation name="EchoString">
<wsdl:input message="tns:EchoStringSoapIn" />
<wsdl:output message="tns:EchoStringSoapOut" />
</wsdl:operation>
</wsdl:portType>

<!--The code below defines how the types map to SOAP. -->

<wsdl:binding name="DocSampleBinding" type="tns:DocSamplePortType">
<wsdl:operation name="EchoString">
<soap:operation soapAction="urn:dotnet.callouttest.soap.sforce.com/EchoString"
style="document" />
<wsdl:input>
<soap:body use="literal" />
</wsdl:input>
<wsdl:output>
<soap:body use="literal" />
</wsdl:output>
</wsdl:operation>
</wsdl:binding>

<!-- Finally, the code below defines the endpoint, which maps to the endpoint in the class -->

<wsdl:service name="DocSample">
<wsdl:port name="DocSamplePort" binding="tns:DocSampleBinding">
<soap:address location="http://YourServer/YourService" />
</wsdl:port>
</wsdl:service>
</wsdl:definitions>
public class WebSvcCallout {
    public static String callEchoString(String input) {
        docSample.DocSamplePort sample = new docSample.DocSamplePort();
        sample.endpoint_x = 'https://example.com/example/test';

        // This invokes the EchoString method in the generated class
        String echo = sample.EchoString(input);

        return echo;
    }
}
@isTest
private class WebSvcCalloutTest {
    @isTest static void testEchoString() {
        // This causes a fake response to be generated
        Test.setMock(WebServiceMock.class, new WebServiceMockImpl());

        // Call the method that invokes a callout
        String output = WebSvcCallout.callEchoString('Hello World!');

        // Verify that a fake result is returned
        System.assertEquals('Mock response', output);
    }
}
此示例基于前面的示例。该示例显示 如何使用 AND 语句允许 在模拟标注之前在测试方法中执行的 DML 操作。 测试方法()首先插入一个测试帐户,调用,使用设置模拟标注模式,调用一个方法 执行标注,验证模拟响应值,最后 调用。Test.startTestTest.stopTesttestEchoStringTest.startTestTest.setMockTest.stopTest
@isTest
private class WebSvcCalloutTest {
    @isTest static void testEchoString() {
        // Perform some DML to insert test data
        Account testAcct = new Account('Test Account');
        insert testAcct;

        // Call Test.startTest before performing callout
        // but after setting test data.
        Test.startTest();

        // Set mock callout class
        Test.setMock(WebServiceMock.class, new WebServiceMockImpl());

        // Call the method that invokes a callout
        String output = WebSvcCallout.callEchoString('Hello World!');

        // Verify that a fake result is returned
        System.assertEquals('Mock response', output);

        Test.stopTest();
    }
}
此示例向外部服务器发出 HTTP GET 请求,该请求传递给参数中的方法。此示例还访问 返回的响应。getCalloutResponseContentsurl
public class HttpCalloutSample {

  // Pass in the endpoint to be used using the string url
  public String getCalloutResponseContents(String url) {

    // Instantiate a new Http object
    Http h = new Http();

     // Instantiate a new HTTP request, specify the method (GET) as well as the endpoint
    HttpRequest req = new HttpRequest();
    req.setEndpoint(url);
    req.setMethod('GET');

    // Send the request, and return a response
    HttpResponse res = h.send(req);
    return res.getBody();
  }
}
前面的示例是同步运行的,这意味着没有进一步的处理 在外部 Web 服务返回响应之前发生。或者,您可以使用 @future注解,使 标注异步运行。
此示例向外部服务器发出 HTTP POST 请求,该请求传递给参数中的方法。替换为 要在标注中发送的 JSON 内容。getPostCalloutResponseContentsurlYour_JSON_Content
public class HttpPostCalloutSample {

  // Pass in the endpoint to be used using the string url
  public String getPostCalloutResponseContents(String url) {

    // Instantiate a new Http object
    Http h = new Http();

    // Instantiate a new HTTP request
    // Specify request properties such as the endpoint, the POST method, etc.
    HttpRequest req = new HttpRequest();
    req.setEndpoint(url);
    req.setMethod('POST');
    req.setHeader('Content-Type', 'application/json');
    req.setBody('{Your_JSON_Content}');

    // Send the request, and return a response
    HttpResponse res = h.send(req);
    return res.getBody();
  }
}
若要从终结点或重定向终结点访问外部服务器,请添加远程站点 添加到授权远程站点的列表中。登录到 Salesforce,然后从“设置”的“快速”中 “查找”框,输入 ,然后选择“远程站点设置”。Remote Site Settings
使用 XML 类或 JSON 类来解析 XML 或 JSON 中的内容 由 HttpRequest 创建的请求的正文,或由 HttpResponse 访问的响应。
global class YourHttpCalloutMockImpl implements HttpCalloutMock {
    global HTTPResponse respond(HTTPRequest req) {
        // Create a fake response.
        // Set response values, and
        // return response.
    }
}
@isTest
global class MockHttpResponseGenerator implements HttpCalloutMock {
    // Implement this interface method
    global HTTPResponse respond(HTTPRequest req) {
        // Optionally, only send a mock response for a specific endpoint
        // and method.
        System.assertEquals('https://example.com/example/test', req.getEndpoint());
        System.assertEquals('GET', req.getMethod());

        // Create a fake response
        HttpResponse res = new HttpResponse();
        res.setHeader('Content-Type', 'application/json');
        res.setBody('{"example":"test"}');
        res.setStatusCode(200);
        return res;
    }
}
public class CalloutClass {
    public static HttpResponse getInfoFromExternalService() {
        HttpRequest req = new HttpRequest();
        req.setEndpoint('https://example.com/example/test');
        req.setMethod('GET');
        Http h = new Http();
        HttpResponse res = h.send(req);
        return res;
    }
}
@isTest
private class CalloutClassTest {
     @isTest static void testCallout() {
        // Set mock callout class
        Test.setMock(HttpCalloutMock.class, new MockHttpResponseGenerator());

        // Call method to test.
        // This causes a fake response to be sent
        // from the class that implements HttpCalloutMock.
        HttpResponse res = CalloutClass.getInfoFromExternalService();

        // Verify response received contains fake values
        String contentType = res.getHeader('Content-Type');
        System.assert(contentType == 'application/json');
        String actualValue = res.getBody();
        String expectedValue = '{"example":"test"}';
        System.assertEquals(actualValue, expectedValue);
        System.assertEquals(200, res.getStatusCode());
    }
}
public class CalloutStaticClass {
    public static HttpResponse getInfoFromExternalService(String endpoint) {
        HttpRequest req = new HttpRequest();
        req.setEndpoint(endpoint);
        req.setMethod('GET');
        Http h = new Http();
        HttpResponse res = h.send(req);
        return res;
    }
}
@isTest
private class CalloutStaticClassTest {
    @isTest static void testCalloutWithStaticResources() {
        // Use StaticResourceCalloutMock built-in class to
        // specify fake response and include response body
        // in a static resource.
        StaticResourceCalloutMock mock = new StaticResourceCalloutMock();
        mock.setStaticResource('mockResponse');
        mock.setStatusCode(200);
        mock.setHeader('Content-Type', 'application/json');

        // Set the mock callout mode
        Test.setMock(HttpCalloutMock.class, mock);

        // Call the method that performs the callout
        HTTPResponse res = CalloutStaticClass.getInfoFromExternalService(
            'https://example.com/example/test');

        // Verify response received contains values returned by
        // the mock response.
        // This is the content of the static resource.
        System.assertEquals('{"hah":"fooled you"}', res.getBody());
        System.assertEquals(200,res.getStatusCode());
        System.assertEquals('application/json', res.getHeader('Content-Type'));
    }
}
这是一个完整的示例,其中包含测试方法 () 和它正在测试的执行标注的方法 ()。在运行此示例之前,请创建 名为 based 的静态资源 在一个文本文件上,其中包含内容,另一个基于 包含以下内容的文本文件。单独保存每个类,并在 中运行测试。testCalloutWithMultipleStaticResourcesgetInfoFromExternalServicemockResponse{"hah":"fooled you"}mockResponse2{"hah":"fooled you twice"}CalloutMultiStaticClassTest
public class CalloutMultiStaticClass {
    public static HttpResponse getInfoFromExternalService(String endpoint) {
        HttpRequest req = new HttpRequest();
        req.setEndpoint(endpoint);
        req.setMethod('GET');
        Http h = new Http();
        HttpResponse res = h.send(req);
        return res;
    }
}
@isTest
private class CalloutMultiStaticClassTest {
    @isTest static void testCalloutWithMultipleStaticResources() {
        // Use MultiStaticResourceCalloutMock to
        // specify fake response for a certain endpoint and
        // include response body in a static resource.
        MultiStaticResourceCalloutMock multimock = new MultiStaticResourceCalloutMock();
        multimock.setStaticResource(
            'https://example.com/example/test', 'mockResponse');
        multimock.setStaticResource(
            'https://example.com/example/sfdc', 'mockResponse2');
        multimock.setStatusCode(200);
        multimock.setHeader('Content-Type', 'application/json');

        // Set the mock callout mode
        Test.setMock(HttpCalloutMock.class, multimock);

        // Call the method for the first endpoint
        HTTPResponse res = CalloutMultiStaticClass.getInfoFromExternalService(
            'https://example.com/example/test');
        // Verify response received
        System.assertEquals('{"hah":"fooled you"}', res.getBody());

        // Call the method for the second endpoint
        HTTPResponse res2 = CalloutMultiStaticClass.getInfoFromExternalService(
            'https://example.com/example/sfdc');
        // Verify response received
        System.assertEquals('{"hah":"fooled you twice"}', res2.getBody());
    }
}
@isTest
private class CalloutClassTest {
     @isTest static void testCallout() {
        // Perform some DML to insert test data
        Account testAcct = new Account('Test Account');
        insert testAcct;

        // Call Test.startTest before performing callout
        // but after setting test data.
        Test.startTest();

        // Set mock callout class
        Test.setMock(HttpCalloutMock.class, new MockHttpResponseGenerator());

        // Call method to test.
        // This causes a fake response to be sent
        // from the class that implements HttpCalloutMock.
        HttpResponse res = CalloutClass.getInfoFromExternalService();

        // Verify response received contains fake values
        String contentType = res.getHeader('Content-Type');
        System.assert(contentType == 'application/json');
        String actualValue = res.getBody();
        String expectedValue = '{"example":"test"}';
        System.assertEquals(actualValue, expectedValue);
        System.assertEquals(200, res.getStatusCode());

        Test.stopTest();
    }
}
public class HttpCalloutSampleReadOnly {
    public class MyReadOnlyException extends Exception {}

    // Pass in the endpoint to be used using the string url
    public String getCalloutResponseContents(String url) {

        // Get Read-only mode status
        ApplicationReadWriteMode mode = System.getApplicationReadWriteMode();
        String returnValue = '';

        if (mode == ApplicationReadWriteMode.READ_ONLY) {
            // Prevent the callout
            throw new MyReadOnlyException('Read-only mode. Skipping callouts!');
        } else if (mode == ApplicationReadWriteMode.DEFAULT) {
            // Instantiate a new http object
            Http h = new Http();

            // Instantiate a new HTTP request, specify the method (GET)
            // as well as the endpoint.
            HttpRequest req = new HttpRequest();
            req.setEndpoint(url);
            req.setMethod('GET');

            // Send the request, and return a response
            HttpResponse res = h.send(req);
            returnValue = res.getBody();
        }
        return returnValue;
    }
}
<apex:page controller="ContinuationController" showChat="false" showHeader="false">
   <apex:form >
      <!-- Invokes the action method when the user clicks this button. -->
      <apex:commandButton action="{!startRequest}"
              value="Start Request" reRender="result"/>
   </apex:form>

   <!-- This output text component displays the callout response body. -->
   <apex:outputText id="result" value="{!result}" />
</apex:page>
public with sharing class ContinuationController {
    // Unique label corresponding to the continuation
    public String requestLabel;
    // Result of callout
    public String result {get;set;}
    // Callout endpoint as a named credential URL
    // or, as shown here, as the long-running service URL
    private static final String LONG_RUNNING_SERVICE_URL =
        '<Insert your service URL>';

   // Action method
    public Object startRequest() {
      // Create continuation with a timeout
      Continuation con = new Continuation(40);
      // Set callback method
      con.continuationMethod='processResponse';

      // Create callout request
      HttpRequest req = new HttpRequest();
      req.setMethod('GET');
      req.setEndpoint(LONG_RUNNING_SERVICE_URL);

      // Add callout request to continuation
      this.requestLabel = con.addHttpRequest(req);

      // Return the continuation
      return con;
    }

    // Callback method
    public Object processResponse() {
      // Get the response by using the unique label
      HttpResponse response = Continuation.getResponse(this.requestLabel);
      // Set the result variable that is displayed on the Visualforce page
      this.result = response.getBody();

      // Return null to re-render the original Visualforce page
      return null;
    }
}
下面的示例演示如何在 Web 测试中调用模拟异步标注 使用 的服务调用。模拟 标注,调用类的以下方法:Test.setContinuationResponse() 和 Test.invokeContinuationMethod()。HTTPRequestTest
首先列出要测试的控制器类,然后是测试类。控制器 此处重用了 Make Long-Running Callouts with Continuations 中的类。
public with sharing class ContinuationController {
    // Unique label corresponding to the continuation request
    public String requestLabel;
    // Result of callout
    public String result {get;set;}
    // Endpoint of long-running service
    private static final String LONG_RUNNING_SERVICE_URL =
        '<Insert your service URL>';

   // Action method
    public Object startRequest() {
      // Create continuation with a timeout
      Continuation con = new Continuation(40);
      // Set callback method
      con.continuationMethod='processResponse';

      // Create callout request
      HttpRequest req = new HttpRequest();
      req.setMethod('GET');
      req.setEndpoint(LONG_RUNNING_SERVICE_URL);

      // Add callout request to continuation
      this.requestLabel = con.addHttpRequest(req);

      // Return the continuation
      return con;
    }

    // Callback method
    public Object processResponse() {
      // Get the response by using the unique label
      HttpResponse response = Continuation.getResponse(this.requestLabel);
      // Set the result variable that is displayed on the Visualforce page
      this.result = response.getBody();

      // Return null to re-render the original Visualforce page
      return null;
    }
}
@isTest
public class ContinuationTestingForHttpRequest {
    public static testmethod void testWebService() {
        ContinuationController controller = new ContinuationController();
        // Invoke the continuation by calling the action method
        Continuation conti = (Continuation)controller.startRequest();

        // Verify that the continuation has the proper requests
        Map<String, HttpRequest> requests = conti.getRequests();
        system.assert(requests.size() == 1);
        system.assert(requests.get(controller.requestLabel) != null);

        // Perform mock callout
        // (i.e. skip the callout and call the callback method)
        HttpResponse response = new HttpResponse();
        response.setBody('Mock response body');
        // Set the fake response for the continuation
        Test.setContinuationResponse(controller.requestLabel, response);
        // Invoke callback method
        Object result = Test.invokeContinuationMethod(controller, conti);
        // result is the return value of the callback
        System.assertEquals(null, result);
        // Verify that the controller's result variable
        //   is set to the mock response.
        System.assertEquals('Mock response body', controller.result);
    }
}
<apex:page controller="MultipleCalloutController" showChat="false" showHeader="false">
   <apex:form >
      <!-- Invokes the action method when the user clicks this button. -->
      <apex:commandButton action="{!startRequestsInParallel}" value="Start Request" reRender="panel"/>
   </apex:form>

   <apex:outputPanel id="panel">
       <!-- Displays the response body of the initial callout. -->
       <apex:outputText value="{!result1}" />

       <br/>
       <!-- Displays the response body of the chained callout. -->
       <apex:outputText value="{!result2}" />
   </apex:outputPanel>

</apex:page>
public with sharing class MultipleCalloutController {

    // Unique label for the first request
    public String requestLabel1;
    // Unique label for the second request
    public String requestLabel2;
    // Result of first callout
    public String result1 {get;set;}
   // Result of second callout
    public String result2 {get;set;}
    // Endpoints of long-running service
    private static final String LONG_RUNNING_SERVICE_URL1 =
        '<Insert your first service URL>';
    private static final String LONG_RUNNING_SERVICE_URL2 =
        '<Insert your second service URL>';

    // Action method
    public Object startRequestsInParallel() {
      // Create continuation with a timeout
      Continuation con = new Continuation(60);
      // Set callback method
      con.continuationMethod='processAllResponses';

      // Create first callout request
      HttpRequest req1 = new HttpRequest();
      req1.setMethod('GET');
      req1.setEndpoint(LONG_RUNNING_SERVICE_URL1);

      // Add first callout request to continuation
      this.requestLabel1 = con.addHttpRequest(req1);

      // Create second callout request
      HttpRequest req2 = new HttpRequest();
      req2.setMethod('GET');
      req2.setEndpoint(LONG_RUNNING_SERVICE_URL2);

      // Add second callout request to continuation
      this.requestLabel2 = con.addHttpRequest(req2);

      // Return the continuation
      return con;
    }

    // Callback method.
    // Invoked only when responses of all callouts are returned.
    public Object processAllResponses() {
      // Get the response of the first request
      HttpResponse response1 = Continuation.getResponse(this.requestLabel1);
      this.result1 = response1.getBody();

      // Get the response of the second request
      HttpResponse response2 = Continuation.getResponse(this.requestLabel2);
      this.result2 = response2.getBody();

      // Return null to re-render the original Visualforce page
      return null;
    }
}
<apex:page controller="ChainedContinuationController" showChat="false" showHeader="false">
   <apex:form >
      <!-- Invokes the action method when the user clicks this button. -->
      <apex:commandButton action="{!invokeInitialRequest}" value="Start Request" reRender="panel"/>
   </apex:form>

   <apex:outputPanel id="panel">
       <!-- Displays the response body of the initial callout. -->
       <apex:outputText value="{!result1}" />

       <br/>
       <!-- Displays the response body of the chained callout. -->
       <apex:outputText value="{!result2}" />
   </apex:outputPanel>

</apex:page>
public with sharing class ChainedContinuationController {

    // Unique label for the initial callout request
    public String requestLabel1;
    // Unique label for the chained callout request
    public String requestLabel2;
    // Result of initial callout
    public String result1 {get;set;}
    // Result of chained callout
    public String result2 {get;set;}
    // Endpoint of long-running service
    private static final String LONG_RUNNING_SERVICE_URL1 =
        '<Insert your first service URL>';
    private static final String LONG_RUNNING_SERVICE_URL2 =
        '<Insert your second service URL>';

    // Action method
    public Object invokeInitialRequest() {
      // Create continuation with a timeout
      Continuation con = new Continuation(60);
      // Set callback method
      con.continuationMethod='processInitialResponse';

      // Create first callout request
      HttpRequest req = new HttpRequest();
      req.setMethod('GET');
      req.setEndpoint(LONG_RUNNING_SERVICE_URL1);

      // Add initial callout request to continuation
      this.requestLabel1 = con.addHttpRequest(req);

      // Return the continuation
      return con;
    }

    // Callback method for initial request
    public Object processInitialResponse() {
      // Get the response by using the unique label
      HttpResponse response = Continuation.getResponse(this.requestLabel1);
      // Set the result variable that is displayed on the Visualforce page
      this.result1 = response.getBody();

      Continuation chainedContinuation = null;
      // Chain continuation if some condition is met
      if (response.getBody().toLowerCase().contains('expired')) {
          // Create a second continuation
          chainedContinuation = new Continuation(60);
          // Set callback method
          chainedContinuation.continuationMethod='processChainedResponse';

          // Create callout request
          HttpRequest req = new HttpRequest();
          req.setMethod('GET');
          req.setEndpoint(LONG_RUNNING_SERVICE_URL2);

          // Add callout request to continuation
          this.requestLabel2 = chainedContinuation.addHttpRequest(req);
      }

      // Start another continuation
      return chainedContinuation;
    }

    // Callback method for chained request
    public Object processChainedResponse() {
      // Get the response for the chained request
      HttpResponse response = Continuation.getResponse(this.requestLabel2);
      // Set the result variable that is displayed on the Visualforce page
      this.result2 = response.getBody();

      // Return null to re-render the original Visualforce page
      return null;
    }
}
public Object processResponse() {
   result = stockQuoteFuture.getValue();
   return null;
}
以下是带有 action 和 callback 方法的整个控制器。
public class ContinuationSOAPController {

    AsyncSOAPStockQuoteService.GetStockQuoteResponse_elementFuture
           stockQuoteFuture;
    public String result {get;set;}

    // Action method
    public Continuation startRequest() {
       Integer TIMEOUT_INT_SECS = 60;
       Continuation cont = new Continuation(TIMEOUT_INT_SECS);
       cont.continuationMethod = 'processResponse';

       AsyncSOAPStockQuoteService.AsyncStockQuoteServiceSoap
          stockQuoteService =
            new AsyncSOAPStockQuoteService.AsyncStockQuoteServiceSoap();
           stockQuoteFuture = stockQuoteService.beginGetStockQuote(cont,'CRM');
       return cont;
    }

    // Callback method
    public Object processResponse() {
       result = stockQuoteFuture.getValue();
       // Return null to re-render the original Visualforce page
       return null;
    }
}
此示例显示了调用该方法并显示结果的相应 Visualforce 页面 田。startRequest
<apex:page controller="ContinuationSOAPController" showChat="false" showHeader="false">
   <apex:form >
      <!-- Invokes the action method when the user clicks this button. -->
      <apex:commandButton action="{!startRequest}"
              value="Start Request" reRender="result"/>
   </apex:form>

   <!-- This output text component displays the callout response body. -->
   <apex:outputText value="{!result}" />
</apex:page>
@isTest
public class ContinuationTestingForWSDL {
    public static testmethod void testWebService() {

        ContinuationSOAPController demoWSDLClass =
            new ContinuationSOAPController();

        // Invoke the continuation by calling the action method
        Continuation conti = demoWSDLClass.startRequest();

        // Verify that the continuation has the proper requests
        Map<String, HttpRequest> requests = conti.getRequests();
        System.assertEquals(requests.size(), 1);

        // Perform mock callout
        // (i.e. skip the callout and call the callback method)
        HttpResponse response = new HttpResponse();
        response.setBody('<SOAP:Envelope'
            + ' xmlns:SOAP="http://schemas.xmlsoap.org/soap/envelope/">'
            + '<SOAP:Body>'
            + '<m:getStockQuoteResponse '
            + 'xmlns:m="http://soap.sforce.com/schemas/class/StockQuoteServiceSoap">'
            + '<m:result>Mock response body</m:result>'
            + '</m:getStockQuoteResponse>'
            + '</SOAP:Body>'
            + '</SOAP:Envelope>');

        // Set the fake response for the continuation
        String requestLabel = requests.keyset().iterator().next();
        Test.setContinuationResponse(requestLabel, response);

        // Invoke callback method
        Object result = Test.invokeContinuationMethod(demoWSDLClass, conti);
        System.debug(demoWSDLClass);

        // result is the return value of the callback
        System.assertEquals(null, result);

        // Verify that the controller's result variable
        //   is set to the mock response.
        System.assertEquals('Mock response body', demoWSDLClass.result);
    }
}
// Get the default business hours
BusinessHours bh = [SELECT Id FROM BusinessHours WHERE IsDefault=true];

// Create Datetime on May 28, 2008 at 1:06:08 AM in local timezone.
Datetime startTime = Datetime.newInstance(2008, 5, 28, 1, 6, 8);

// Find the time it will be one business hour from May 28, 2008, 1:06:08 AM using the
// default business hours.  The returned Datetime will be in the local timezone.
Datetime nextTime = BusinessHours.add(bh.id, startTime, 60 * 60 * 1000L);
本示例查找距离 1 个工作小时的时间 startTime,以 GMT 为单位返回日期时间:
// Get the default business hours
BusinessHours bh = [SELECT Id FROM BusinessHours WHERE IsDefault=true];

// Create Datetime on May 28, 2008 at 1:06:08 AM in local timezone.
Datetime startTime = Datetime.newInstance(2008, 5, 28, 1, 6, 8);

// Find the time it will be one business hour from May 28, 2008, 1:06:08 AM using the
// default business hours.  The returned Datetime will be in GMT.
Datetime nextTimeGmt = BusinessHours.addGmt(bh.id, startTime, 60 * 60 * 1000L);
下一个示例查找 startTime 之间的差异 和 nextTime:
// Get the default business hours
BusinessHours bh = [select id from businesshours where IsDefault=true];

// Create Datetime on May 28, 2008 at 1:06:08 AM in local timezone.
Datetime startTime = Datetime.newInstance(2008, 5, 28, 1, 6, 8);

// Create Datetime on May 28, 2008 at 4:06:08 PM in local timezone.
Datetime endTime = Datetime.newInstance(2008, 5, 28, 16, 6, 8);

// Find the number of business hours milliseconds between startTime and endTime as
// defined by the default business hours.  Will return a negative value if endTime is
// before startTime, 0 if equal, positive value otherwise.
Long diff = BusinessHours.diff(bh.id, startTime, endTime);
public class GetCaseIdController {

   public static void getCaseIdSample() {
        // Get email thread ID
        String emailThreadId = '_00Dxx1gEW._500xxYktg';
        // Call Apex method to retrieve case ID from email thread ID
        ID caseId = Cases.getCaseIdFromEmailThreadId(emailThreadId);

    }
}
trigger maintainTerritoryCount on Territory2 (after insert, after delete) {
    // Track the effective delta for each model
    Map<Id, Integer> modelMap = new Map<Id, Integer>();
    for(Territory2 terr : (Trigger.isInsert ? Trigger.new : Trigger.old)) {
       Integer offset = 0;
       if(modelMap.containsKey(terr.territory2ModelId)) {
           offset = modelMap.get(terr.territory2ModelId);
       }
       offset += (Trigger.isInsert ? 1 : -1);
       modelMap.put(terr.territory2ModelId, offset);
    }
    // We have a custom field on Territory2Model called TerritoryCount__c
    List<Territory2Model> models = [SELECT Id, TerritoryCount__c FROM
                            Territory2Model WHERE Id IN :modelMap.keySet()];
    for(Territory2Model tm : models) {
       // In case the field is not defined with a default of 0
       if(tm.TerritoryCount__c == null) {
           tm.TerritoryCount__c = 0;
       }
       tm.TerritoryCount__c += modelMap.get(tm.Id);
    }
    // Bulk update the field on all the impacted models
    update(models);
}
trigger notifySalesOps on UserTerritory2Association (after insert) {
    // Query the details of the users and territories involved
    List<UserTerritory2Association> utaList = [SELECT Id, User.FirstName, User.LastName,
       Territory2.Name, Territory2.Territory2Model.Name
       FROM UserTerritory2Association WHERE Id IN :Trigger.New];

    // Email message to send
    Messaging.SingleEmailMessage mail = new Messaging.SingleEmailMessage();
    mail.setToAddresses(new String[]{'salesOps@acme.com'});
    mail.setSubject('Users added to territories notification');

    // Build the message body
    List<String> msgBody = new List<String>();
    String addedToTerrStr = '{0}, {1} added to territory {2} in model {3} \n';
    msgBody.add('The following users were added to territories by ' +
        UserInfo.getFirstName() + ', ' + UserInfo.getLastName() + '\n');
    for(UserTerritory2Association uta : utaList) {
       msgBody.add(String.format(addedToTerrStr,
           new String[]{uta.User.FirstName, uta.User.LastName,
                        uta.Territory2.Name, uta.Territory2.Territory2Model.Name}));
    }

    // Set the message body and send the email
    mail.setPlainTextBody(String.join(msgBody,''));
    Messaging.sendEmail(new Messaging.Email[] { mail });
}

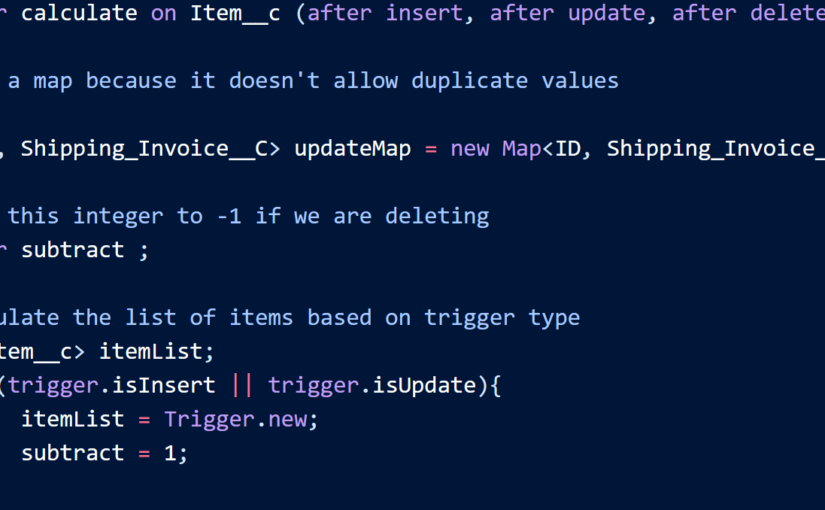
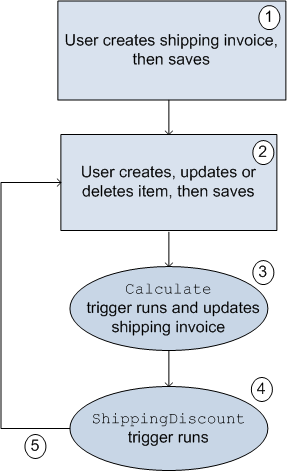
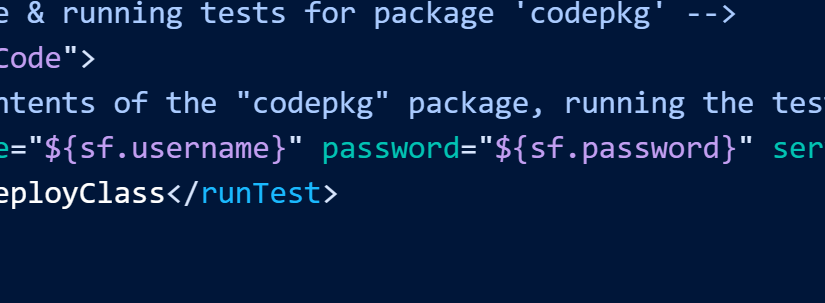
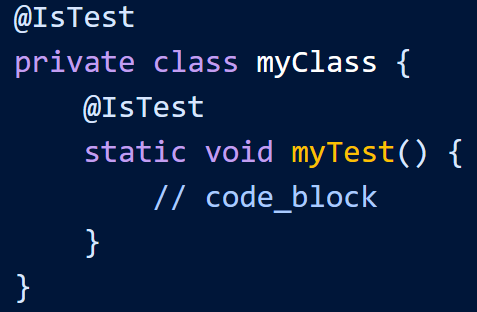
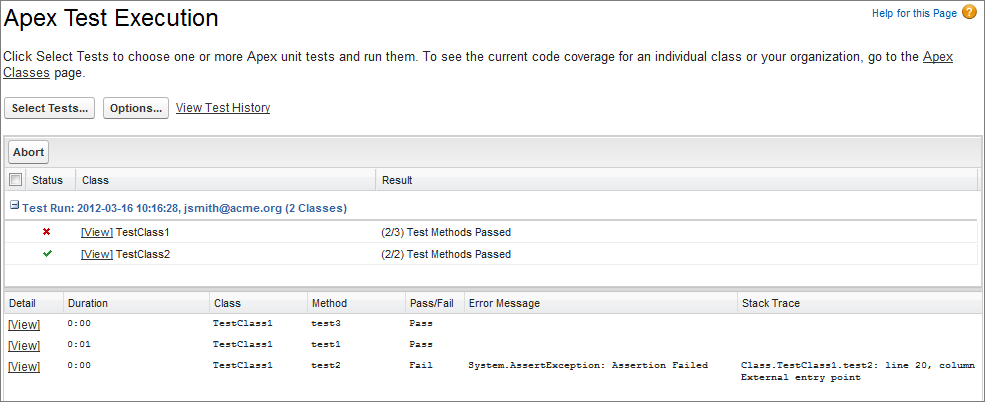
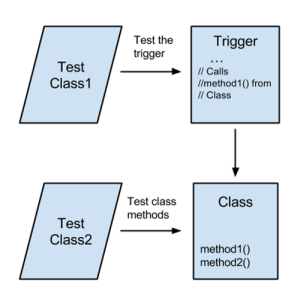
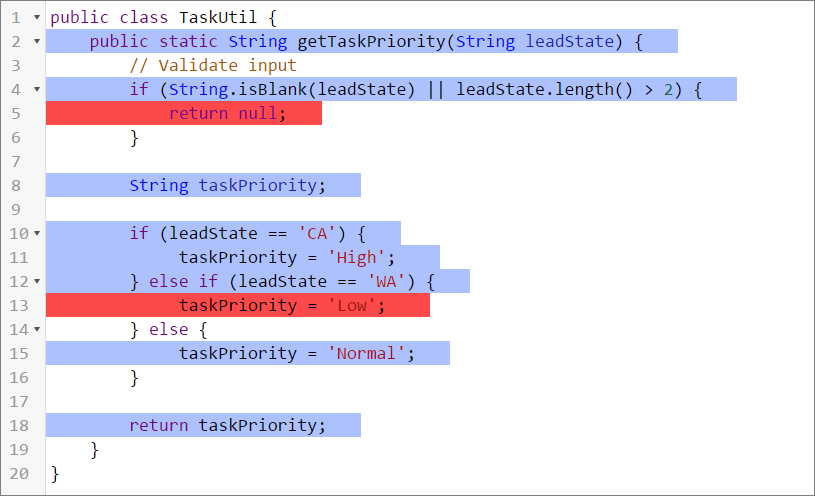
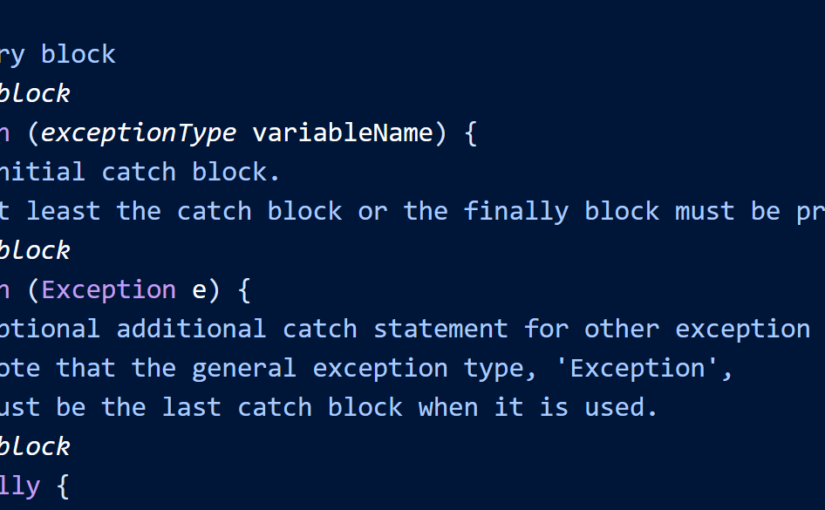
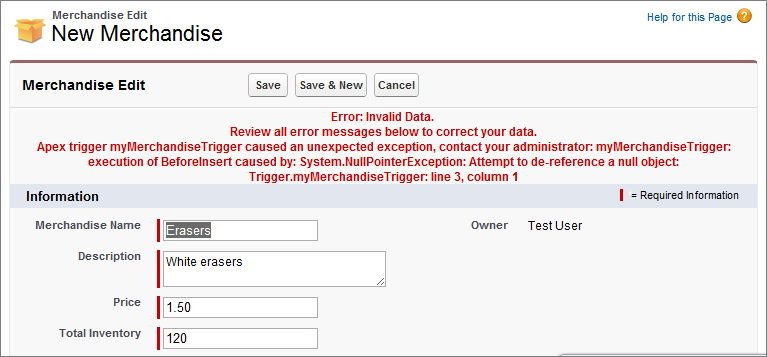
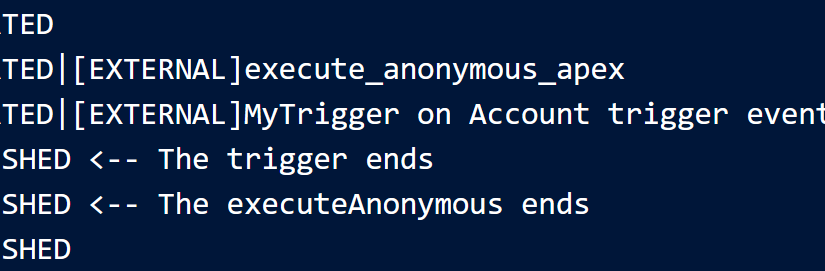
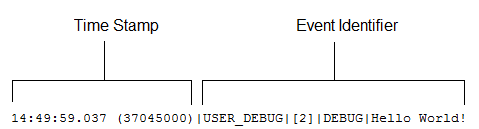
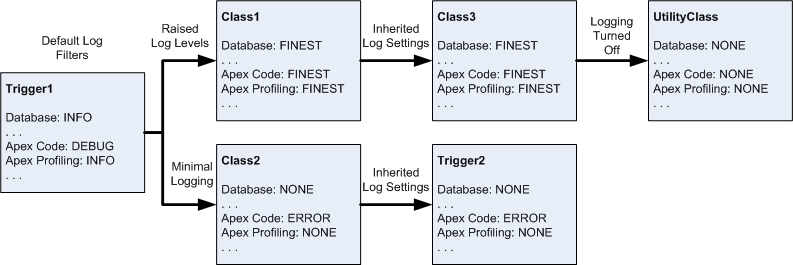 下面是该关系图所基于的伪代码示例。
 当测试到达第 5 行时,将记录以下日志行 法典。