<!-- child.html -->
<template>
<span
>Tabbing to the custom element moves focus to the input, skipping the component itself.</span
>
<br /><input type="text" />
</template>
// coolButton.js
import { LightningElement } from "lwc";
export default class CoolButton extends LightningElement {
static delegatesFocus = true;
}
使用可实现以下情况。delegatesFocus
使用 将焦点添加到本机按钮 HTML 元素。coolButton.focus()
如果单击阴影 DOM 中的某个节点,并且该节点不是可聚焦区域,则第一个可聚焦区域将变为焦点。这类似于单击标签并将焦点跳转到输入时。
当影子 DOM 中的节点获得焦点时,除了焦点元素之外,CSS 选择器还会应用于主机。:focus
注意
不要使用 with,因为它会偏离焦点顺序。tabindexdelegatesFocus
移动就绪组件
Lightning Web 组件支持在桌面和移动设备上使用组件。在桌面上,支持各种 Web 浏览器。在移动设备上,支持的环境包括 Salesforce 分布式移动应用程序。这两种环境之间的差异不仅仅是屏幕尺寸;有新的限制,也有移动端的扩展功能。若要构建在移动体验中表现良好的组件,请遵循我们的移动就绪组件指南。
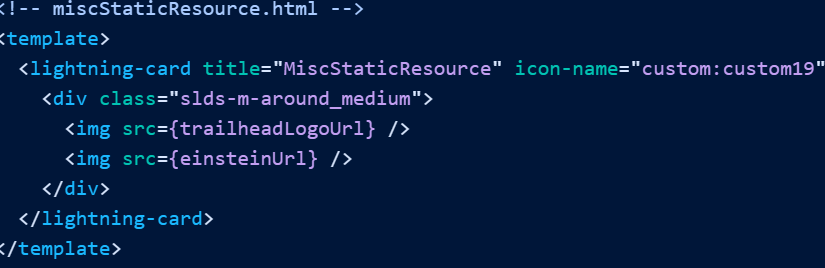
// miscStaticResource.js
import { LightningElement } from "lwc";
import TRAILHEAD_LOGO from "@salesforce/resourceUrl/trailhead_logo";
import TRAILHEAD_CHARACTERS from "@salesforce/resourceUrl/trailhead_characters";
export default class MiscStaticResource extends LightningElement {
// Expose the static resource URL for use in the template
trailheadLogoUrl = TRAILHEAD_LOGO;
// Expose URL of assets included inside an archive file
einsteinUrl = TRAILHEAD_CHARACTERS + "/images/einstein.png";
}
// assetFileExample.js
import { LightningElement } from "lwc";
import SALES_WAVE_LOGO from "@salesforce/contentAssetUrl/SalesWaveLogo";
import PARTNER_LOGOS from "@salesforce/contentAssetUrl/PartnerLogos";
export default class AssetFileExample extends LightningElement {
// Expose the asset file URL for use in the template
salesWaveLogoUrl = SALES_WAVE_LOGO;
// Expose URL of assets included inside an archive file
goldPartnerLogoUrl = PARTNER_LOGOS + "pathinarchive=images/gold_partner.png";
}
// labelExample.js
import { LightningElement } from "lwc";
// Import the URL for the static resource named 'salesforceLogo'
import SALESFORCE_LOGO from "@salesforce/resourceUrl/salesforceLogo";
// Import custom labels
import greeting from "@salesforce/label/c.greeting";
import salesforceLogoDescription from "@salesforce/label/c.salesforceLogoDescription";
export default class LabelExample extends LightningElement {
// Expose the static resource URL to use in the template.
logoUrl = SALESFORCE_LOGO;
// Expose the labels to use in the template.
label = {
greeting,
salesforceLogoDescription,
};
}
若要在模板中使用标签,请使用与引用任何 JavaScript 属性相同的语法。{property}
<!-- labelExample.html -->
<template>
<c-page-header
header="Using static resources and custom labels"
description="This sample shows how to reference external items like static resources and custom labels"
></c-page-header>
<c-card>
<img src={logoUrl} alt={label.salesforceLogoDescription} width="100" /><br />
<br />
{label.greeting}
</c-card>
</template>
// formatDate.js
import { LightningElement } from "lwc";
import LOCALE from "@salesforce/i18n/locale";
export default class FormatDate extends LightningElement {
date = new Date(2020, 6, 7);
formattedDate = new Intl.DateTimeFormat(LOCALE).format(this.date);
}
若要将国际化属性绑定到 HTML 属性,请将它们作为私有属性存储在组件的 JavaScript 文件中。在这里,确定用户的语言并指定文本在 HTML 中的显示方向。langdir
// languageExample.js
import { LightningElement } from "lwc";
import LANG from "@salesforce/i18n/lang";
import DIR from "@salesforce/i18n/dir";
export default class LanguageExample extends LightningElement {
lang = LANG;
dir = DIR;
}
在 HTML 模板中,使用 引用值。{property}
<!-- languageExample.html -->
<template>
<p lang={lang} dir={dir}><!-- Localized text in a paragraph --></p>
</template>
// languagePicker.js
// Sample data: [{ code: 'en-US', label: 'English (US)' },{ code: 'fr', label: 'Françias' }]
import activeLanguages from "@salesforce/site/activeLanguages";
import { LightningElement } from "lwc";
import currentLanguage from "@salesforce/i18n/lang";
import basePath from "@salesforce/community/basePath";
export default class LanguagePicker extends LightningElement {
get options() {
return activeLanguages.map((x) => ({ value: x.code, ...x }));
}
get currentValue() {
return currentLanguage;
}
handleLanguageSelect(evt) {
const selectedLanguageCode = evt.detail.value;
// locale is in base path and needs to be replaced with new locale
const newBasePath = this.updateLocaleInBasePath(
basepath,
currentLanguage,
selectedLanguageCode,
);
const currentUrl = window.location.pathname;
if (currentUrl) {
const restOfUrl = currentUrl.substring(basepath.length);
window.location.href = window.location.origin + newBasePath + restOfUrl;
} else {
// WARNING: this is a current limitation of Lightning Locker in LWR sites
// Locker must be disabled to reference the global window object
console.warn(
"Lightning Locker must be disabled for this language picker component to redirect",
);
}
}
updateLocaleInBasePath(path, oldLocale, newLocale) {
if (path.endsWith("/" + oldLocale)) {
// replace with new locale
return path.replace(new RegExp("/" + oldLocale + "$"), "/" + newLocale);
} else {
// since the default locale is not present in the base path,
// append the new locale
return path + "/" + newLocale;
}
}
}
import hasPermission from "@salesforce/customPermission/PermissionName";
import hasPermission from "@salesforce/customPermission/namespace__PermissionName";
静态引用的名称由您选择。我们选择的格式是指示引用包含布尔值。has{Permission}
此示例检查当前用户是否具有 ViewSetup 标准权限。
// app.js
import { LightningElement } from 'lwc';
import hasViewSetup from '@salesforce/userPermission/ViewSetup';
export default class App extends LightingElement {
get isSetupEnabled() {
return !hasViewSetup;
}
openSetup(e) {...}
}
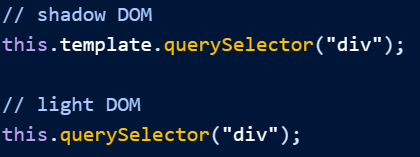
文档对象模型 (DOM) 表示 HTML 页面,以便您可以使用 JavaScript 或标准 DOM API 处理其内容、结构和样式。例如,您可以使用标准 DOM API 访问组件中的元素,无论是否使用模板引用选择器。虽然我们不建议操作 DOM,但某些第三方 JavaScript 库需要接管 DOM。querySelector()
有关 DOM 的更多信息,请参阅 MDN Web 文档:文档对象模型 (DOM)。
访问组件拥有的元素
要访问使用标准 DOM API 的组件呈现的元素,请使用 或 。要在没有选择器的情况下查找 DOM 中的元素,请使用 refs。querySelector()this.templatethis
querySelector()
访问 DOM 中元素的标准方法是使用 .要查找影子 DOM 节点,请使用 或 on 。对于轻量级 DOM 节点,请在 上使用以下方法之一。querySelector()querySelector()querySelectorAll()this.templatethis
// shadow DOM
this.template.querySelector("div");
// light DOM
this.querySelector("div");
注意
您也可以使用 .{element}.template.querySelector
使用这些方法查找组件呈现的元素。
元素的顺序不保证。
未呈现到 DOM 的元素不会在结果中返回。querySelector
不要将 ID 选择器与 一起使用。呈现模板时,在 HTML 模板中定义的 ID 可能会转换为全局唯一值。如果在 JavaScript 中使用 ID 选择器,它将与转换后的 ID 不匹配。querySelector
对于轻量级 DOM 组件,搜索直接模板之外的元素,例如轻量级 DOM 子级。使用更具体的选择器来缩小方法的范围。this.querySelector()
如果组件在启用了 Lightning Locker 的组织中运行,请注意潜在的内存泄漏。如果可能,组织应启用 Lightning Web Security。或者,考虑使用 refs 而不是 .querySelector
// example.js
import { LightningElement } from "lwc";
export default class Example extends LightningElement {
renderedCallback() {
this.template.querySelector("div"); // <div>First</div>
this.template.querySelector("span"); // null
this.template.querySelectorAll("div"); // [<div>First</div>, <div>Second</div>]
}
}
重要
不要使用 或 全局属性来查询 DOM 元素。请参阅 DOM 访问遏制。此外,我们不建议使用 JavaScript 来操作 DOM,除非您通过 lightning/platformResourceLoader 使用第三方库。最好使用 Lightning Web 组件 HTML 指令来编写声明性代码。windowdocument
裁判
Refs 查找没有选择器的 DOM 元素,并且只查询包含在指定模板中的元素。首先,将指令添加到元素中并为其赋值。要调用该引用,请使用 .在此示例中,该元素具有指令 ,该指令引用以访问 at 运行时。lwc:refthis.refs<div>lwc:ref="myDiv"this.refs<div>
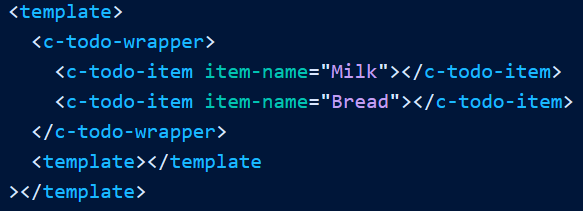
为了理解影子树,让我们看一些标记。此标记包含两个 Lightning Web 组件:和 .文档片段定义了 DOM 和影子树之间的边界。阴影根下方的元素位于阴影树中。c-todo-appc-todo-item#shadow-root
<c-todo-app>
#shadow-root
<div>
<p>Your To Do List</p>
</div>
<c-todo-item>
#shadow-root
<div>
<p>Go to the store</p>
</div>
</c-todo-item>
</c-todo-app>
影子树中的元素无法通过传统的 DOM 查询方法访问。代码无法使用或访问 Lightning Web 组件的影子树。例如,代码无法调用以选择 Lightning Web 组件的影子树中的节点。要访问自己的影子树,Lightning Web 组件会调用 .请参阅组件拥有的 Access 元素。documentdocument.bodydocument.querySelector()this.template.querySelector()访问插槽
插槽是父组件传递到组件主体中的标记的占位符。通过插槽传递给组件的 DOM 元素不归该组件所有,也不在组件的影子树中。要访问通过插槽传递的 DOM 元素,请调用 。该组件不拥有这些元素,因此您不使用 .请参阅将标记传递到槽中。this.querySelector()template测试组件
请参阅 DOM 检查测试可能会发生变化。
提示
观看 Salesforce 开发人员布道师 Alba Rivas 对 Shadow DOM 的解释。
DOM API 接口
不要使用这些 DOM API 访问使用 Lightning Locker 的组织中的组件影子树。如果您使用的第三方 JavaScript 库使用这些 DOM API 访问组件的影子树,请与库作者合作提交并修复问题。
Document.prototype.getElementById
Document.prototype.querySelector
Document.prototype.querySelectorAll
Document.prototype.getElementsByClassName
Document.prototype.getElementsByTagName
Document.prototype.getElementsByTagNameNS
Document.prototype.getElementsByName
document.body.querySelector
document.body.querySelectorAll
document.body.getElementsByClassName
document.body.getElementsByTagName
document.body.getElementsByTagNameNS
Lightning Locker 通过阻止这些 API 来防止您破坏 Lightning Web 组件之间的影子 DOM 封装。但是,在 Aura 组件版本 39.0 及更早版本中,Lightning Locker 在组件级别被禁用,因此 Aura 组件的代码可能会失败。
这些 API 不受 Lightning Web Security (LWS) 的限制。LWS 通过对所有组件的 ShadowRoot 属性强制执行值来防止破坏影子 DOM 封装。closedmode
重要
Shadow DOM polyfill 包含接口的补丁。如果您习惯于监视 DOM 树中的更改,请断开它,否则将造成内存泄漏。请注意,组件只能在其自己的模板中观察到突变。它无法观察到其他自定义元素的影子树中的突变。MutationObserverMutationObserver
轻量级 DOM
Lightning Web 组件目前在每个组件上强制执行影子 DOM,封装组件的内部标记,并使编程代码无法访问它。当您使用轻量级 DOM 时,您的组件位于影子 DOM 之外,并避免了影子 DOM 限制。这种方法简化了第三方集成和全局样式设置。
在深入探讨轻量级 DOM 的细节之前,让我们先看看不同的 DOM 结构是如何在 DOM 中呈现的。首先,考虑影子树的一些标记。原生影子 DOM 在标签中呈现组件。但是,Lightning Experience 和 Experience Cloud 改用合成阴影,这模仿了本机阴影行为。#shadow-root
使用轻量级 DOM 时,组件内容将附加到主机元素,而不是其影子树。然后,可以像文档宿主中的任何其他内容一样访问它,从而提供与不受影子 DOM 约束的内容类似的行为。
在基于 Aura 的 Experience Builder 站点中,Lightning Locker 会阻止 DOM 访问和其他 Web API。如果您在基于 Aura 的 Experience Cloud 站点中使用轻量级 DOM,请确保至少有一个 LWC 阴影 DOM 组件作为轻量级 DOM 组件的祖先。使用影子 DOM 组件意味着封装组件的内部标记,并受到影子 DOM 限制的约束。this.querySelector()
注意
从 23 年冬季开始,如果在组织中启用了 Lightning Web Security (LWS),则 Aura 站点中包含的任何 Lightning Web 组件都将受到 LWS 而不是 Lightning Locker 的保护。如果为站点禁用 Lightning Locker,则也会禁用 Lightning Web Security。
比较 Light DOM 和 Shadow DOM
由于其强大的封装性,shadow DOM 是创作组件的推荐方法。它隐藏了组件的内部结构,因此使用者只能使用其公共 API。
Shadow DOM 不适用于以下情况。
构建高度可自定义的 UI,在其中完全控制 Web 应用的外观。
使用第三方库。许多流行的库与影子 DOM 不兼容。
在这些情况下,Light DOM 更适合,但请注意,消费者可以像使用公共 API 一样访问组件的内部。允许此类访问使得在不影响使用者代码的情况下实现更改变得具有挑战性。
以下是使用一个而不是另一个的利弊。
影子 DOM
轻量级 DOM
安全
强大的组件封装可保护组件免受未经授权的访问
弱封装使组件容易受到未经授权的访问
可移植性
高度可移植,通过公共 API 进行访问控制
容易受到组件作者或使用者导致的重大更改的影响
造型
需要 CSS 自定义属性来覆盖样式
易于覆盖样式
第三方库和工具集成
与需要 DOM 遍历或事件重定向的第三方库或工具的兼容性有限
与第三方库和工具的简单集成
使用第三方库(例如 Google Analytics 或其他检测库)时,如果您的影子 DOM 组件公开了正确的 API,则不必使用轻量级 DOM。假设您要检测按钮上的点击交互:
<!-- myButton.html example -->
<template>
<button>{label}</button>
</template>
使用 light DOM,您可以在元素上附加单击事件侦听器。如果在阴影 DOM 中渲染组件,则无法从组件外部访问该元素。使用影子 DOM,成为组件的内部实现细节。在这种情况下,检测此组件的正确方法是在其自身上添加一个单击处理程序来检测它。buttonbutton<button>my-buttonmy-button
<!-- myComponent.html example -->
<template>
<my-button label="click me" onclick={handleClick}></my-button>
</template>
使用影子 DOM 时,在父组件中定义的 CSS 样式不适用于子组件。相比之下,轻量级 DOM 允许从根文档设置样式以针对 DOM 节点并设置其样式。
以下本机阴影组件上的样式级联到子组件的浅色 DOM 中。在这种情况下,light DOM 组件位于原生阴影组件中,并挂载在最近的原生阴影根级别,该根级别在本地作用域为整个阴影根,并影响该根内的任何轻量级 DOM 组件。
<template>
<my-app>
#shadow-root
| <style> p { color: green; }</style>
| <p>This is a paragraph in shadow DOM</p>
| <my-container>
| <p>This is a paragraph in light DOM</p>
| </my-container>
</my-app>
</template>
同样,在轻量级 DOM 中呈现的子组件上的样式将应用于其父组件,直到在使用本机阴影 DOM 时遇到阴影边界。
对于合成阴影 DOM,阴影 DOM 样式不会级联到轻量级 DOM 子组件中。
注意
在合成影子 DOM 中,样式是在全局文档级别实现的,但使用属性来限定样式的范围。这是合成影子 DOM 的当前限制。
LWC 不会自动为您确定样式范围。为了防止样式从组件中级联出来,我们建议对文件使用作用域样式。请参阅在 Light DOM 中使用作用域样式部分。*.scoped.css
要覆盖 Lightning Web 组件中继承的样式,请在组件样式表中创建 SLDS 样式挂钩。样式挂钩充当自定义样式的占位符。有关支持样式挂钩的组件蓝图列表,请参阅蓝图概述。
提示
轻量级 DOM 组件的渲染顺序会影响样式表注入根节点的顺序,并直接影响 CSS 规则的特异性。
访问元素
在影子 DOM 中,您只能访问组件拥有的元素。
相比之下,您可以从轻量级 DOM 组件中检索节点,这对第三方集成和测试很有帮助。例如,您可以使用 查询应用中的段落。document.querySelector('p')
<!-- lightSlotContainer.html -->
<template lwc:render-mode="light">
<slot name="other">
<p>Hello from other slot</p>
</slot>
<slot>This is the default slot</slot>
</template>
如果在 中包含样式,则插槽中的所有元素(在阴影 DOM 和浅色 DOM 组件中)都会获得样式。但是,没有插槽的影子 DOM 组件不会接收样式。c-app
<c-app>
<style type="text/css">
p {
background: green;
color: white;
}
</style>
<h2>Hello Light DOM</h2>
<p>This is a paragraph in app.html</p>
<h3>Shadow DOM</h3>
<c-shadow-component>
#shadow-root (open)
| <p>Hello, Shadow DOM container</p>
</c-shadow-component>
<h3>Slots</h3>
<c-light-slot-consumer>
<c-shadow-slot-container>
#shadow-root (open)
| <p>Hello from shadow-slot-container</p>
</c-shadow-slot-container>
<c-light-slot-container>
<p>Hello from other slot</p>
<p>Hello from light-slot-container</p>
</c-light-slot-container>
</c-light-slot-consumer>
</c-app>
考虑使用插槽的这些组合模型。轻量级 DOM 中的组件可以插入内容和其他组件。插槽支持轻量级 DOM 和阴影 DOM 组件。
<template>
<slot name="content">Default content in the named slot</slot>
<p>This makes the component a bit more complex</p>
<slot>This is a default slot to test if content bypasses the named slot and goes here</slot>
</template>
以下是您的内容在插槽中的呈现方式。
<my-component>
<!-- Inserted into the content slot -->
<div slot="content">Some text here</div>
</my-component>
<my-component>
<!-- Inserted into the content slot -->
<my-shadow-lwc slot="content">Some text here</my-shadow-lwc>
</my-component>
<my-component>
<!-- Inserted into the content slot -->
<my-light-lwc slot="content">Some text here</my-light-lwc>
</my-component>
<my-component>
<!-- Inserted into the default slot -->
<my-shadow-lwc>Some text here</my-shadow-lwc>
</my-component>
<my-component>
<!-- Inserted into the default slot -->
<my-light-lwc>Some text here</my-light-lwc>
</my-component>
注意
不支持事件和 CSS 伪选择器,因为 slot 元素不会在 DOM 中呈现。slotchange::slotted
Light DOM 不会渲染未分配给插槽的插槽元素,因此永远不会调用它们的生命周期钩子。
<!-- c-parent -->
<template>
<c-child>
<span>This element is not rendered in light DOM</span>
</c-child>
</template>
<!-- c-child -->
<template>
<p>This component does not include a slot</p>
</template>
作用域插槽
使用作用域槽,您可以访问子组件中的数据,并在父组件内的槽内容中呈现数据。通过将数据从子组件绑定到作用域内插槽,父组件可以在插槽内容中引用子组件的数据。此数据入子组件的轻量级 DOM 中。
<template>
<c-child>
<template lwc:slot-data="defaultdata"> <!-- This is a default slot -->
<p>{defaultdata.title}</p>
</template>
<template slot="slotname1" lwc:slot-data="slot1data"> <!-- This is a named slot -->
<p>{slot1data.title}</p>
</template>
<template slot="slotname2" lwc:slot-data="slot2data"> <!-- This is a named slot -->
<p>{slot2data.title}</p>
</template>
</c-child>
</template
<template lwc:render-mode="light">
<!-- This is a default slot -->
<slot lwc:slot-bind={slotdata}></slot>
<!-- This is a named slot -->
<slot name="slotname1" lwc:slot-bind={slotdata}></slot>
<!-- This is a named slot -->
<slot name="slotname2" lwc:slot-bind={slotdata}></slot>
</template>
<template>
<c-table data={data}>
<template lwc:slot-data="row">
<c-row row={row}> <!-- This is rendered for every row in the table -->
<template lwc:slot-data="column">
<span> <!-- This is rendered for every column in the row -->
Coordinates: {row.number} - {column.number} <!-- This can refer to both `row` and `column` -->
</span>
</template>
</c-row>
<template>
</c-table>
</template>
Scoped slots can reference component bindings and scope bindings.
<template>
{title}
<c-list>
<template lwc:slot-data="item">
<div>{label}</div>
<!-- label is a component binding that’s repeated in every row of the list -->
<span>{item.id} - {item.name}</span>
</template>
</c-list>
</template>
在 Light DOM 中使用作用域样式
在轻量级 DOM 中,您可以使用作用域样式仅将 CSS 应用于组件上的元素。此行为类似于使用影子 DOM 进行样式封装。
/* lightCmp.css */
p {
background: yellow;
color: #777;
}
在这种情况下,使用作用域样式,但无作用域样式表中的样式可能会从组件中渗出。c-light-cmp
<!-- c-app -->
<template>
<!-- This paragraph is styled yellow from lightCmp.css -->
<p>This is a paragraph in c-app shadow DOM</p>
<c-light-cmp></c-light-cmp>
</template>
在设置为启用混合影子模式之前,我们建议检查子树中的所有组件是否都与本机影子 DOM 兼容。例如,不能在本机影子 DOM 子树中使用属性选择器,因为该选择器仅在合成影子 DOM 中起作用。相反,请查看您的浏览器是否支持本机影子 DOM 中的伪类。 或者,您可以从叶组件开始,然后沿着组件树向上移动,以确保混合阴影模式按预期工作。shadowSupportModeany[dir=""]:dir()
class Parent extends LightningElement {
myColor = "red";
}
class Child extends LightningElement {
@api color;
get myStyle() {
return `color: ${this.color}`;
}
}
子组件中显示的颜色由父组件确定。
<!-- c-parent -->
<template>
<c-child color={myColor}></c-child>
</template>
<!-- c-child -->
<template>
<h1 style={myStyle}>My color is determined by my parent</h1>
</template>
或者,如果不需要对组件进行封装,请考虑迁移组件以改用轻量级 DOM。
可及性
使用合成阴影,您可以通过在父组件和子组件中动态设置属性来创建跨阴影边界的引用。使用原生阴影时,您不能执行相同的操作,因为元素 ID 的范围限定为特定组件。
我们推荐以下选项。
如果一个元素引用了另一个元素的 ID,请将两者放在同一个组件中。
如果使用 ,则使用 在元素之间复制字符串。aria-labelledbyaria-label
或者,如果您使用的是不需要封装的组件,请考虑使用轻量级 DOM。例如,在同一个影子 DOM 父组件中,有两个轻量级 DOM 组件作为同级组件,并且 ID 在同级组件之间共享。
使用合成影子,如果事件源自子树中的非 LWC 组件,侦听器可以处理根 LWC 节点之外的非组合事件。但是,影子 DOM 不支持此行为。
基本 Lightning 组件
混合阴影模式目前不支持基本组件。Salesforce 正在按照 Web 组件标准为本机影子 DOM 准备基本组件。随着我们努力实现未来对混合影子模式和原生影子 DOM 的支持,基本组件的内部结构会不断变化。 目前,当基本组件放置在本机阴影组件中时,可能无法显示正确的样式;原生阴影渲染所有子组件,而不渲染合成阴影。
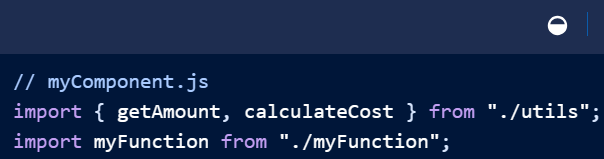
// someComponent.js
// This import is valid
import { getSomething } from "c/utils";
所有这些导入都失败:
// someComponent.js
// These imports are invalid
import { getSomething } from "c/utils/utils.js";
import { getSomething } from "c/utils/other.js";
import { getSomething } from "c/utils/utils";
检查以下常见违规行为:声明一个变为全局变量的变量严格模式不允许变量成为全局变量。为避免违反此规则,请在库中显式地将库全局附加到 。windowwindow.myLib = (function () { return { myFunction: function (a, b) { return a * b; }, }; })();CSP 违规扫描代码以查找 、 或 标记的任何用法。eval()new Function()<script>DOM 访问冲突如果库尝试对 DOM 进行广泛扫描,而不是仅操作传递给其 API 的元素,则它们将被阻止。如果库操作 DOM,则可以将该指令添加到本机 HTML 元素以允许它,如使用第三方 JavaScript库中所述。lwc:dom="manual"使用非标准或不受支持的 DOM API请参阅在 Locker API 查看器中标记为“支持”和“不支持”的 API。
使用 Lightning 数据服务 (LDS) 处理 Salesforce 记录的数据和元数据。Lightning Data Service 建立在公共用户界面 API 之上,但它仅支持 API 的一个子集。该子集涵盖了许多处理数据的典型用例。您无法从 JavaScript代码调用除 LDS 之外的 Salesforce API。
import { LightningElement } from "lwc";
export default class extends LightningElement {
componentConstructor;
// Use connectedCallback() on the dynamic component
// to signal when it's attached to the DOM
connectedCallback() {
import("c/concreteComponent")
.then(({ default: ctor }) => (this.componentConstructor = ctor))
.catch((err) => console.log("Error importing component"));
}
}
import { LightningElement } from "lwc";
export default class extends LightningElement {
componentConstructor;
connectedCallback() {
import("lightning/concreteComponent")
.then(({ default: ctor }) => (this.componentConstructor = ctor))
.catch((err) => console.log("Error importing component"));
}
renderedCallback() {
// this.refs.myCmp will be available on the next rendering cycle after the constructor is set
if (this.refs.myCmp) {
// this.refs.myCmp will contain a reference to the DOM node
console.log(this.refs.myCmp);
}
}
}
分配属性和模板指令
所有可应用于 的受支持的 HTML 属性也可以应用于 。HTMLElementlwc:component
一些例子包括:
标准全局 HTML 属性
自定义 HTML 属性,例如data-*
事件侦听器
动态组件的行为类似于标准的 Lightning Web 组件。 支持 HTML 元素的指令,但 .lwc:componentlwc:external
子元素
您可以在动态组件上包含子元素。 首先呈现动态组件,然后呈现其子组件。每次动态组件更改时,都会从 DOM 中删除现有元素及其所有子元素。然后,新的动态组件将与其子组件一起呈现。<lwc:component>
在这些特定情况下,[lwc’ 还使元素能够接受在运行时绑定为属性的对象。lwc:spread directive](../create/create-components-spread-properties.md) can be used to dynamically set to dynamic component properties at runtime.
通过使用 注释属性,使属性公开。@api
// dynamicCmp.js
import { LightningElement, api } from "lwc";
export default class extends LightningElement {
@api city;
@api state;
}
// 👎 DON'T USE THIS
// Example with component name as prop:
import { LightningElement, api } from "lwc";
export default class Field extends LightningElement {
rendererCtor;
_renderer;
@api
get renderer() {
return this._renderer;
}
set renderer(val) {
this._renderer = val;
import(val).then(({ default: rendererCtor }) => {
this.rendererCtor = rendererCtor;
});
}
}
// 👍 USE THIS
// Example with component constructor as prop:
import { LightningElement, api } from "lwc";
export default class Field extends LightningElement {
@api rendererCtor;
}
在其标记中使用组件的所有者组件可以通过 DOM 属性访问组件的公共属性。DOM 属性是在类中声明的公共字段。它们可以通过带有点表示法的 DOM 元素访问。在此示例中,该组件将一个公共字段声明为 ,其值可通过 (DOM 元素)实例上的 DOM 属性访问。c-todo-item@api itemNamec-todo-item
import { LightningElement } from "lwc";
export default class ReactivityExample extends LightningElement {
bool = true;
number = 42;
obj = { name: "John" };
checkMutation() {
this.bool = false; // Mutation detected
this.number = 42; // No mutation detected: previous value is equal to the newly assigned value
this.number = 43; // Mutation detected
this.obj.name = "Bob"; // No mutation detect: `obj` field value is not reassigned
this.obj = { name: "John" }; // Mutation detected - redefining the object with the same value creates a new object
this.obj = { ...this.obj, title: "CEO" }; // Mutation detected
}
}
单击“初始化”按钮时,将观察到更改并重新呈现模板。Lightning Web Components 观察到它指向一个新对象。但是,单击“更新”时,不会重新呈现模板。Lightning Web 组件不会观察到对象值的变化。xDateDate
若要确保在值更改时重新呈现模板,请克隆现有日期并更新其值。
updateDate() {
const cloned = new Date(this.x.getTime());
cloned.setHours(7);
// Assign the new date instance to rerender the component.
this.x = cloned;
}
使用 JavaScript getter in 返回 的值。parent.js{computedValue}
将 JavaScript 属性反映为 HTML 属性
您可以控制公共 JavaScript 属性是否在 Lightning Web 组件的渲染 HTML 中显示为属性。在创建可访问的组件时,允许属性显示为属性尤为重要,因为屏幕阅读器和其他辅助技术使用 HTML 属性。
默认情况下,所有 HTML 属性都是响应式的。当组件 HTML 中的属性值发生更改时,将重新呈现该组件。
当您通过将某个属性公开为公共属性来控制该属性时,默认情况下,该属性将不再显示在 HTML 输出中。若要将值作为属性传递到呈现的 HTML(以反映属性),请为属性定义 getter 和 setter 并调用该方法。setAttribute()
您还可以在 setter 中执行操作。使用字段保存计算值。
此示例公开为公共属性。它将标题转换为大写,并使用该属性来保存标题的计算值。setter 调用以将属性的值反映到 HTML 属性。title_privateTitlesetAttribute()
// myComponent.js
import { LightningElement, api } from "lwc";
export default class MyComponent extends LightningElement {
_privateTitle;
@api
get title() {
return this._privateTitle;
}
set title(value) {
this._privateTitle = value.toUpperCase();
this.setAttribute("title", this._privateTitle);
}
}
/* parent.html */
<template>
<c-my-component title="Hover Over the Component to See Me"></c-my-component>
</template>
/* Generated HTML */
<c-my-component title="HOVER OVER THE COMPONENT TO SEE ME">
  <div>Reflecting Attributes Example</div>
</c-my-component>
要确保您了解 JavaScript 属性如何反映到 HTML 属性,请查看不调用 .生成的 HTML 不包含该属性。setAttribute()title
// myComponent.js
import { LightningElement, api } from "lwc";
export default class MyComponent extends LightningElement {
_privateTitle;
@api
get title() {
return this._privateTitle;
}
set title(value) {
this._privateTitle = value.toUpperCase();
// this.setAttribute('title', this._privateTitle);
}
}
/* parent.html */
<template>
<c-my-component title="Hover Over the Component to See Me"></c-my-component>
</template>
/* Generated HTML */
<c-my-component>
<div>Reflecting Attributes Example</div>
</c-my-component>
在设置值之前,请检查使用者是否已经设置了该值。
// myComponent.js
import { LightningElement } from "lwc";
export default class MyComponent extends LightningElement {
connectedCallback() {
const tabindex = this.getAttribute("tabindex");
// Set the tabindex to 0 if it hasn’t been set by the consumer.
if (!tabindex) {
this.setAttribute("tabindex", "0");
}
}
}
在此标记中设置 using 结果。tabindexthis.setAttribute()
<c-my-component tabindex="0"></c-my-component>
要设置这些属性,请使用 .setAttribute()
for
aria-activedescendant
aria-controls
aria-describedby
aria-details
aria-errormessage
aria-flowto
aria-labelledby
aria-owns
要从呈现的 HTML 中隐藏 HTML 属性,请调用 .removeAttribute()
管理 Getter 中的属性依赖关系
HTML 中的属性变成了 JavaScript 中的属性赋值。在这两种情况下,都不能保证分配顺序。要检查是否存在其他属性,请使用 getter。
export default class Datatable extends LightningElement {
@track state = {};
@api
get rows() {
return this.state.rows;
}
set rows(value) {
this.state.rows = value;
// Check to see if the rows have
// been marked as selected.
if (this.state.selectedRows && !this.selectedRowsSet) {
this.markSelectedRows();
this.selectedRowsSet = true;
}
}
@api
set selectedRows(value) {
this.state.selectedRows = value;
// If rows haven’t been set,
// then we can't mark anything
// as selected.
if (!this.state.rows) {
this.selectedRowsSet = false;
return;
}
this.markSelectedRows();
}
get selectedRows() {
return this.state.selectedRows;
}
markSelectedRows() {
// Mark selected rows.
}
}
使用 getter 和 setter 可确保公共 API 协定易于执行。组件不应更改用 批注的属性的值。@api
该组件无法更改对象或数组的内容。当您尝试更新原始对象值时,会引发错误,因为子组件正在尝试改变对象上的属性。Uncaught Error: Invalid mutation: Cannot set "msg" on "[object Object]". "[object Object]" is read-only.
// child.js
import { LightningElement, api } from "lwc";
export default class Child extends LightningElement {
@api obj;
get serializedObj() {
return JSON.stringify(this.obj);
}
updateOriginal() {
this.obj.msg += "!!!"; // throws an invalid mutation error
}
updateShallow() {
this.obj = { ...this.obj, msg: this.obj.msg + "!" };
}
}
传递给组件的非基元值(如对象或数组)是只读的。该组件无法更改对象或数组的内容。如果组件尝试更改内容,您会在浏览器控制台中看到错误:Uncaught Error: Invalid mutation: Cannot set "msg" on "[object Object]". "[object Object]" is read-only.
// videoPlayer.js
import { LightningElement, api } from "lwc";
export default class VideoPlayer extends LightningElement {
@api videoUrl;
@api
get isPlaying() {
const player = this.template.querySelector("video");
return player !== null && player.paused === false;
}
@api
play() {
const player = this.template.querySelector("video");
// the player might not be in the DOM just yet
if (player) {
player.play();
}
}
@api
pause() {
const player = this.template.querySelector("video");
if (player) {
// the player might not be in the DOM just yet
player.pause();
}
}
// private getter for computed value
get videoType() {
return "video/" + this.videoUrl.split(".").pop();
}
}
videoUrl是公共财产。装饰器可用于在组件上定义公共属性和公共 JavaScript 方法。公共属性是组件公共 API 的另一部分。@api
但是,传递到插槽中的 DOM 元素不是组件影子树的一部分。要访问通过插槽传递的元素,组件将调用 和 .this.querySelector()this.querySelectorAll()
此示例演示如何将 DOM 元素从子组件的上下文传递给子组件。为 和 提供选择器名称,例如元素。this.querySelector()this.querySelectorAll()
// namedSlots.js
import { LightningElement } from "lwc";
export default class NamedSlots extends LightningElement {
renderedCallback() {
this.querySelector("span"); // <span>push the green button.</span>
this.querySelectorAll("span"); // [<span>push the green button</span>, <span>push the red button</span>]
}
}
在此示例中,接受元素 .querySelectorspan
注意
不要将 传递给查询方法,例如 。呈现 HTML 模板时,可以将值转换为全局唯一值。如果在 JavaScript 中使用选择器,则它与转换后的 .idquerySelectorididid
// buttonGroup.js
handleSlotChange(event) {
const slot = event.target;
const children = slot.assignedElements() || [];
// Loop through each child and
// set the order value based on position in the group
this.updateGroupOrder(children); }
/* Don’t do this */
button.button {
...;
}
.card > * {
...;
}
.button {
margin-bottom: 18px !important;
}
body.container > div.sidebar > article.card {
...;
}
从基础组件创建自定义组件
要构建 Lightning Web 组件,请通过将较小的基本组件组合成一个更复杂的自定义组件来组合它。尝试从按钮和媒体对象等组件构建您的设计。使用实用程序(例如网格和间距类)进行布局。当您向组件添加新功能时,请在 Lightning Design System 中搜索有效的模式,并将这些类应用于模板。lightning
import { LightningElement, api } from "lwc";
export default class ScopedNotification extends LightningElement {
@api message = "It looks as if duplicates exist ...";
}
使用通用 CSS 模块为 Lightning Web 组件创建一致的外观。在 CSS 模块中定义样式,并将该模块导入到要共享样式的组件中。
您可以导入一个或多个 CSS 模块。导入的样式规则将应用于模板,就像未导入的样式规则一样。Lightning Web 组件支持 CSS 级联算法。
/* myComponent.css */
/* Syntax */
@import "namespace/moduleName";
/* Example */
@import "c/cssLibrary";
/* Note: Lightning web components can access modules only from the c and lightning namespaces
under Lightning Locker. If Lightning Web Security is enabled, Lightning web components
can access modules from other namespaces. */
在 Lightning Web 组件的 CSS 文件中,导入 CSS 模块。myComponent ├──myComponent.html ├──myComponent.js ├──myComponent.js-meta.xml └──myComponent.css/* myComponent.css */ @import "c/cssLibrary"; /* Define other style rules for myComponent here */
导入的样式规则将应用于模板,就像未导入的样式规则一样。所有样式规则级联。在模板中,标记中的文本使用 中定义的样式。myComponent.html<h1>xx-largecssLibrary.css<!-- myComponent.html --> <template> <h1>Words to the Wise</h1> <p>An apple a day keeps the doctor away.</p> </template>
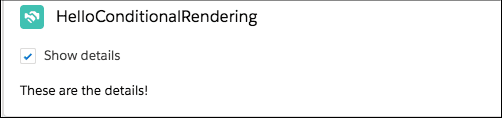
让我们看另一个例子。此模板包含一个标记为“显示详细信息”的复选框。当用户选中或取消选中该复选框时,该函数将设置属性的值。如果属性为 ,则该指令将呈现嵌套模板,该模板显示 These are the details!。handleChangeareDetailsVisibleareDetailsVisibletruelwc:if
使用 Lightning Web 组件 (LWC) 框架在 Salesforce 平台上构建自定义用户界面、Web 和移动应用程序以及数字体验。Lightning Web 组件是使用 HTML 和 JavaScript 构建的自定义 HTML 元素。
Salesforce 提供基于 Lightning Design System 构建的基本 Lightning Web 组件,用作自定义体验的构建块。使用基本的 Lightning Web 组件为您的用户提供一致的外观,并简化您的开发体验。Salesforce Lightning Experience 基于 Lightning Design System 和基础 Lightning 组件构建。
提示
首先,请选择适合您的路径。
开始编码:创建您的第一个组件
设置开发环境
探索 Trailhead 和示例代码
了解如何使用 Salesforce 数据
了解如何自定义 Salesforce 功能
编写标准的 JavaScript 和 HTML
Lightning Web 组件使用核心 Web 组件标准,并且仅提供在 Salesforce 支持的浏览器中正常运行所需的内容。由于 Lightning Web 组件基于在浏览器中本地运行的代码构建,因此它是轻量级的,可提供卓越的性能。您编写的大多数代码都是标准的 JavaScript 和 HTML。
运行时环境也跟不上 SLDS 版本。我们在 See Improved Color Contrast in UI Elements Winter ’24 发行说明中宣布的 Web 内容辅助功能指南 (WCAG) 颜色更新未反映在示例中。但是,您在自定义组件中使用并在 Salesforce 组织中运行的基本 Lightning 组件确实包含基本组件和 SLDS 的最新功能。
Lightning Web Security 控制台和 LWS 失真查看器工具
Lightning Web Security 控制台和 LWS 失真查看器可帮助您开发与 Lightning Web Security 一起运行的安全 JavaScript 代码。
有关使用这些工具的更多信息,请参阅在 Lightning Web Security 控制台中评估 JavaScript 和在 LWS 失真查看器中查找失真详细信息。
有关 Lightning Web Security 及其与 Lightning Locker 的比较的更多信息,请参阅 Lightning Web Security。
Locker 控制台和 Locker API 查看器工具
Locker 控制台和 Locker API 查看器可帮助您开发与 Lightning Locker 兼容并高效运行的安全 JavaScript 代码。
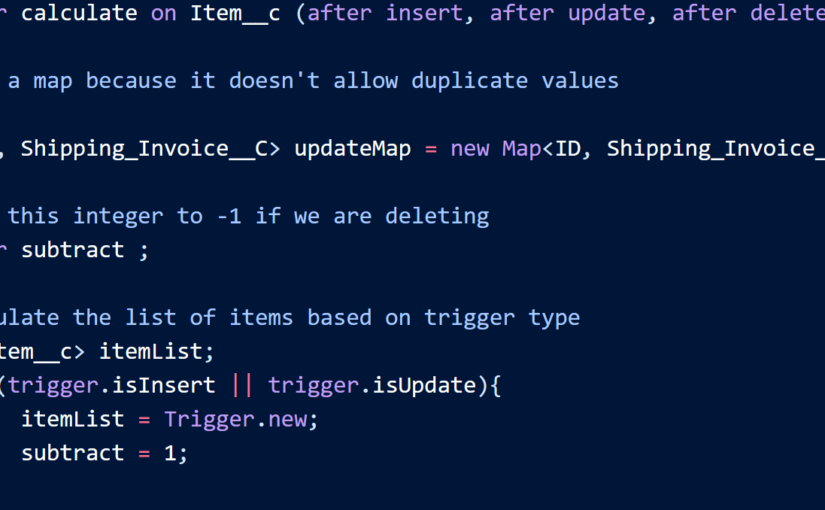
trigger calculate on Item__c (after insert, after update, after delete) {
// Use a map because it doesn't allow duplicate values
Map<ID, Shipping_Invoice__C> updateMap = new Map<ID, Shipping_Invoice__C>();
// Set this integer to -1 if we are deleting
Integer subtract ;
// Populate the list of items based on trigger type
List<Item__c> itemList;
if(trigger.isInsert || trigger.isUpdate){
itemList = Trigger.new;
subtract = 1;
}
else if(trigger.isDelete)
{
// Note -- there is no trigger.new in delete
itemList = trigger.old;
subtract = -1;
}
// Access all the information we need in a single query
// rather than querying when we need it.
// This is a best practice for bulkifying requests
set<Id> AllItems = new set<id>();
for(item__c i :itemList){
// Assert numbers are not negative.
// None of the fields would make sense with a negative value
System.assert(i.quantity__c > 0, 'Quantity must be positive');
System.assert(i.weight__c >= 0, 'Weight must be non-negative');
System.assert(i.price__c >= 0, 'Price must be non-negative');
// If there is a duplicate Id, it won't get added to a set
AllItems.add(i.Shipping_Invoice__C);
}
// Accessing all shipping invoices associated with the items in the trigger
List<Shipping_Invoice__C> AllShippingInvoices = [SELECT Id, ShippingDiscount__c,
SubTotal__c, TotalWeight__c, Tax__c, GrandTotal__c
FROM Shipping_Invoice__C WHERE Id IN :AllItems];
// Take the list we just populated and put it into a Map.
// This will make it easier to look up a shipping invoice
// because you must iterate a list, but you can use lookup for a map,
Map<ID, Shipping_Invoice__C> SIMap = new Map<ID, Shipping_Invoice__C>();
for(Shipping_Invoice__C sc : AllShippingInvoices)
{
SIMap.put(sc.id, sc);
}
// Process the list of items
if(Trigger.isUpdate)
{
// Treat updates like a removal of the old item and addition of the
// revised item rather than figuring out the differences of each field
// and acting accordingly.
// Note updates have both trigger.new and trigger.old
for(Integer x = 0; x < Trigger.old.size(); x++)
{
Shipping_Invoice__C myOrder;
myOrder = SIMap.get(trigger.old[x].Shipping_Invoice__C);
// Decrement the previous value from the subtotal and weight.
myOrder.SubTotal__c -= (trigger.old[x].price__c *
trigger.old[x].quantity__c);
myOrder.TotalWeight__c -= (trigger.old[x].weight__c *
trigger.old[x].quantity__c);
// Increment the new subtotal and weight.
myOrder.SubTotal__c += (trigger.new[x].price__c *
trigger.new[x].quantity__c);
myOrder.TotalWeight__c += (trigger.new[x].weight__c *
trigger.new[x].quantity__c);
}
for(Shipping_Invoice__C myOrder : AllShippingInvoices)
{
// Set tax rate to 9.25% Please note, this is a simple example.
// Generally, you would never hard code values.
// Leveraging Custom Settings for tax rates is a best practice.
// See Custom Settings in the Apex Developer Guide
// for more information.
myOrder.Tax__c = myOrder.Subtotal__c * .0925;
// Reset the shipping discount
myOrder.ShippingDiscount__c = 0;
// Set shipping rate to 75 cents per pound.
// Generally, you would never hard code values.
// Leveraging Custom Settings for the shipping rate is a best practice.
// See Custom Settings in the Apex Developer Guide
// for more information.
myOrder.Shipping__c = (myOrder.totalWeight__c * .75);
myOrder.GrandTotal__c = myOrder.SubTotal__c + myOrder.tax__c +
myOrder.Shipping__c;
updateMap.put(myOrder.id, myOrder);
}
}
else
{
for(Item__c itemToProcess : itemList)
{
Shipping_Invoice__C myOrder;
// Look up the correct shipping invoice from the ones we got earlier
myOrder = SIMap.get(itemToProcess.Shipping_Invoice__C);
myOrder.SubTotal__c += (itemToProcess.price__c *
itemToProcess.quantity__c * subtract);
myOrder.TotalWeight__c += (itemToProcess.weight__c *
itemToProcess.quantity__c * subtract);
}
for(Shipping_Invoice__C myOrder : AllShippingInvoices)
{
// Set tax rate to 9.25% Please note, this is a simple example.
// Generally, you would never hard code values.
// Leveraging Custom Settings for tax rates is a best practice.
// See Custom Settings in the Apex Developer Guide
// for more information.
myOrder.Tax__c = myOrder.Subtotal__c * .0925;
// Reset shipping discount
myOrder.ShippingDiscount__c = 0;
// Set shipping rate to 75 cents per pound.
// Generally, you would never hard code values.
// Leveraging Custom Settings for the shipping rate is a best practice.
// See Custom Settings in the Apex Developer Guide
// for more information.
myOrder.Shipping__c = (myOrder.totalWeight__c * .75);
myOrder.GrandTotal__c = myOrder.SubTotal__c + myOrder.tax__c +
myOrder.Shipping__c;
updateMap.put(myOrder.id, myOrder);
}
}
// Only use one DML update at the end.
// This minimizes the number of DML requests generated from this trigger.
update updateMap.values();
}
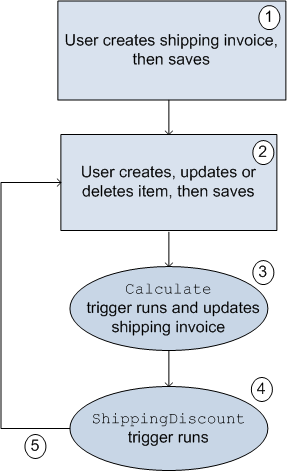
运费折扣 触发
trigger ShippingDiscount on Shipping_Invoice__C (before update) {
// Free shipping on all orders greater than $100
for(Shipping_Invoice__C myShippingInvoice : Trigger.new)
{
if((myShippingInvoice.subtotal__c >= 100.00) &&
(myShippingInvoice.ShippingDiscount__c == 0))
{
myShippingInvoice.ShippingDiscount__c =
myShippingInvoice.Shipping__c * -1;
myShippingInvoice.GrandTotal__c += myShippingInvoice.ShippingDiscount__c;
}
}
}
运输发票 测试
@IsTest
private class TestShippingInvoice{
// Test for inserting three items at once
public static testmethod void testBulkItemInsert(){
// Create the shipping invoice. It's a best practice to either use defaults
// or to explicitly set all values to zero so as to avoid having
// extraneous data in your test.
Shipping_Invoice__C order1 = new Shipping_Invoice__C(subtotal__c = 0,
totalweight__c = 0, grandtotal__c = 0,
ShippingDiscount__c = 0, Shipping__c = 0, tax__c = 0);
// Insert the order and populate with items
insert Order1;
List<Item__c> list1 = new List<Item__c>();
Item__c item1 = new Item__C(Price__c = 10, weight__c = 1, quantity__c = 1,
Shipping_Invoice__C = order1.id);
Item__c item2 = new Item__C(Price__c = 25, weight__c = 2, quantity__c = 1,
Shipping_Invoice__C = order1.id);
Item__c item3 = new Item__C(Price__c = 40, weight__c = 3, quantity__c = 1,
Shipping_Invoice__C = order1.id);
list1.add(item1);
list1.add(item2);
list1.add(item3);
insert list1;
// Retrieve the order, then do assertions
order1 = [SELECT id, subtotal__c, tax__c, shipping__c, totalweight__c,
grandtotal__c, shippingdiscount__c
FROM Shipping_Invoice__C
WHERE id = :order1.id];
System.assert(order1.subtotal__c == 75,
'Order subtotal was not $75, but was '+ order1.subtotal__c);
System.assert(order1.tax__c == 6.9375,
'Order tax was not $6.9375, but was ' + order1.tax__c);
System.assert(order1.shipping__c == 4.50,
'Order shipping was not $4.50, but was ' + order1.shipping__c);
System.assert(order1.totalweight__c == 6.00,
'Order weight was not 6 but was ' + order1.totalweight__c);
System.assert(order1.grandtotal__c == 86.4375,
'Order grand total was not $86.4375 but was '
+ order1.grandtotal__c);
System.assert(order1.shippingdiscount__c == 0,
'Order shipping discount was not $0 but was '
+ order1.shippingdiscount__c);
}
// Test for updating three items at once
public static testmethod void testBulkItemUpdate(){
// Create the shipping invoice. It's a best practice to either use defaults
// or to explicitly set all values to zero so as to avoid having
// extraneous data in your test.
Shipping_Invoice__C order1 = new Shipping_Invoice__C(subtotal__c = 0,
totalweight__c = 0, grandtotal__c = 0,
ShippingDiscount__c = 0, Shipping__c = 0, tax__c = 0);
// Insert the order and populate with items.
insert Order1;
List<Item__c> list1 = new List<Item__c>();
Item__c item1 = new Item__C(Price__c = 1, weight__c = 1, quantity__c = 1,
Shipping_Invoice__C = order1.id);
Item__c item2 = new Item__C(Price__c = 2, weight__c = 2, quantity__c = 1,
Shipping_Invoice__C = order1.id);
Item__c item3 = new Item__C(Price__c = 4, weight__c = 3, quantity__c = 1,
Shipping_Invoice__C = order1.id);
list1.add(item1);
list1.add(item2);
list1.add(item3);
insert list1;
// Update the prices on the 3 items
list1[0].price__c = 10;
list1[1].price__c = 25;
list1[2].price__c = 40;
update list1;
// Access the order and assert items updated
order1 = [SELECT id, subtotal__c, tax__c, shipping__c, totalweight__c,
grandtotal__c, shippingdiscount__c
FROM Shipping_Invoice__C
WHERE Id = :order1.Id];
System.assert(order1.subtotal__c == 75,
'Order subtotal was not $75, but was '+ order1.subtotal__c);
System.assert(order1.tax__c == 6.9375,
'Order tax was not $6.9375, but was ' + order1.tax__c);
System.assert(order1.shipping__c == 4.50,
'Order shipping was not $4.50, but was '
+ order1.shipping__c);
System.assert(order1.totalweight__c == 6.00,
'Order weight was not 6 but was ' + order1.totalweight__c);
System.assert(order1.grandtotal__c == 86.4375,
'Order grand total was not $86.4375 but was '
+ order1.grandtotal__c);
System.assert(order1.shippingdiscount__c == 0,
'Order shipping discount was not $0 but was '
+ order1.shippingdiscount__c);
}
// Test for deleting items
public static testmethod void testBulkItemDelete(){
// Create the shipping invoice. It's a best practice to either use defaults
// or to explicitly set all values to zero so as to avoid having
// extraneous data in your test.
Shipping_Invoice__C order1 = new Shipping_Invoice__C(subtotal__c = 0,
totalweight__c = 0, grandtotal__c = 0,
ShippingDiscount__c = 0, Shipping__c = 0, tax__c = 0);
// Insert the order and populate with items
insert Order1;
List<Item__c> list1 = new List<Item__c>();
Item__c item1 = new Item__C(Price__c = 10, weight__c = 1, quantity__c = 1,
Shipping_Invoice__C = order1.id);
Item__c item2 = new Item__C(Price__c = 25, weight__c = 2, quantity__c = 1,
Shipping_Invoice__C = order1.id);
Item__c item3 = new Item__C(Price__c = 40, weight__c = 3, quantity__c = 1,
Shipping_Invoice__C = order1.id);
Item__c itemA = new Item__C(Price__c = 1, weight__c = 3, quantity__c = 1,
Shipping_Invoice__C = order1.id);
Item__c itemB = new Item__C(Price__c = 1, weight__c = 3, quantity__c = 1,
Shipping_Invoice__C = order1.id);
Item__c itemC = new Item__C(Price__c = 1, weight__c = 3, quantity__c = 1,
Shipping_Invoice__C = order1.id);
Item__c itemD = new Item__C(Price__c = 1, weight__c = 3, quantity__c = 1,
Shipping_Invoice__C = order1.id);
list1.add(item1);
list1.add(item2);
list1.add(item3);
list1.add(itemA);
list1.add(itemB);
list1.add(itemC);
list1.add(itemD);
insert list1;
// Seven items are now in the shipping invoice.
// The following deletes four of them.
List<Item__c> list2 = new List<Item__c>();
list2.add(itemA);
list2.add(itemB);
list2.add(itemC);
list2.add(itemD);
delete list2;
// Retrieve the order and verify the deletion
order1 = [SELECT id, subtotal__c, tax__c, shipping__c, totalweight__c,
grandtotal__c, shippingdiscount__c
FROM Shipping_Invoice__C
WHERE Id = :order1.Id];
System.assert(order1.subtotal__c == 75,
'Order subtotal was not $75, but was '+ order1.subtotal__c);
System.assert(order1.tax__c == 6.9375,
'Order tax was not $6.9375, but was ' + order1.tax__c);
System.assert(order1.shipping__c == 4.50,
'Order shipping was not $4.50, but was ' + order1.shipping__c);
System.assert(order1.totalweight__c == 6.00,
'Order weight was not 6 but was ' + order1.totalweight__c);
System.assert(order1.grandtotal__c == 86.4375,
'Order grand total was not $86.4375 but was '
+ order1.grandtotal__c);
System.assert(order1.shippingdiscount__c == 0,
'Order shipping discount was not $0 but was '
+ order1.shippingdiscount__c);
}
// Testing free shipping
public static testmethod void testFreeShipping(){
// Create the shipping invoice. It's a best practice to either use defaults
// or to explicitly set all values to zero so as to avoid having
// extraneous data in your test.
Shipping_Invoice__C order1 = new Shipping_Invoice__C(subtotal__c = 0,
totalweight__c = 0, grandtotal__c = 0,
ShippingDiscount__c = 0, Shipping__c = 0, tax__c = 0);
// Insert the order and populate with items.
insert Order1;
List<Item__c> list1 = new List<Item__c>();
Item__c item1 = new Item__C(Price__c = 10, weight__c = 1,
quantity__c = 1, Shipping_Invoice__C = order1.id);
Item__c item2 = new Item__C(Price__c = 25, weight__c = 2,
quantity__c = 1, Shipping_Invoice__C = order1.id);
Item__c item3 = new Item__C(Price__c = 40, weight__c = 3,
quantity__c = 1, Shipping_Invoice__C = order1.id);
list1.add(item1);
list1.add(item2);
list1.add(item3);
insert list1;
// Retrieve the order and verify free shipping not applicable
order1 = [SELECT id, subtotal__c, tax__c, shipping__c, totalweight__c,
grandtotal__c, shippingdiscount__c
FROM Shipping_Invoice__C
WHERE Id = :order1.Id];
// Free shipping not available on $75 orders
System.assert(order1.subtotal__c == 75,
'Order subtotal was not $75, but was '+ order1.subtotal__c);
System.assert(order1.tax__c == 6.9375,
'Order tax was not $6.9375, but was ' + order1.tax__c);
System.assert(order1.shipping__c == 4.50,
'Order shipping was not $4.50, but was ' + order1.shipping__c);
System.assert(order1.totalweight__c == 6.00,
'Order weight was not 6 but was ' + order1.totalweight__c);
System.assert(order1.grandtotal__c == 86.4375,
'Order grand total was not $86.4375 but was '
+ order1.grandtotal__c);
System.assert(order1.shippingdiscount__c == 0,
'Order shipping discount was not $0 but was '
+ order1.shippingdiscount__c);
// Add items to increase subtotal
item1 = new Item__C(Price__c = 25, weight__c = 20, quantity__c = 1,
Shipping_Invoice__C = order1.id);
insert item1;
// Retrieve the order and verify free shipping is applicable
order1 = [SELECT id, subtotal__c, tax__c, shipping__c, totalweight__c,
grandtotal__c, shippingdiscount__c
FROM Shipping_Invoice__C
WHERE Id = :order1.Id];
// Order total is now at $100, so free shipping should be enabled
System.assert(order1.subtotal__c == 100,
'Order subtotal was not $100, but was '+ order1.subtotal__c);
System.assert(order1.tax__c == 9.25,
'Order tax was not $9.25, but was ' + order1.tax__c);
System.assert(order1.shipping__c == 19.50,
'Order shipping was not $19.50, but was '
+ order1.shipping__c);
System.assert(order1.totalweight__c == 26.00,
'Order weight was not 26 but was ' + order1.totalweight__c);
System.assert(order1.grandtotal__c == 109.25,
'Order grand total was not $86.4375 but was '
+ order1.grandtotal__c);
System.assert(order1.shippingdiscount__c == -19.50,
'Order shipping discount was not -$19.50 but was '
+ order1.shippingdiscount__c);
}
// Negative testing for inserting bad input
public static testmethod void testNegativeTests(){
// Create the shipping invoice. It's a best practice to either use defaults
// or to explicitly set all values to zero so as to avoid having
// extraneous data in your test.
Shipping_Invoice__C order1 = new Shipping_Invoice__C(subtotal__c = 0,
totalweight__c = 0, grandtotal__c = 0,
ShippingDiscount__c = 0, Shipping__c = 0, tax__c = 0);
// Insert the order and populate with items.
insert Order1;
Item__c item1 = new Item__C(Price__c = -10, weight__c = 1, quantity__c = 1,
Shipping_Invoice__C = order1.id);
Item__c item2 = new Item__C(Price__c = 25, weight__c = -2, quantity__c = 1,
Shipping_Invoice__C = order1.id);
Item__c item3 = new Item__C(Price__c = 40, weight__c = 3, quantity__c = -1,
Shipping_Invoice__C = order1.id);
Item__c item4 = new Item__C(Price__c = 40, weight__c = 3, quantity__c = 0,
Shipping_Invoice__C = order1.id);
try{
insert item1;
}
catch(Exception e)
{
system.assert(e.getMessage().contains('Price must be non-negative'),
'Price was negative but was not caught');
}
try{
insert item2;
}
catch(Exception e)
{
system.assert(e.getMessage().contains('Weight must be non-negative'),
'Weight was negative but was not caught');
}
try{
insert item3;
}
catch(Exception e)
{
system.assert(e.getMessage().contains('Quantity must be positive'),
'Quantity was negative but was not caught');
}
try{
insert item4;
}
catch(Exception e)
{
system.assert(e.getMessage().contains('Quantity must be positive'),
'Quantity was zero but was not caught');
}
}
}