
Visualforce 可用于向您的任何联系人、潜在客户或 其他收件人。也可以创建可重复使用的电子邮件模板 利用 Visualforce 迭代您的 Salesforce 记录的能力。 以下主题说明如何操作:
- 使用 Visualforce 发送电子邮件
- Visualforce 电子邮件模板
使用 Visualforce 发送电子邮件
可以使用 Visualforce 发送电子邮件,方法是创建自定义控制器以 传递消息。Apex 类处理可用的出站电子邮件功能 到 Salesforce。Messaging.SingleEmailMessage以下主题演示了通过 Visualforce 发送电子邮件时可用的许多功能:
- 使用 Messaging 类创建自定义控制器
- 创建电子邮件附件
使用 Messaging 类创建自定义控制器
使用 Apex 命名空间的自定义控制器至少需要 电子邮件。您将需要一个页面作为表单来填写主题和正文,并且 发送电子邮件。Messaging创建一个新页面,称为并使用 以下 法典:
sendEmailPage
<apex:page controller="sendEmail">
	<apex:messages />
	<apex:pageBlock title="Send an Email to Your
			{!account.name} Representatives">
		<p>Fill out the fields below to test how you might send an email to a user.</p>
		<br />
		<apex:dataTable value="{!account.Contacts}" var="contact" border="1">
			<apex:column >
				<apex:facet name="header">Name</apex:facet>
				{!contact.Name}
			</apex:column>
			<apex:column >
				<apex:facet name="header">Email</apex:facet>
				{!contact.Email}
			</apex:column>
		</apex:dataTable>

		<apex:form >
		<br /><br />
			<apex:outputLabel value="Subject" for="Subject"/>:<br />
			<apex:inputText value="{!subject}" id="Subject" maxlength="80"/>
			<br /><br />
			<apex:outputLabel value="Body" for="Body"/>:<br />
			<apex:inputTextarea value="{!body}" id="Body"  rows="10" cols="80"/>
			<br /><br /><br />
			<apex:commandButton value="Send Email" action="{!send}" />
		</apex:form>
	</apex:pageBlock>
</apex:page>
请注意,在页面标记中,帐户 ID 是从页面的 URL 中检索的。为 此示例要正确呈现,您必须将 Visualforce 页面与有效的 URL 中的帐户记录。例如,如果是帐户 ID,则生成的 URL 应 是:
001D000000IRt53
https://Salesforce_instance/apex/sendEmailPage?id=001D000000IRt53使用 Visualforce 显示字段值提供了有关检索记录 ID 的更多信息。下面的代码创建一个名为实现该类的控制器,并使用与 帐户作为 收件人:
sendEmailMessaging.SingleEmailMessage
public class sendEmail {
public String subject { get; set; }
public String body { get; set; }
private final Account account;
// Create a constructor that populates the Account object
public sendEmail() {
account = [select Name, (SELECT Contact.Name, Contact.Email FROM Account.Contacts)
from Account where id = :ApexPages.currentPage().getParameters().get('id')];
}
public Account getAccount() {
return account;
}
public PageReference send() {
// Define the email
Messaging.SingleEmailMessage email = new Messaging.SingleEmailMessage();
String addresses;
if (account.Contacts[0].Email != null)
{
addresses = account.Contacts[0].Email;
// Loop through the whole list of contacts and their emails
for (Integer i = 1; i < account.Contacts.size(); i++)
{
if (account.Contacts[i].Email != null)
{
addresses += ':' + account.Contacts[i].Email;
}
}
}
String[] toAddresses = addresses.split(':', 0);
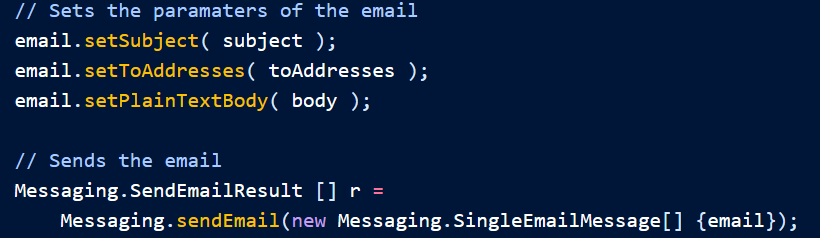
// Sets the paramaters of the email
email.setSubject( subject );
email.setToAddresses( toAddresses );
email.setPlainTextBody( body );
// Sends the email
Messaging.SendEmailResult [] r =
Messaging.sendEmail(new Messaging.SingleEmailMessage[] {email});
return null;
}
}请注意,在控制器中:
- 电子邮件的主题和正文通过单独的 Visualforce 页面进行设置,并且 传递到控制器中。
- 发送电子邮件的方法称为 。此名称必须与 Visualforce 按钮的操作名称匹配 发送电子邮件。send()
- 电子邮件的收件人,即存储在 中的电子邮件地址,来自 关联帐户中可用的联系人。编制 来自联系人、潜在顾客或其他记录的收件人,最好循环 通过所有记录来验证是否为每个记录定义了一个电子邮件地址。这 帐户 ID 是从页面的 URL 中检索的。toAddresses[]
sendEmailPage 上的表单示例
创建电子邮件附件
如果要在电子邮件中添加附件,只需添加几行 代码添加到自定义控制器。电子邮件附件是文件类型。若要创建附件,需要使用 Apex 类。您必须定义 对象的文件名和内容。BlobMessaging.EmailFileAttachmentEmailFileAttachment
添加 PDF 附件
以下示例演示了如何将 Visualforce 页面转换为呈现为 将 PDF 转换为电子邮件附件。首先,创建一个名为:
PageReferenceattachmentPDF
<apex:page standardController="Account" renderAs="PDF">

  <h1>Account Details</h1>

  <apex:panelGrid columns="2">

      <apex:outputLabel for="Name" value="Name"/>
      <apex:outputText id="Name" value="{!account.Name}"/>

      <apex:outputLabel for="Owner" value="Account Owner"/>
      <apex:outputText id="Owner" value="{!account.Owner.Name}"/>

      <apex:outputLabel for="AnnualRevenue" value="Annual Revenue"/>
      <apex:outputText id="AnnualRevenue" value="{0,number,currency}">
          <apex:param value="{!account.AnnualRevenue}"/>
      </apex:outputText>

      <apex:outputLabel for="NumberOfEmployees" value="Employees"/>
      <apex:outputText id="NumberOfEmployees" value="{!account.NumberOfEmployees}"/>

  </apex:panelGrid>

</apex:page>
注意
请参阅渲染 PDF 文件的最佳实践,了解建议在 PDF 中使用哪些组件的详细信息 附件。接下来,创建对象 在您的自定义方法中 控制器。在调用之前必须放置以下示例:
EmailFileAttachmentsend()Messaging.sendEmail
// Reference the attachment page, pass in the account ID
    PageReference pdf = Page.attachmentPDF;
    pdf.getParameters().put('id',(String)account.id);
    pdf.setRedirect(true);

    // Take the PDF content
    Blob b = pdf.getContent();

    // Create the email attachment
    Messaging.EmailFileAttachment efa = new Messaging.EmailFileAttachment();
    efa.setFileName('attachment.pdf');
    efa.setBody(b);
如果 您的对象已命名,然后您关联附件 喜欢 这:
SingleEmailMessageemail
email.setFileAttachments(new Messaging.EmailFileAttachment[] {efa});将自定义组件定义为 附件
通过创建自定义组件并在 Visualforce 电子邮件表单上使用它,然后 呈现电子邮件的 PDF,用户可以看到他们正在尝试的内容的预览 发送。以下标记定义了一个名为 电子邮件:
attachment
<apex:component access="global">
  <h1>Account Details</h1>

  <apex:panelGrid columns="2">

      <apex:outputLabel for="Name" value="Name"/>
      <apex:outputText id="Name" value="{!account.Name}"/>

      <apex:outputLabel for="Owner" value="Account Owner"/>
      <apex:outputText id="Owner" value="{!account.Owner.Name}"/>

      <apex:outputLabel for="AnnualRevenue" value="Annual Revenue"/>
      <apex:outputText id="AnnualRevenue" value="{0,number,currency}">
          <apex:param value="{!account.AnnualRevenue}"/>
      </apex:outputText>

      <apex:outputLabel for="NumberOfEmployees" value="Employees"/>
      <apex:outputText id="NumberOfEmployees" value="{!account.NumberOfEmployees}"/>

  </apex:panelGrid>
</apex:component>
替换您的页面,例如 这:
attachmentPDF
<apex:page standardController="account" renderAs="PDF">
    <c:attachment/>
</apex:page>
然后添加自定义组件,渲染在你之前的底部:
sendEmailPage
<apex:pageBlock title="Preview the Attachment for {!account.name}">
    <c:attachment/>
</apex:pageBlock>
如果要同时更改附件和预览,则需要修改自定义组件 仅在一个位置。attachment
示例:发送带有 附件
以下示例显示了前面的 sendEmail 示例,其中包含一个自定义组件,该组件将 Visualforce 页面添加为 附件。首先, 控制器:
public class sendEmail {
    public String subject { get; set; }
    public String body { get; set; }

    private final Account account;

    // Create a constructor that populates the Account object
    public sendEmail() {
        account = [SELECT Name,
                  (SELECT Contact.Name, Contact.Email FROM Account.Contacts)
                   FROM Account
                   WHERE Id = :ApexPages.currentPage().getParameters().get('id')];
    }

    public Account getAccount() {
        return account;
    }

    public PageReference send() {
        // Define the email
        Messaging.SingleEmailMessage email = new Messaging.SingleEmailMessage();

        // Reference the attachment page and pass in the account ID
        PageReference pdf =  Page.attachmentPDF;
        pdf.getParameters().put('id',(String)account.id);
        pdf.setRedirect(true);

        // Take the PDF content
        Blob b = pdf.getContent();

        // Create the email attachment
        Messaging.EmailFileAttachment efa = new Messaging.EmailFileAttachment();
        efa.setFileName('attachment.pdf');
        efa.setBody(b);

        String addresses;
        if (account.Contacts[0].Email != null) {
            addresses = account.Contacts[0].Email;
            // Loop through the whole list of contacts and their emails
            for (Integer i = 1; i < account.Contacts.size(); i++) {
                if (account.Contacts[i].Email != null) {
                    addresses += ':' + account.Contacts[i].Email;
                }
            }
        }

        String[] toAddresses = addresses.split(':', 0);

        // Sets the paramaters of the email
        email.setSubject( subject );
        email.setToAddresses( toAddresses );
        email.setPlainTextBody( body );

        email.setFileAttachments(new Messaging.EmailFileAttachment[] {efa});

        // Sends the email
        Messaging.SendEmailResult [] r =
            Messaging.sendEmail(new Messaging.SingleEmailMessage[] {email});

        return null;
    }
}
接下来,Visualforce 页面 发送 电子邮件:
<apex:page controller="sendEmail">
    <apex:messages/>
    <apex:pageBlock title="Send an Email to Your {!account.name} Representatives">
        <p>Fill out the fields below to test how you might send an email to a user.</p>

        <apex:dataTable value="{!account.Contacts}" var="contact" border="1">
            <apex:column>
                <apex:facet name="header">Name</apex:facet>
                {!contact.Name}
            </apex:column>
            <apex:column>
                <apex:facet name="header">Email</apex:facet>
                {!contact.Email}
            </apex:column>
        </apex:dataTable>

        <apex:form><br/><br/>
            <apex:outputLabel value="Subject" for="Subject"/>: <br/>
            <apex:inputText value="{!subject}" id="Subject" maxlength="80"/>
            <br/><br/>

            <apex:outputLabel value="Body" for="Body"/>: <br/>
            <apex:inputTextarea value="{!body}" id="Body" rows="10" cols="80"/>
            <br/><br/>

            <apex:commandButton value="Send Email" action="{!send}"/>
        </apex:form>
    </apex:pageBlock>

    <apex:pageBlock title="Preview the Attachment for {!account.name}">
        <c:attachment/>
    </apex:pageBlock>
</apex:page>
Visualforce 电子邮件模板
开发人员和管理员可以使用 Visualforce 创建电子邮件模板。与标准 HTML 电子邮件模板相比,使用 Visualforce 的优势在于,Visualforce 使您能够对以下数据执行高级操作: 发送给收件人。尽管 Visualforce 电子邮件模板使用标准的 Visualforce 组件,但它们的创建方式并不相同。Visualforce 电子邮件模板始终使用以命名空间开头的组件。另外:
messaging
- 所有 Visualforce 电子邮件模板必须包含在单个标记中。 这类似于在单个标记中定义的常规 Visualforce 页面。<messaging:emailTemplate><apex:page>
- 标签必须包含单个标签或单个标签。<messaging:emailTemplate><messaging:htmlEmailBody><messaging:plainTextEmailBody>
- 有几个标准的 Visualforce 组件不能在 中使用。这些 包括 、所有相关组件和所有输入 组件,例如 .如果您尝试使用这些组件保存 Visualforce 电子邮件模板,则会显示一条错误消息。<messaging:emailTemplate><apex:detail><apex:pageBlock>pageBlock<apex:form>
以下主题提供了更多详细信息:
- 创建 Visualforce 电子邮件模板
- 在 Visualforce 电子邮件模板中使用自定义样式表
- 添加附件
- 在 Visualforce 电子邮件模板中使用自定义控制器
创建 Visualforce 电子邮件模板
- 执行下列操作之一:
- 如果您有权编辑公共模板,请从“设置”中输入“快速查找”框,然后选择“经典电子邮件模板”。Email Templates
- 如果您无权编辑公共模板,请转到您的个人 设置。输入“快速查找”框,然后选择“电子邮件模板”或“我的” 模板 – 以出现的模板为准。Templates
- 单击“新建模板”。
- 选择 Visualforce,然后单击下一步。你 无法使用 Visualforce 电子邮件模板发送群发电子邮件。
- 选择要在其中存储模板的文件夹。
- 若要使模板可供使用,请选择“可用于” 使用复选框。
- 在“电子邮件模板名称”中输入名称。
- 如有必要,请更改模板唯一名称。这个唯一的名称 指使用 Lightning 平台 API 时的组件。在托管包中,这 唯一名称可防止软件包安装中的命名冲突。此名称只能包含 下划线和字母数字字符,并且在组织中必须是唯一的。它必须开始 对于字母,不包含空格,不以下划线结尾,不包含两个 连续下划线。使用“模板唯一名称”字段,您可以 更改托管包中某些组件的名称,这些更改将反映出来 在订阅者的组织中。
- 如果需要,请从“编码”下拉列表中选择其他字符集。
- 输入模板的描述。模板名称和描述都适用于你的 仅供内部使用。
- 在电子邮件主题中输入模板的主题行。
- 在“收件人类型”下拉列表中,选择收件人的类型 接收从模板创建的电子邮件。
- 如果需要,在“与类型相关”下拉列表中,选择对象 模板从中检索合并字段数据。
- 点击保存。
- 在“在 Salesforce Classic 中查看和编辑电子邮件模板”页面上,单击“编辑” 模板。
- 输入 Visualforce 电子邮件模板的标记文本。注意如果您包括 图像,我们建议将其上传到“文档”选项卡以引用图像的副本 在我们的服务器上。例如:
<apex:image id="Logo" value="https://yourInstance.salesforce.com/servlet/servlet.ImageServer? id=015D0000000Dpwc&oid=00DD0000000FHaG&lastMod=127057656800" /> - 要指定 Visualforce 的版本以及与此电子邮件模板一起使用的 API,请单击版本设置。如果您已从 AppExchange,您还可以指定要与此软件包一起使用的每个托管软件包的版本 电子邮件模板。通常,对所有版本使用默认值来关联电子邮件 包含最新版本的 Visualforce、API 和每个托管包的模板。 要保持特定行为,您可以指定旧版本的 Visualforce,并且 应用程序接口。访问与最新包不同的组件或功能 version,您可以指定托管包的旧版本。
- 若要查看模板的详细信息,请单击“保存”。继续 编辑模板时,点击快速保存。您的 Visualforce 标记 必须有效,然后才能保存模板。注意Visualforce 的最大大小 电子邮件模板为 1 MB。您无法使用 Visualforce 电子邮件发送群发电子邮件 模板。{!Receiving_User。field_name}和 {!Sending_User。field_name}合并字段 仅适用于群发电子邮件和列表电子邮件,在 Visualforce 电子邮件中不可用 模板。
以下示例显示了如何定义一个 Visualforce 电子邮件模板,该模板 显示与联系人关联的所有案例。该示例使用标签遍历所有 与联系人相关的案例,并将其纳入 模板:
<apex:repeat>
<messaging:emailTemplate recipientType="Contact"
	relatedToType="Account"
	subject="Case report for Account: {!relatedTo.name}"
	language="{!recipient.language__c}"
	replyTo="support@acme.com">

	<messaging:htmlEmailBody>
		<html>
			<body>

			<p>Dear {!recipient.name},</p>
			<p>Below is a list of cases related to {!relatedTo.name}.</p>
			<table border="0" >
				<tr>
					<th>Case Number</th><th>Origin</th>
					<th>Creator Email</th><th>Status</th>
				</tr>
				<apex:repeat var="cx" value="{!relatedTo.Cases}">
				<tr>
					<td><a href =
						"https://yourInstance.salesforce.com/{!cx.id}">{!cx.CaseNumber}
					</a></td>
					<td>{!cx.Origin}</td>
					<td>{!cx.Contact.email}</td>
					<td>{!cx.Status}</td>
				</tr>
				</apex:repeat>
			</table>
			<p/>
			<center>
				<apex:outputLink value="https://salesforce.com">
					For more detailed information login to Salesforce.com
				</apex:outputLink>
			</center>
			</body>
		</html>
	</messaging:htmlEmailBody>
</messaging:emailTemplate>
请注意有关标记的以下信息:
- 属性和充当 电子邮件模板的控制器。有了它们,您可以访问相同的 合并可供其他标准控制器使用的字段。该属性表示 电子邮件的收件人。该属性表示要与电子邮件关联的记录。recipientTyperelatedToTyperecipientTyperelatedToType
- 该组件可以包含 Visualforce 标记和 HTML 的组合。该组件只能包含 Visualforce 标记和纯文本。<messaging:htmlEmailBody><messaging:plainTextEmailBody>
- 翻译基于 Visualforce 电子邮件模板 在收件人或相关对象的语言上,使用标记的属性(有效值:Salesforce 支持的语言键,用于 例如,“en-US”)。language 属性接受来自 电子邮件模板和属性。创建自定义语言 用于合并字段的字段。<messaging:emailTemplate>languagerecipientTyperelatedToType翻译 需要 Workbench 来翻译电子邮件模板。该示例使用合并字段获取联系人的属性 接收电子邮件。language
在 Visualforce 电子邮件模板中使用自定义样式表
默认情况下,Visualforce 电子邮件模板始终使用其他 Salesforce 组件的标准外观。 但是,您可以通过定义 自己的样式表。
与其他 Visualforce 页面不同,Visualforce 电子邮件模板不能使用引用的页面样式或静态资源。尽管 CSS 似乎在 电子邮件模板预览窗格,它对收件人来说看起来不一样 您的电子邮件。您必须在标签中使用 CSS 定义样式。<style>以下示例将电子邮件的字体更改为 Courier,向表格添加边框,然后 更改表格的颜色 行:
<messaging:emailTemplate recipientType="Contact"
	relatedToType="Account"
	subject="Case report for Account: {!relatedTo.name}"
	replyTo="support@acme.com">

	<messaging:htmlEmailBody>
		<html>
			<style type="text/css">
			body {font-family: Courier; size: 12pt;}

			table {
			border-width: 5px;
			border-spacing: 5px;
			border-style: dashed;
			border-color: #FF0000;
			background-color: #FFFFFF;
		}

		td {
			border-width: 1px;
			padding: 4px;
			border-style: solid;
			border-color: #000000;
			background-color: #FFEECC;
		}

		th {
			color: #000000;
			border-width: 1px ;
			padding: 4px ;
			border-style: solid ;
			border-color: #000000;
			background-color: #FFFFF0;
		}
		</style>
		<body>
			<p>Dear {!recipient.name},</p>
			<table border="0" >
				<tr>
					<th>Case Number</th><th>Origin</th>
					<th>Creator Email</th><th>Status</th>
				</tr>
				<apex:repeat var="cx" value="{!relatedTo.Cases}">
				<tr>
					<td><a href =
						"https://MyDomainName.my.salesforce.com/{!cx.id}">{!cx.CaseNumber}
					</a></td>
					<td>{!cx.Origin}</td>
					<td>{!cx.Contact.email}</td>
					<td>{!cx.Status}</td>
				</tr>
				</apex:repeat>
			</table>
		</body>
		</html>
	</messaging:htmlEmailBody>
</messaging:emailTemplate>
呈现的 Visualforce 电子邮件模板示例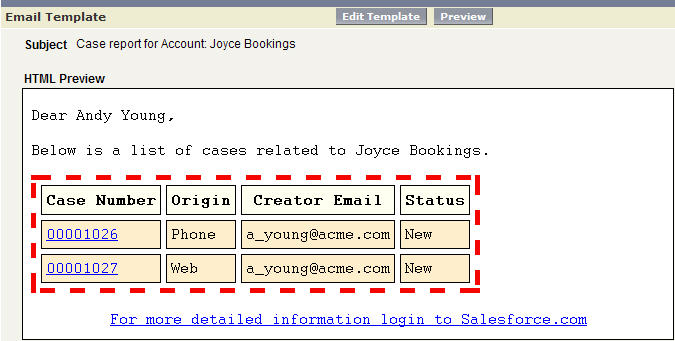
在自定义组件中定义 Visualforce 样式表
虽然您无法在 Visualforce 电子邮件模板中引用外部样式表,但您可以将样式定义放在自定义样式中 可以在其他地方引用的组件。例如 您可以修改前面的示例以放置样式信息 在名为 EmailStyle 的组件中:
<apex:component access="global">
		<style type="text/css">
		body {font-family: Courier; size: 12pt;}

		table {
			border-width: 5px;
			border-spacing: 5px;
			border-style: dashed;
			border-color: #FF0000;
			background-color: #FFFFFF;
		}

		td {
			border-width: 1px;
			padding: 4px;
			border-style: solid;
			border-color: #000000;
			background-color: #FFEECC;
		}

		th {
			color: #000000;
			border-width: 1px ;
			padding: 4px ;
			border-style: solid ;
			border-color: #000000;
			background-color: #FFFFF0;
		}
		</style>
</apex:component>
然后,在 Visualforce 电子邮件模板中,您可以仅引用该组件:
<messaging:htmlEmailBody>
	<html>
	<c:EmailStyle />
		<body>
			<p>Dear {!recipient.name},</p>
		...
		</body>
	</html>
</messaging:htmlEmailBody>
注意
Visualforce 电子邮件模板中使用的任何标签的访问级别都必须为 。<apex:component>global
添加附件
您可以向 Visualforce 电子邮件模板添加附件。每 附件必须封装在单个组件中。其中的代码可以是 HTML 和 Visualforce 标记。<messaging:attachment><messaging:attachment>前面的示例演示了如何通过以下方式创建 Visualforce 电子邮件模板 遍历某些数据并将其显示给电子邮件收件人。此示例显示 如何修改该标记以将数据显示为 附件:
<messaging:emailTemplate recipientType="Contact"
	relatedToType="Account"
	subject="Case report for Account: {!relatedTo.name}"
	replyTo="support@acme.com">

	<messaging:htmlEmailBody>
		<html>
			<body>
			<p>Dear {!recipient.name},</p>
			<p>Attached is a list of cases related to {!relatedTo.name}.</p>
			<center>
				<apex:outputLink value="https://salesforce.com">
					For more detailed information login to Salesforce.com
				</apex:outputLink>
			</center>
			</body>
		</html>
	</messaging:htmlEmailBody>

	<messaging:attachment>
		<apex:repeat var="cx" value="{!relatedTo.Cases}">
			Case Number: {!cx.CaseNumber}
			Origin: {!cx.Origin}
			Creator Email: {!cx.Contact.email}
			Case Number: {!cx.Status}
		</apex:repeat>
	</messaging:attachment>
</messaging:emailTemplate>
此标记在电子邮件中呈现为附加的数据文件,没有任何格式。您可以 使用以下选项之一以更具可读性的格式显示数据:
- 更改文件名
- 更改 renderAs 属性
- 添加样式和图像
更改文件名
该标签具有 属性,用于定义 附加文件的名称。虽然定义一个容易的 可识别的名称,它不是必需的。如果您将其保留为未定义,Salesforce 会生成一个名称 给你的。<messaging:attachment>filename不带扩展名的文件名默认为文本文件。您可以渲染附加的 文件作为 CSV格式:
<messaging:attachment filename="cases.csv">
	<apex:repeat var="cx" value="{!relatedTo.Cases}">
		{!cx.CaseNumber}
		{!cx.Origin}
		{!cx.Contact.email}
		{!cx.Status}
	</apex:repeat>
</messaging:attachment>
您还可以将数据呈现为 HTML 格式 文件:
<messaging:attachment filename="cases.html">
	<html>
		<body>
		<table border="0" >
			<tr>
				<th>Case Number</th><th>Origin</th>
				<th>Creator Email</th><th>Status</th>
			</tr>
			<apex:repeat var="cx" value="{!relatedTo.Cases}">
			<tr>
				<td><a href =
					"https://MyDomainName.my.salesforce.com/{!cx.id}">{!cx.CaseNumber}
				</a></td>
				<td>{!cx.Origin}</td>
				<td>{!cx.Contact.email}</td>
				<td>{!cx.Status}</td>
			</tr>
			</apex:repeat>
		</table>
		</body>
	</html>
</messaging:attachment>
虽然您只能为每个组件定义一个文件名,但可以将多个文件附加到 一封电子邮件。<messaging:attachment>
更改 renderAs 属性
与其他 Visualforce 页面类似,在组件上将 renderAs 属性设置为 PDF 会将附件呈现为 PDF。 为 例:
<messaging:attachment>
<messaging:attachment renderAs="PDF" filename="cases.pdf">
	<html>
		<body>
		<p>You can display your {!relatedTo.name} cases as a PDF:</p>
			<table border="0" >
			<tr>
				<th>Case Number</th><th>Origin</th>
				<th>Creator Email</th><th>Status</th>
			</tr>
			<apex:repeat var="cx" value="{!relatedTo.Cases}">
			<tr>
				<td><a href =
					"https://MyDomainName.my.salesforce.com/{!cx.id}">{!cx.CaseNumber}
				</a></td>
				<td>{!cx.Origin}</td>
				<td>{!cx.Contact.email}</td>
				<td>{!cx.Status}</td>
			</tr>
			</apex:repeat>
		</table>
		</body>
	</html>
</messaging:attachment>
Visualforce PDF 渲染的局限性 服务包括以下内容。
- PDF 是唯一受支持的渲染服务。
- PDF 渲染服务渲染 PDF 版本 1.4 和 CSS 版本,最高可达 2.1.
- 渲染 作为 PDF 文件的 Visualforce 页面适用于设计和优化的页面 用于打印。
- 呈现的 Visualforce 页面 PDF文件要么显示在浏览器中,要么被下载,这取决于 浏览器的设置。具体行为取决于浏览器、版本、 和用户设置,并且不受 Visualforce 的控制。
- PDF 呈现服务在页面上呈现标记和数据,但它可能会 不呈现富文本区域字段内容中包含的格式 添加到页面。
- 没有断点的长文本行(如空格或短划线)不能 由 PDF 渲染服务包装。这种情况最常发生 具有长 URL、注册表项等。当这些线比 页面,它们将页面内容的宽度增加到 PDF 边缘之外 页。然后,内容从页面的一侧“流出”并被切断。
- 不要使用不容易格式化以用于打印或表单的标准组件 元素,例如输入或按钮,或任何需要 JavaScript 的组件 格式化。
- PDF 呈现不支持 JavaScript 呈现的内容。
- Salesforce 移动应用程序中的页面不支持 PDF 呈现。
- 页面上使用的字体必须在 Visualforce PDF 渲染中可用 服务。不支持 Web 字体。
- 如果 PDF 文件无法显示页面的所有文本,尤其是多字节 字符,例如日语或重音国际字符,请调整您的 CSS 使用支持它们的字体。为 例:
<apex:page showHeader="false" applyBodyTag="false" renderAs="pdf"> <head> <style> body { font-family: 'Arial Unicode MS'; } </style> </head> <body> これはサンプルページです。<br/> This is a sample page: API version 28.0 </body> </apex:page>“Arial Unicode MS”是唯一支持的字体 包含多字节字符的扩展字符集。 - 如果您使用内联 CSS 样式,请将 API 版本设置为 28.0 或更高版本。还设置了, 并向页面添加静态、有效和标签,如上文所示 例。<apex:page applyBodyTag=”false”><head><body>
- 创建 PDF 文件时的最大响应大小必须小于 15 MB,然后才能呈现为 PDF 文件。此限制是以下标准限制 所有 Visualforce 请求。
- 生成的 PDF 文件的最大文件大小为60兆字节.
- 生成的 PDF 中包含的所有图像的最大总大小为30兆字节.
- PDF 呈现不支持以 data: URI 方案格式编码的图像。
- PDF 渲染不支持 WebP 图像或 SVG 标记。
- 以下组件在呈现为 PDF 时不支持双字节字体。
- <apex:pageBlock>
- <apex:sectionHeader>
- 如果 或 没有 rendered,将页面呈现为 PDF 失败。要解决此问题,请将 table 组件的属性,如果其子组件均不为 呈现。<apex:dataTable><apex:pageBlockTable><apex:column>renderedfalse<apex:column>
添加样式和图像
附件还可以使用样式表来更改数据的呈现方式。风格 与附件的关联方式与在 Visualforce 电子邮件中的关联方式相同 模板,可以作为内联代码,也可以使用自定义组件。
呈现为 PDF 的附件可以通过 $Resource 全局变量引用静态资源。这 使您能够引用 PDF 正文中的图像或样式表。例如,以下附件在 PDF格式:
<messaging:attachment renderAs="PDF" filename="cases.pdf">
		<html>
			<body>
			<img src = "{!$Resource.logo}" />
			...
			</body>
		</html>
	</messaging:attachment>
此附件引用已另存为静态的样式表 资源:
<messaging:attachment renderAs="PDF">
		<html>
		<link rel='stylesheet' type='text/css' href='{!$Resource.EMAILCSS}' />
			<body>
			...
			</body>
		</html>
	</messaging:attachment>
警告
在远程服务器上引用静态资源可能会增加 呈现 PDF 附件所需的时间。您不能引用遥控器 在 Apex 触发器中创建 PDF 附件时的资源;这样做将导致 异常。
在 Visualforce 电子邮件模板中使用自定义控制器
Visualforce 电子邮件模板可以利用自定义控制器进行高度渲染 定制内容。为此,请在使用该自定义控制器的 Visualforce 电子邮件模板中包含自定义组件。例如,假设您要显示所有帐户的列表 以电子邮件模板中的“Smith”一词开头。 为此,请首先编写一个使用 SOSL 调用的自定义控制器 返回以“Smith”开头的帐户列表:
public class findSmithAccounts {
	private final List<Account> accounts;

	public findSmithAccounts() {
		accounts = [select Name from Account where Name LIKE 'Smith_%'];
	}

	public List<Account> getSmithAccounts() {
		return accounts;
	}
}
接下来,创建一个名为使用此控制器的自定义组件:
smithAccounts
<apex:component controller="findSmithAccounts" access="global">
	<apex:dataTable value="{!SmithAccounts}" var="s_account">
		<apex:column>
			<apex:facet name="header">Account Name</apex:facet>
			{!s_account.Name}
		</apex:column>
	</apex:dataTable>
</apex:component>
提示
请记住,Visualforce 电子邮件模板中使用的所有自定义组件的级别必须为 .accessglobal最后,创建一个包含组件的 Visualforce 电子邮件模板:
smithAccounts
<messaging:emailTemplate subject="Embedding Apex Code" recipientType="Contact" relatedToType="Opportunity">
	<messaging:htmlEmailBody>
		<p>As you requested, here's a list of all our Smith accounts:</p>
		<c:smithAccounts/>
		<p>Hope this helps with the {!relatedToType}.</p>
	</messaging:htmlEmailBody>
</messaging:emailTemplate>
请注意,尽管该属性是组件所必需的,但它对此示例没有任何影响。它具有 仅值 以表明它可以采用与 自定义组件中使用的对象。relatedToTypeemailTemplate“Opportunity”
注意
如果您的电子邮件模板使用 标准控制器。如果组织范围的用户默认 object 设置为 Private,您需要访问用户信息,例如 作为 Visualforce 电子邮件模板中的名称和电子邮件地址,您可以使用自定义组件或自定义控制器 替换为“不共享”关键字。
为 有关用户对象共享的信息,请参阅 Salesforce Online 中的用户共享概述 帮助。