
快速入门中的示例 tutorial 被视为入门示例,主要仅使用 Visualforce 标记。 除了 Visualforce 标记之外,高级示例还使用 Lightning Platform Apex 代码。
创建您的第一个自定义控制器
到目前为止,本教程中的所有示例都使用了标准帐户 控制器来定义每个页面的底层逻辑。但是,Visualforce 允许您 通过定义自定义控制器,将自己的逻辑和导航控件添加到页面。这 以下主题将介绍创建自定义控制器类和定义自定义控制器类的基础知识 可以与 Visualforce 标记交互的类方法:
- 创建自定义控制器类
- 定义 Getter 方法
- 定义操作方法
- 定义导航方法
- 使用自定义列表控制器批量更新记录
注意
您只能在开发人员中使用 Salesforce 用户界面添加、编辑或删除 Apex Edition、Salesforce Enterprise Edition 试用组织或沙盒组织。在一个 Salesforce 生产组织,您只能使用 Ant 对 Apex 进行更改 迁移工具或 Lightning 平台 API 调用。compileAndTest
创建自定义控制器类
自定义控制器只是一个 Apex 类。例如,以下代码是有效的 虽然无效,但控制器类:
public class MyController {

}
您可以创建控制器类,并通过两种不同的方式将其添加到页面中:
- 将 controller 属性添加到您的页面,并使用“快速修复”来 动态创建控制器类:
- 在页面编辑器中,将 controller 属性添加到标记中。例如:<apex:page>
<apex:page controller="MyController"> <apex:pageBlock title="Hello {!$User.FirstName}!"> This is your new page. </apex:pageBlock> </apex:page> - 使用快速修复选项自动创建名为 我的控制器。
- 在页面编辑器中,将 controller 属性添加到标记中。例如:<apex:page>
- 在您选择的 Apex 编辑器中创建并保存控制器类,然后 在您的页面中引用它:
- 在应用程序中,从“设置”中,在“快速查找”框中输入“Apex 类”,然后选择“Apex” 类,然后单击“新建”以创建一个 新类。
- 返回到您的网页,然后将属性添加到代码中,如 上面的例子。controller<apex:page>
注意
一个页面一次只能引用一个控制器。您不能在标签中同时使用该属性和该属性。standardControllercontroller<apex:page>
一旦您保存了引用有效自定义控制器的页面,第二个控制器 编辑器选项卡位于页面编辑器旁边。此编辑器允许您向后切换 在页面标记和定义页面的 Apex 之间来回切换 逻辑。
定义 Getter 方法
Visualforce 控制器类的主要任务之一是为开发人员提供一种显示数据库的方法 以及页面标记中的其他计算值。启用此功能的方法 功能类型称为 getter 方法,并且 通常被命名为 ,其中 是 方法返回的记录或基元值。getIdentifierIdentifier
例如,以下控制器有一个用于返回的 getter 方法 控制器的名称以字符串形式表示:
public class MyController {

    public String getName() {
        return 'MyController';
    }

}
若要在页面中显示 getter 方法的结果,请使用名称 的 getter 方法,表达式中没有前缀。例如,若要在页面标记中显示方法的结果,请使用:getgetName{!name}
<apex:page controller="MyController">
    <apex:pageBlock title="Hello {!$User.FirstName}!">
        This is your new page for the {!name} controller.
    </apex:pageBlock>
</apex:page>
在使用标准帐户控制器的早期示例中, 页面显示 URL(带有查询字符串 参数)。这是可能的 因为 Account 标准控制器包含一个名为 getter 的方法,该方法返回指定的 帐户记录。我们可以在自定义控制器中模拟此功能 使用以下代码:id{!account.<fieldName>}getAccount
public class MyController {

    public String getName() {
        return 'MyController';
    }

    public Account getAccount() {
        return [select id, name from Account
                 where id = :ApexPages.currentPage().getParameters().get('id')];
    }
}
注意为了正确呈现此示例, 您必须将 Visualforce 页面与 URL 中的有效客户记录相关联。例如,如果是账户 ID,则 生成的 URL 应为:
001D000000IRt53
https://Salesforce_instance/apex/MyFirstPage?id=001D000000IRt53该方法使用嵌入式 SOQL 查询,返回页面 URL 中参数指定的帐户。 为了访问 ,该方法使用命名空间:getAccountididgetAccountApexPages
- 首先,该方法返回当前页面的实例。 返回对 Visualforce 页面的引用,包括其查询字符串参数。currentPagePageReferencePageReference
- 使用页面引用,使用该方法返回指定查询的映射 字符串参数名称和值。getParameters
- 然后调用指定返回的方法 参数的值 本身。getidid
使用 MyController 的页面 控制器可以分别显示带有 OR 表达式的帐户名称或 ID 字段。 只有这些字段对页面可用,因为这些字段是 仅控制器中 SOQL 查询返回的字段。{!account.name}{!account.id}
为了更接近地模仿标准帐户控制器,我们可以添加 属性设置为 标记到 为页面提供与其他帐户页面相同的样式。标记 因为页面现在如下所示:tabStyle<apex:page>
<apex:page controller="MyController" tabStyle="Account">
    <apex:pageBlock title="Hello {!$User.FirstName}!">
        This is your new page for the {!name} controller. <br/>
        You are viewing the {!account.name} account.
    </apex:pageBlock>
</apex:page>定义操作方法
操作方法在页面执行逻辑或导航时 事件发生,例如当用户单击按钮或将鼠标悬停在 页。可以通过在以下参数之一的参数中使用表示法从页面标记中调用操作方法 标签:
- <apex:commandButton> 创建一个按钮,该按钮调用 行动
- <apex:commandLink> 创建一个调用操作的链接
- <apex:actionPoller> 定期调用操作
- <apex:actionSupport> 创建一个事件(例如 “onclick”、“onmouseover”等) 命名组件,调用操作
- <apex:actionFunction> 定义了一个新的 JavaScript 调用操作的函数
- <apex:page> 调用操作 加载页面时
例如,在页面中使用输入组件中描述的示例页面中,命令按钮绑定到 Account 标准控制器中的方法。我们可以适应以前的 示例,以便它现在使用 MyController 自定义控制器:save
<apex:page controller="MyController" tabStyle="Account">
    <apex:form>
        <apex:pageBlock title="Hello {!$User.FirstName}!">
            You are viewing the {!account.name} account. <p/>
            Change Account Name: <p/>
            <apex:inputField value="{!account.name}"/> <p/>
            <apex:commandButton action="{!save}" value="Save New Account Name"/>
        </apex:pageBlock>
    </apex:form>
</apex:page>
注意
请记住,要使此页面显示帐户数据,有效的 ID 必须在页面的 URL 中将客户记录指定为查询参数。为 例:
https://Salesforce_instance/apex/myPage?id=001x000xxx3Jsxb保存页面后 上面,Visualforce 编辑器提供了一个“快速修复”选项,用于将方法添加到 MyController 类中。如果 单击快速修复链接,MyController 现在如下所示:save
public class MyController {

    public PageReference save() {
        return null;
    }

    public String getName() {
        return 'MyController';
    }

    public Account getAccount() {
        return [select id, name from Account
                 where id = :ApexPages.currentPage().getParameters().get('id')];
    }
}
由快速生成的方法 fix 采用操作方法的标准签名:它是公共的,返回一个 PageReference,并且不包含任何参数。save最终,方法定义必须 使用新的帐户值更新数据库,但首先我们必须定义一个成员变量 保存从数据库中检索到的帐户信息。没有成员 变量,则从数据库中检索到的记录在 其值用于呈现页面,并且用户对记录的更新不能 保存。要引入此成员变量,需要更改控制器代码的两个部分:
save
- 必须将成员变量添加到类中
- 执行初始查询时必须设置成员变量getAccount
public class MyController {

    Account account;

    public PageReference save() {
        return null;
    }

    public String getName() {
        return 'MyController';
    }

    public Account getAccount() {
        if(account == null)
            account = [select id, name, site from Account
                       where id = :ApexPages.currentPage().getParameters().get('id')];
        return account;
    }
}现在成员变量已经到位,该方法需要做的就是更新数据库:save
public class MyController {

    Account account;

    public PageReference save() {
        update account;
        return null;
    }

    public String getName() {
        return 'MyController';
    }

    public Account getAccount() {
        if(account == null)
            account = [select id, name, site from Account
                       where id = :ApexPages.currentPage().getParameters().get('id')];
        return account;
    }
}
一个更强大的解决方案,可能会抓住 各种异常,查找重复项,等等。因为这本来是一个简单的 例如,这些细节被遗漏了。save
若要测试此页,请更改“更改帐户名称”字段中的值 ,然后单击保存新帐户名称。与标准帐户一样 控制器示例中,页面只需使用新帐户名称进行刷新。在下一个 例如,我们将扩展保存操作,以便不是刷新当前页面, 它会将用户导航到不同的确认页面。
注意
要使页面正确呈现,必须在 URL 中指定有效的帐户 ID。为 例如,如果是帐户 ID, 使用以下 URL:001D000000HRgU6
https://Salesforce_instance/apex/MyFirstPage?id=001D000000HRgU6定义导航方法
除了执行数据库更新和其他计算外, 自定义控制器操作方法可以将用户导航到不同的 page,通过返回一个 PageReference 对象。
PageReference 是对 页面的实例化。除其他属性外,PageReferences 由一个 URL 和一组查询参数名称和值组成。在自定义控制器或控制器扩展中, 您可以在以下选项之一中引用或实例化 PageReference 方式:
Page.existingPageName指已保存在组织中的 Visualforce 页面的 PageReference。通过推荐 以这种方式到页面,平台识别出这个控制器 或控制器扩展依赖于指定的 页面,并将防止在控制器时删除页面 或存在扩展。PageReference pageRef = new PageReference('partialURL');创建对 Lightning 平台上托管的任何页面的 PageReference。例如 设置为是指位于 http:// mySalesforceInstance/apex/HelloWorld 的 Visualforce 页面。 同样,设置为引用 到指定记录的详细信息页面。‘partialURL’‘/apex/HelloWorld’‘partialURL‘‘/’ + ‘recordID‘此语法不太适合引用其他 Visualforce 页面,因为 PageReference 是在运行时构造的,而不是在编译时引用的 时间。运行时引用不可用于参照完整性 系统。因此,平台无法识别此控制器或 控制器扩展依赖于指定页面的存在,并且 不会发出错误消息以防止用户删除页面。Page.existingPageNamePageReference pageRef = new PageReference('fullURL');为 外部 URL。例如:PageReference pageRef = new PageReference('http://www.google.com');
在此示例中,假设您要将一个用户重定向到另一个用户 在他或她点击保存后,页面中新增了 URL。为此,首先通过导航创建名为 mySecondPage 的第二个页面 添加到以下 URL 并使用快速修复:
https://Salesforce_instance/apex/mySecondPage然后将以下标记添加到 mySecondPage。为简单起见, 只需使用以下定义的基于标准控制器的页面即可 本教程前面部分:
<apex:page standardController="Account">
    Hello {!$User.FirstName}!
    <p>You are viewing the {!account.name} account.</p>
</apex:page>
现在返回到您在定义操作方法中构建的原始页面,并确保已在 URL 中指定了帐户查询参数。编辑 控制器中的方法 以便它返回您刚刚创建的新页面的 PageReference, “我的第二页”:idsave
public class MyController {

    Account account;

    public PageReference save() {
        update account;
        PageReference secondPage = Page.mySecondPage;
        secondPage.setRedirect(true);
        return secondPage;
    }

    public String getName() {
        return 'MyController';
    }

    public Account getAccount() {
        if(account == null)
            account = [select id, name, site from Account
                       where id = :ApexPages.currentPage().getParameters().get('id')];
        return account;
    }
}
请注意,在上面的代码中,PageReference 的属性设置为 true。 如果未设置此属性,则 PageReference 将返回到 浏览器,但不进行导航 – 原始 URL 页面保持不变。如果要更改 URL,则由于 导航,您必须设置属性。redirectredirect
如果您现在测试该页面,请点击保存新帐户 Name 导航到 mySecondPage,但数据上下文为 lost — 也就是说,没有可用于 的值。其原因 当发生重定向时,控制器会清除上下文状态。 因此,我们需要重置 PageReference 参数中的查询字符串参数 地图:{!account.name}id
public class MyUpdatedController {

    Account account;

    public PageReference save() {
        update account;
        PageReference secondPage = Page.mySecondPage;
        secondPage.setRedirect(true);
        secondPage.getParameters().put('id',account.id);
        return secondPage;
    }

    public String getName() {
        return 'MyController';
    }

    public Account getAccount() {
        if(account == null)
            account = [select id, name, site from Account
                       where id = :ApexPages.currentPage().getParameters().get('id')];
        return account;
    }
}
创建向导
了解了 Visualforce 标记和控制器的基本功能后, 最后一个示例演示如何将它们一起使用以创建自定义的三步向导 允许用户与相关联系人、客户和 联系人角色:
- 第一步捕获与客户和联系人相关的信息
- 第二步捕获与商机相关的信息
- 最后一步显示将创建哪些记录,并允许用户保存或 取消
要实现此向导,我们必须为 向导,以及一个自定义控制器,用于在每个页面和 跟踪用户输入的数据。
重要
跨多个使用的数据 Visualforce 页面必须 在第一页中定义,即使该页未使用数据。例如,如果 字段在三步流程的第二页和第三页是必需的,第一页也必须 包含字段。您可以通过将字段的属性设置为 来对用户隐藏此字段。renderedfalse
每个组件的代码都包含在以下各节中,但首先需要 了解创建它们的最佳过程,因为三个页面中的每一个都引用了 控制器,控制器引用这三个页面中的每一个。在看似一个 难题,你不能在没有页面的情况下创建控制器,但页面必须存在 在控制器中引用它们。我们可以通过首先定义完全为空的页面来解决这个问题,然后 创建控制器,然后向页面添加标记。因此,最好的程序 用于创建向导页面和控制器的流程如下:
- 导航到第一页的 URL,然后单击“创建页面” opptyStep1.https://Salesforce_instance/apex/opptyStep1
- 对向导中的其他页面重复上述步骤,然后 .opptyStep2opptyStep3
- 创建控制器 将其作为属性添加到某个网页上的代码中(例如, ,然后单击创建 Apex 控制器 newOpportunityController。糊 ,然后单击保存。newOpportunityController<apex:page><apex:page controller=”newOpportunityController”>
- 现在返回到您创建的三个页面的编辑器,并在其代码中复制。 向导现在应按预期工作。
注意
虽然您可以创建一个空页面,但反之则不行 true – 为了使页面引用控制器,控制器必须与所有 的方法和属性。
Opportunity Wizard 控制器
以下 Apex 类是 New Customer 中所有三个页面的控制器 商机向导:
public class newOpportunityController {

   // These four member variables maintain the state of the wizard.
   // When users enter data into the wizard, their input is stored
   // in these variables.
   Account account;
   Contact contact;
   Opportunity opportunity;
   OpportunityContactRole role;


   // The next four methods return one of each of the four member
   // variables. If this is the first time the method is called,
   // it creates an empty record for the variable.
   public Account getAccount() {
      if(account == null) account = new Account();
      return account;
   }

   public Contact getContact() {
      if(contact == null) contact = new Contact();
      return contact;
   }

   public Opportunity getOpportunity() {
      if(opportunity == null) opportunity = new Opportunity();
      return opportunity;
   }

   public OpportunityContactRole getRole() {
      if(role == null) role = new OpportunityContactRole();
      return role;
   }


   // The next three methods control navigation through
   // the wizard. Each returns a PageReference for one of the three pages
   // in the wizard. Note that the redirect attribute does not need to
   // be set on the PageReference because the URL does not need to change
   // when users move from page to page.
   public PageReference step1() {
      return Page.opptyStep1;
   }

   public PageReference step2() {
      return Page.opptyStep2;
   }

   public PageReference step3() {
      return Page.opptyStep3;
   }


   // This method cancels the wizard, and returns the user to the
   // Opportunities tab
    public PageReference cancel() {
      PageReference opportunityPage = new PageReference('/006');
      opportunityPage.setRedirect(true);
      return opportunityPage;
    }

   // This method performs the final save for all four objects, and
   // then navigates the user to the detail page for the new
   // opportunity.
   public PageReference save() {

      // Create the account. Before inserting, copy the contact's
      // phone number into the account phone number field.
      account.phone = contact.phone;
      insert account;

      // Create the contact. Before inserting, use the id field
      // that's created once the account is inserted to create
      // the relationship between the contact and the account.
      contact.accountId = account.id;
      insert contact;

      // Create the opportunity. Before inserting, create
      // another relationship with the account.
      opportunity.accountId = account.id;
      insert opportunity;

      // Create the junction contact role between the opportunity
      // and the contact.
      role.opportunityId = opportunity.id;
      role.contactId = contact.id;
      insert role;

      // Finally, send the user to the detail page for
      // the new opportunity.


      PageReference opptyPage = new ApexPages.StandardController(opportunity).view();
      opptyPage.setRedirect(true);

      return opptyPage;
   }

}
商机向导的第 1 步
下面的代码定义向导 () 的第一页,其中收集了有关关联联系人和客户的数据 来自用户:opptyStep1
<apex:page controller="newOpportunityController" tabStyle="Opportunity">
  <script>
  function confirmCancel() {
      var isCancel = confirm("Are you sure you wish to cancel?");
      if (isCancel) return true;

     return false;
  }
  </script>
  <apex:sectionHeader title="New Customer Opportunity" subtitle="Step 1 of 3"/>
    <apex:form>
      <apex:pageBlock title="Customer Information" mode="edit">

        <!-- The pageBlockButtons tag defines the buttons that appear at the top
             and bottom of the pageBlock. Like a facet, it can appear anywhere in
             a pageBlock, but always defines the button areas.-->
        <!-- The Next button contained in this pageBlockButtons area
             calls the step2 controller method, which returns a pageReference to
             the next step of the wizard. -->
        <apex:pageBlockButtons>
          <apex:commandButton action="{!step2}" value="Next"/>
          <apex:commandButton action="{!cancel}" value="Cancel"
                              onclick="return confirmCancel()" immediate="true"/>
        </apex:pageBlockButtons>
      <apex:pageBlockSection title="Account Information">

        <!-- Within a pageBlockSection, inputFields always display with their
             corresponding output label. -->
        <apex:inputField id="accountName" value="{!account.name}"/>
        <apex:inputField id="accountSite" value="{!account.site}"/>
      </apex:pageBlockSection>
      <apex:pageBlockSection title="Contact Information">
        <apex:inputField id="contactFirstName" value="{!contact.firstName}"/>
        <apex:inputField id="contactLastName" value="{!contact.lastName}"/>
        <apex:inputField id="contactPhone" value="{!contact.phone}"/>
      </apex:pageBlockSection>
    </apex:pageBlock>
  </apex:form>
</apex:page>
请注意以下有关向导第一页的标记的信息:
- 标签可以采用 可选儿童 元素,用于控制组件页眉和页脚中显示的按钮。 标记在正文中出现的顺序无关紧要。在这个 页面上,标记包括显示在页面块区域页脚中的“下一步”按钮。<apex:pageBlock><apex:pageBlockButtons><apex:pageBlockButtons><apex:pageBlock><apex:pageBlockButtons>
- 该向导依赖于 JavaScript 代码来显示一个对话框,询问用户是否想要 单击“取消”按钮时导航离开。虽然 为了简单起见,示例将 JavaScript 直接包含在标记中,这是一个更好的 练习将 JavaScript 代码放在静态资源中并引用该资源。
- 在向导的此页中,“下一步”按钮调用控制器中的方法,该方法返回向导的下一步:step2PageReference
<apex:pageBlockButtons> <apex:commandButton action="{!step2}" value="Next"/> </apex:pageBlockButtons>命令按钮必须出现在窗体中,因为窗体组件本身是 负责刷新页面显示,基于新的.PageReference - 标签组织一个 用于显示的数据集。与表类似,an 由一列或多列组成,每列 跨越两个单元格 – 一个用于字段的标签,一个用于字段的值。每个组件 在标签正文中找到的被放置在一行的下一个单元格中,直到 已达到列数。此时,下一个组件将换行到下一个组件 行,并放置在第一个单元格中。<apex:pageBlockSection><apex:pageBlockSection><apex:pageBlockSection>某些组件(包括 )会自动跨越两个单元 一次,填写字段的标签和值。为 例如,在此页面的“联系信息”区域中,第一个 “姓名”字段位于第一列,“姓氏”字段位于第二列,“电话”字段换行为 下一行的第一列:<apex:inputField>
<apex:pageBlockSection title="Contact Information"> <apex:inputField id="contactFirstName" value="{!contact.firstName}"/> <apex:inputField id="contactLastName" value="{!contact.lastName}"/> <apex:inputField id="contactPhone" value="{!contact.phone}"/> </apex:pageBlockSection> - 上述代码中第一个标记的属性 excerpt 将用户的输入分配给联系人记录的 firstName 字段,该字段是 由 中的方法返回 控制器。value<apex:inputField>getContact
您的页面应如下所示:
新客户机会的第 1 步 巫师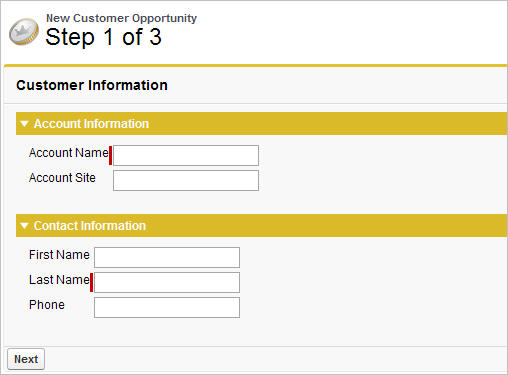
商机向导的第 2 步
以下代码定义向导 () 的第二页,其中从用户那里收集有关商机的数据:opptyStep2
<apex:page controller="newOpportunityController" tabStyle="Opportunity">
  <script>
  function confirmCancel() {
      var isCancel = confirm("Are you sure you wish to cancel?");
      if (isCancel) return true;

     return false;
  }
  </script>
  <apex:sectionHeader title="New Customer Opportunity" subtitle="Step 2 of 3"/>
  <apex:form>
    <apex:pageBlock title="Opportunity Information" mode="edit">
      <apex:pageBlockButtons>
        <apex:commandButton action="{!step1}" value="Previous"/>
        <apex:commandButton action="{!step3}" value="Next"/>
        <apex:commandButton action="{!cancel}" value="Cancel"
                            onclick="return confirmCancel()" immediate="true"/>
      </apex:pageBlockButtons>
      <apex:pageBlockSection title="Opportunity Information">
        <apex:inputField id="opportunityName" value="{!opportunity.name}"/>
        <apex:inputField id="opportunityAmount" value="{!opportunity.amount}"/>
        <apex:inputField id="opportunityCloseDate" value="{!opportunity.closeDate}"/>
        <apex:inputField id="opportunityStageName" value="{!opportunity.stageName}"/>
        <apex:inputField id="contactRole" value="{!role.role}"/>
      </apex:pageBlockSection>
    </apex:pageBlock>
  </apex:form>
</apex:page>
请注意,尽管用于在窗体上放置“联系人的关闭日期”、“阶段”和“角色”字段的标记 与其他字段相同,标签会检查每个字段的数据类型以确定如何 来显示它。例如,单击“关闭日期”文本框会带来 向上显示一个日历,用户可以从中选择日期。<apex:inputField>您的页面应如下所示:
新客户机会的第 2 步 巫师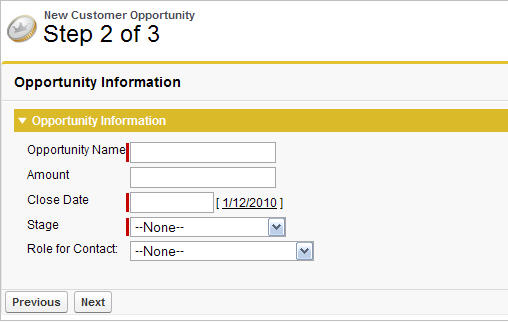
商机向导的第三步
最后一个代码块定义向导 () 的第三页,其中显示所有输入的数据。这 用户可以决定保存操作或返回上一步:opptyStep3
<apex:page controller="newOpportunityController" tabStyle="Opportunity">
  <script>
  function confirmCancel() {
      var isCancel = confirm("Are you sure you wish to cancel?");
      if (isCancel) return true;

     return false;
  }
  </script>
  <apex:sectionHeader title="New Customer Opportunity" subtitle="Step 3 of 3"/>
  <apex:form>
    <apex:pageBlock title="Confirmation">
      <apex:pageBlockButtons>
          <apex:commandButton action="{!step2}" value="Previous"/>
          <apex:commandButton action="{!save}" value="Save"/>
          <apex:commandButton action="{!cancel}" value="Cancel"
                              onclick="return confirmCancel()" immediate="true"/>
      </apex:pageBlockButtons>
      <apex:pageBlockSection title="Account Information">
        <apex:outputField value="{!account.name}"/>
        <apex:outputField value="{!account.site}"/>
      </apex:pageBlockSection>
      <apex:pageBlockSection title="Contact Information">
        <apex:outputField value="{!contact.firstName}"/>
        <apex:outputField value="{!contact.lastName}"/>
        <apex:outputField value="{!contact.phone}"/>
        <apex:outputField value="{!role.role}"/>
      </apex:pageBlockSection>
      <apex:pageBlockSection title="Opportunity Information">
        <apex:outputField value="{!opportunity.name}"/>
        <apex:outputField value="{!opportunity.amount}"/>
        <apex:outputField value="{!opportunity.closeDate}"/>
      </apex:pageBlockSection>
    </apex:pageBlock>
  </apex:form>
</apex:page>请注意,向导的第三页只是将文本写入带有标记的页面。<apex:outputField>最终页面应如下所示:
高级 Visualforce Dashboard 组件
Visualforce 页面可用作仪表板组件。仪表板显示源报表中的数据 作为可视化组件,可以是图表、仪表、表格、指标或 Visualforce 页面。 这些组件提供了关键指标的快照和 组织的绩效指标。 每个仪表板最多可以有 20 个组件。
使用标准控制器的 Visualforce 页面不能 在仪表板中使用。要包含在仪表板中,Visualforce 页面必须没有控制器,使用自定义 控制器,或引用绑定到 StandardSetController 类的页面。如果 Visualforce 页面不满足这些要求,则它不会显示为 仪表板组件 Visualforce Page 下拉列表中的选项。以下示例显示了一个 Visualforce 页面,该页面可在仪表板中使用,并使用自定义 列表控制器。它显示与 一位名叫“Babara Levy”的联系人:
<apex:page controller="retrieveCase" tabStyle="Case">
    <apex:pageBlock>
        {!contactName}'s Cases
        <apex:pageBlockTable value="{!cases}" var="c">
            <apex:column value="{!c.status}"/>
            <apex:column value="{!c.subject}"/>
        </apex:pageBlockTable>
    </apex:pageBlock>
</apex:page>
此代码显示与 页:
public class retrieveCase {

    public String getContactName() {
        return 'Babara Levy';
    }

    public List<Case> getCases() {
        return [SELECT status, subject FROM Case
                WHERE Contact.name = 'Babara Levy' AND status != 'Closed' limit 5];
    }
}
在仪表板中运行的 Visualforce 页面的示例
集成 Visualforce 和 Google Charts
Google Charts 提供了一种动态 通过不同的可视化呈现数据。结合 Visualforce,Google Charts 可以提供更大的灵活性和分发潜力 而不是使用仪表板。由于图表是通过 URL 生成的, 无论图像位于何处,都可以共享和嵌入可视化效果 允许。
使用前有两个先决条件 Google Charts API。首先是确定如何对 数据。Google Charts API 有三种数据编码类型:文本、 简单且扩展。对于此示例,我们将仅使用简单的 编码。第二种是决定使用哪种类型的图表。为此 例如,用户将在条形图或折线图之间进行选择。自定义控制器有两个重要的 函数 — 和 — 对应于 以上要求:
init()create()
- 该函数采用 一个数值,并将其转换为 Google Chart 的简单数据编码 类型。如需了解详情,请参阅 Google Charts API 文档中的简单编码数据格式。init()
- 该函数构造向 Google Charts API 发出请求的 URL。create()
以下代码表示 Visualforce 页面的控制器:
/* This class contains the encoding algorithm for use with the
Google chartAPI. */
public class GoogleDataEncoding {
// Exceptions to handle any erroneous data
public class EncodingException extends Exception {}
public class UnsupportedEncodingTypeException
extends Exception {}
/* The encoding map which takes an integer key and returns the
respective encoding value as defined by Google.
This map is initialized in init() */
private Map<Integer, String> encodingMap { get; set; }
/* The maximum encoding value supported for the given encoding
type. This value is set during init() */
private Integer encodingMax { get; set; }
/* The minimum encoding value supported for the given encoding
type. This value is set during init() */
private Integer encodingMin { get; set; }
/* The encoding type according to Google's API. Only SIMPLE
is implemented. */
public enum EncodingType { TEXT, SIMPLE, EXTENDED }
/* The minimum value to use in the generation of an encoding
value. */
public Integer min { get; private set; }
/* The maximum value to use in the generation of an encoding
value. */
public Integer max { get; private set; }
// The encoding type according to the API defined by Google
public EncodingType eType { get; private set; }
// Corresponds to the data set provided by the page
public String dataSet { get; set; }
// Corresponds to the type of graph selected on the page
public String graph { get; set; }
// The URL that renders the Google Chart
public String chartURL { get; set; }
// Indicates whether the chart should be displayed
public Boolean displayChart { get; set; }
public GoogleDataEncoding() {
min = 0;
max = 61;
eType = EncodingType.SIMPLE;
displayChart = false;
init();
}
public PageReference create() {
String[] dataSetList = dataSet.split(',', 0);
String mappedValue = 'chd=s:';
chartURL = 'http://chart.apis.google.com/chart?chs=600x300'
+ '&chtt=Time+vs|Distance&chxt=x,y,x,y'
+ '&chxr=0,0,10,1|1,0,65,5'
+ '&chxl=2:|Seconds|3:|Meters';
if (graph.compareTo('barChart') == 0)
{
chartURL += '&cht=bvs';
}
else if (graph.compareTo('lineChart') == 0)
{
chartURL += '&cht=ls';
}
else
{
throw new EncodingException('An unsupported chart type'
+ 'was selected: ' + graph + ' does not exist.');
}
for(String dataPoint : dataSetList)
{
mappedValue +=
getEncode(Integer.valueOf(dataPoint.trim()));
}
chartURL += '&' + mappedValue;
displayChart = true;
return null;
}
/* This method returns the encoding type parameter value that
matches the specified encoding type. */
public static String getEncodingDescriptor(EncodingType t) {
if(t == EncodingType.TEXT) return 't';
else if(t == EncodingType.SIMPLE) return 's';
else if(t == EncodingType.EXTENDED) return 'e';
else return '';
}
/* This method takes a given number within the declared
range of the encoding class and encodes it according to the
encoding type. If the value provided fall outside of the
declared range, an EncodingException is thrown. */
public String getEncode(Integer d) {
if(d > max || d < min) {
throw new EncodingException('Value provided ' + d
+ ' was outside the declared min/max range ('
+ min + '/' + max + ')');
}
else {
return encodingMap.get(d);
}
}
/* This method initializes the encoding map which is then
stored for expected repetitious use to minimize statement
invocation. */
private void init() {
if(eType == EncodingType.SIMPLE) {
encodingMax = 61;
encodingMin = 0;
encodingMap = new Map<Integer, String>();
encodingMap.put(0,'A');
encodingMap.put(1,'B');
encodingMap.put(2,'C');
encodingMap.put(3,'D');
encodingMap.put(4,'E');
encodingMap.put(5,'F');
encodingMap.put(6,'G');
encodingMap.put(7,'H');
encodingMap.put(8,'I');
encodingMap.put(9,'J');
encodingMap.put(10,'K');
encodingMap.put(11,'L');
encodingMap.put(12,'M');
encodingMap.put(13,'N');
encodingMap.put(14,'O');
encodingMap.put(15,'P');
encodingMap.put(16,'Q');
encodingMap.put(17,'R');
encodingMap.put(18,'S');
encodingMap.put(19,'T');
encodingMap.put(20,'U');
encodingMap.put(21,'V');
encodingMap.put(22,'W');
encodingMap.put(23,'X');
encodingMap.put(24,'Y');
encodingMap.put(25,'Z');
encodingMap.put(26,'a');
encodingMap.put(27,'b');
encodingMap.put(28,'c');
encodingMap.put(29,'d');
encodingMap.put(30,'e');
encodingMap.put(31,'f');
encodingMap.put(32,'g');
encodingMap.put(33,'h');
encodingMap.put(34,'i');
encodingMap.put(35,'j');
encodingMap.put(36,'k');
encodingMap.put(37,'l');
encodingMap.put(38,'m');
encodingMap.put(39,'n');
encodingMap.put(40,'o');
encodingMap.put(41,'p');
encodingMap.put(42,'q');
encodingMap.put(43,'r');
encodingMap.put(44,'s');
encodingMap.put(45,'t');
encodingMap.put(46,'u');
encodingMap.put(47,'v');
encodingMap.put(48,'w');
encodingMap.put(49,'x');
encodingMap.put(50,'y');
encodingMap.put(51,'z');
encodingMap.put(52,'0');
encodingMap.put(53,'1');
encodingMap.put(54,'2');
encodingMap.put(55,'3');
encodingMap.put(56,'4');
encodingMap.put(57,'5');
encodingMap.put(58,'6');
encodingMap.put(59,'7');
encodingMap.put(60,'8');
encodingMap.put(61,'9');
}
}
}Visualforce 页面需要两个输入元素:一个用于图表类型,一个用于 数据集。下面是构造要收集的表单的示例页面 这些信息:
<apex:page controller="GoogleDataEncoding">
    <apex:form >
        <apex:pageBlock
               title="Create a Google Chart for Time and Distance">
            <apex:outputLabel
               value="Enter data set, separated by commas: "
               for="dataInput"/><br/>
            <apex:inputTextArea
               id="dataInput" title="First Data Point"
               value="{!dataSet}" rows="3" cols="50"/><br/>
            <apex:selectRadio value="{!graph}"
               layout="pageDirection">
                <apex:selectOption itemValue="barChart"
               itemLabel="Horizontal Bar Chart"/>
                <apex:selectOption itemValue="lineChart"
               itemLabel="Line Chart"/>
            </apex:selectRadio>
            <apex:commandButton action="{!create}"
               value="Create"/>
        </apex:pageBlock>
    </apex:form>
    <apex:image url="{!chartURL}" alt="Sample chart"
               rendered="{!displayChart}"/>
</apex:page>
对于示例,请输入以下序列 数字: .您的页面应呈现以下内容:
1, 1, 2, 3, 5, 8, 13, 21, 34, 55
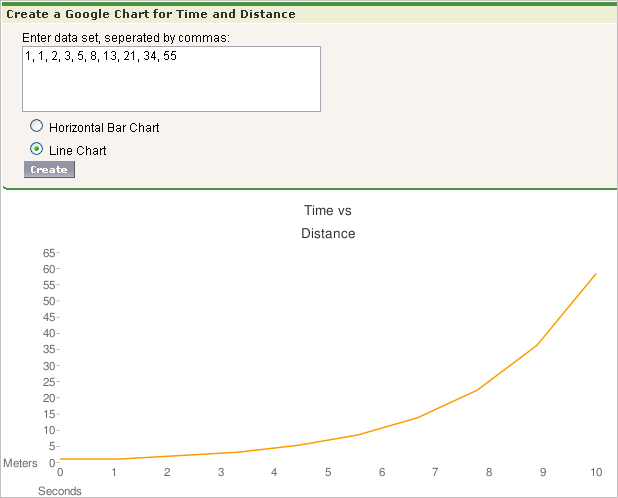
使用自定义列表控制器批量更新记录
要创建执行批量更新的页面,请使用 StandardSetController 类。
列表控制器跟踪两组记录:包含所有记录的主列表 由筛选器选择,以及包含用户选择的那些记录的辅助列表。 辅助列表通常建立在标准列表视图页面上,用户可以在其中 复选框以选择记录。然后,用户可以单击自定义列表按钮 导航到自定义批量更新页面,该页面使用 prototype 对象应用新的 字段值添加到用户的选择中。原型对象对所有记录进行操作 在用户的选择中。若要在自定义控制器中检索原型对象,请使用 StandardSetController 的方法。 例如,要启用 Opportunity 的批量更新,请使用单数术语来表示其 associated object () 设置所有字段值 选择中的记录:getRecordOpportunity
- 创建 Visualforce 页面 叫。massupdatestages
- 提供以下控制器:
public class selectedSizeWorkaround { ApexPages.StandardSetController setCon; public selectedSizeWorkaround(ApexPages.StandardSetController controller) { setCon = controller; } public integer getMySelectedSize() { return setCon.getSelected().size(); } public integer getMyRecordsSize() { return setCon.getRecords().size(); } } - 提供以下信息 标记:
<apex:page standardController="Opportunity" recordSetVar="opportunities" extensions="selectedSizeWorkaround" showHeader="false" id="muopp" > <apex:form id="muform"> <apex:pageMessage summary="Selected Collection Size: {!mySelectedSize}" severity="info" id="mupms" /> <apex:pageMessage summary="Record Set Size: {!myRecordsSize}" severity="info" id="mupmr" /> <apex:pageBlock title="Opportunity Mass-Update" mode="edit" id="mub1"> <apex:pageMessages /> <apex:pageBlockSection id="mus1"> <apex:inputField value="{!opportunity.stagename}" id="stagename"> <apex:actionSupport event="onchange" rerender="muselectedlist"/> </apex:inputField> </apex:pageBlockSection> <apex:pageBlockButtons location="bottom" id="mubut"> <apex:commandButton value="Save" action="{!save}" id="butsav"/> <apex:commandButton value="Cancel" action="{!cancel}" id="butcan"/> </apex:pageBlockButtons> </apex:pageBlock> <apex:pageBlock title="Selected Opportunities" id="muselectedlist"> <apex:pageBlockTable value="{!selected}" var="opp" id="mutab"> <apex:column value="{!opp.name}" id="oppname"/> <apex:column value="{!opp.stagename}" id="oppstage"/> </apex:pageBlockTable> </apex:pageBlock> </apex:form> </apex:page> - 从商机的对象管理设置中,转到按钮、链接和 行动。
- 单击“新建”按钮或链接。
- 将“按钮标签”设置为 ,并将“名称”设置为 。Mass Update StagesMassUpdateStages
- 将显示类型设置为和 确保显示复选框(用于多记录选择)是 检查。将“行为”设置为 ,并将“内容源”设置为 。单击您刚刚创建的页面的名称以将其关联 使用此按钮。List ButtonDisplay in existing window with sidebarVisualforce Page
- 点击保存。
- 从商机的对象管理设置中,转到搜索布局。然后 单击“商机列表视图”旁边的“编辑”。
- 在“自定义按钮”下,将“批量更新阶段”按钮移动到“所选按钮” 列表。
- 点击保存。
- 单击 Opportunity 选项卡。选择或创建一个筛选器,以显示一些现有的 您想要改变的机会。
- 您将在每个结果旁边看到复选框。单击任意数量的复选框 ,然后单击“批量更新阶段”按钮将所选阶段更改为任何值 你愿意。
- 点击保存。
虽然此示例显示如何更新一个字段,但 原型对象可以被引用并应用于用户的选择;中的任何字段 用户未设置的原型对象不会影响所选记录。记得 字段的属性(例如其必需性)在原型中保持不变 对象。例如,如果您在页面上为必填字段添加输入字段,例如 as ,用户必须输入 字段的值。Opportunity.StageName
注意
你只需要当你 希望您的页面显示或引用用户选择的大小,或者 过滤集。这样的显示很有帮助,因为它为用户提供了有关 集合,该集合将由批量更新修改。selectedSizeWorkaround