
若要显示记录数据的行和列,请使用该组件。若要在具有结构层次结构的表中显示数据,例如客户记录和关联的联系人,请使用该组件。lightning-datatablelightning-tree-grid
比较和用于数据显示lightning-datatable lightning-tree-grid
这些组件类似,但有一个 V 形按钮,用于展开和折叠具有子记录的行。lightning-tree-grid
lightning-datatable使用 Salesforce Lightning Design System (SLDS) 中的数据表蓝图,并提供一种在桌面上显示记录数据的简单方法。
lightning-tree-grid使用 SLDS 中的树网格蓝图,使您能够显示分层数据,将记录分组到父子关系中。
提示
Lightning Design System 文档提供了每个组件处于不同状态的示例。
以下是 和 支持的功能列表。lightning-datatablelightning-tree-grid
| 特征 | lightning-datatable | lightning-tree-grid |
|---|---|---|
| 按数据类型设置列格式 |  | |
| 标头操作 | | |
| 行操作 | | |
| 调整列大小 | | |
| 选择行 | | |
| 换行或剪裁列内容 | | |
| 行号 | | |
| 列排序 | | – |
| 内联编辑 | | – |
| 无限滚动 | | – |
| 可扩展行 | – | |
注意
lightning-datatable并且不受移动设备支持。lightning-tree-grid
使用内联编辑在表格中显示数据
要在表中显示 Salesforce 数据,请使用该组件。该组件支持内联编辑,使用户无需导航到记录即可更新字段值。lightning-datatable
若要加载记录列表,请使用 getListUi(已弃用)线路适配器或在 Apex 方法中使用 SOQL。请参阅数据指南。
此示例在 Apex 方法中使用 SOQL 在客户记录中加载联系人。
public with sharing class ContactController {

    @AuraEnabled(cacheable=true)
    public static List<Contact> getContacts(String accId) {
        return [
            SELECT AccountId, Id, FirstName, LastName, Title, Phone, Email
            FROM Contact
            WHERE AccountId = :accId
            WITH SECURITY_ENFORCED
        ];
    }
}
注释将方法公开给 Lightning 组件,并在客户端上缓存联系人列表。该参数筛选给定客户记录的联系人。@AuraEnabled(cacheable=true)accId
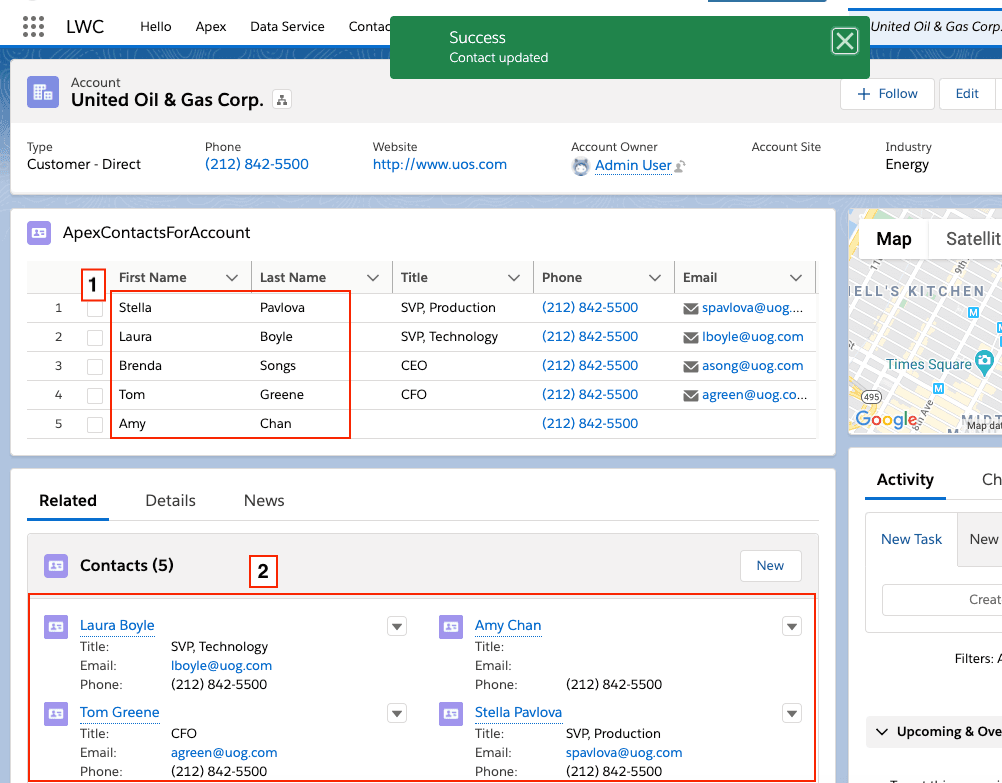
如果 Apex 方法返回数据,则 HTML 模板将显示具有可编辑名字和姓氏字段 (1) 的组件。编辑字段时,将显示“保存”按钮,您可以单击该按钮以更新联系人记录。成功更新联系人记录还会更新相关列表 (2) 中的记录数据,以及页面上由 Lightning 数据服务管理的其他组件。lightning-datatable
实现内联编辑
提示
此示例基于 lwc-recipes 存储库中的组件。此版本略有不同,以便能够在记录页面上使用数据表。datatableInlineEditWithUiApi
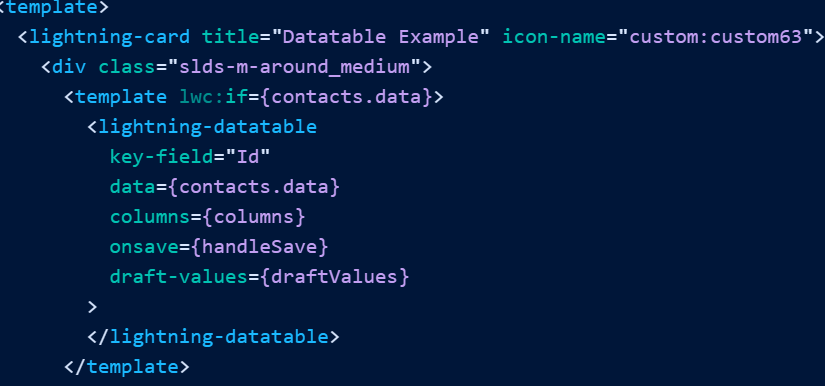
若要启用内联编辑,请按以下模板所示配置组件。lightning-datatableapexContactsForAccount
<!-- apexContactsForAccount.html -->
<template>
  <lightning-card title="Datatable Example" icon-name="custom:custom63">
    <div class="slds-m-around_medium">
      <template lwc:if={contacts.data}>
        <lightning-datatable
          key-field="Id"
          data={contacts.data}
          columns={columns}
          onsave={handleSave}
          draft-values={draftValues}
        >
        </lightning-datatable>
      </template>
      <template lwc:if={contacts.error}>
        <!-- Handle Apex error -->
      </template>
    </div>
  </lightning-card>
</template>
required 属性将每一行与联系人记录相关联。该属性保存通过线路服务从 Apex 方法或线路适配器检索的数据。该属性为每列分配一个记录字段,并自定义列的行为。当用户编辑单元格时,更新后的值将存储在 中。key-fielddatacolumnsdraft-values
单击“保存”按钮将触发该事件。使用事件处理程序将更改保留在数据表中。在此示例中,事件处理程序调用 updateRecord(recordInput, clientOptions) 来保存记录更改。saveonsaveonsave
注意
有关属性和支持的功能的列表,请参阅 lightning-datatable。
在列中启用内联编辑
一行数据对应于一条记录,每列显示该记录的其中一个字段的值。若要启用内联编辑,请通过在列定义中设置来指定可编辑的字段。在此示例中,“名字”和“姓氏”字段是可编辑的。由于联系人的“姓名”字段是复合字段,因此必须分别使用“名字”和“姓氏”字段。editable: true
// apexContactsForAccount.js

import { LightningElement, wire, api } from "lwc";
import getContacts from "@salesforce/apex/ContactController.getContactList";
import { refreshApex } from "@salesforce/apex";
import { updateRecord } from "lightning/uiRecordApi";

import { ShowToastEvent } from "lightning/platformShowToastEvent";
import FIRSTNAME_FIELD from "@salesforce/schema/Contact.FirstName";
import LASTNAME_FIELD from "@salesforce/schema/Contact.LastName";
import TITLE_FIELD from "@salesforce/schema/Contact.Title";
import PHONE_FIELD from "@salesforce/schema/Contact.Phone";
import EMAIL_FIELD from "@salesforce/schema/Contact.Email";
import ID_FIELD from "@salesforce/schema/Contact.Id";

const COLS = [
  {
    label: "First Name",
    fieldName: FIRSTNAME_FIELD.fieldApiName,
    editable: true,
  },
  {
    label: "Last Name",
    fieldName: LASTNAME_FIELD.fieldApiName,
    editable: true,
  },
  { label: "Title", fieldName: TITLE_FIELD.fieldApiName, editable: true },
  {
    label: "Phone",
    fieldName: PHONE_FIELD.fieldApiName,
    type: "phone",
    editable: true,
  },
  {
    label: "Email",
    fieldName: EMAIL_FIELD.fieldApiName,
    type: "email",
    editable: true,
  },
];
export default class DatatableInlineEditWithUiApi extends LightningElement {
  @api recordId;
  columns = COLS;
  draftValues = [];

  @wire(getContacts, { accId: "$recordId" })
  contacts;

  async handleSave(event) {
    // Convert datatable draft values into record objects
    const records = event.detail.draftValues.slice().map((draftValue) => {
      const fields = Object.assign({}, draftValue);
      return { fields };
    });

    // Clear all datatable draft values
    this.draftValues = [];

    try {
      // Update all records in parallel thanks to the UI API
      const recordUpdatePromises = records.map((record) => updateRecord(record));
      await Promise.all(recordUpdatePromises);

      // Report success with a toast
      this.dispatchEvent(
        new ShowToastEvent({
          title: "Success",
          message: "Contacts updated",
          variant: "success",
        }),
      );

      // Display fresh data in the datatable
      await refreshApex(this.contacts);
    } catch (error) {
      this.dispatchEvent(
        new ShowToastEvent({
          title: "Error updating or reloading contacts",
          message: error.body.message,
          variant: "error",
        }),
      );
    }
  }
}@wire(getContacts)将数据提供给 ,并将记录 ID 提供给 。contacts.dataaccId
编辑字段时,将编辑的字段值和记录存储为对象数组。event.detail.draftValuesId
[
  {
    FirstName: "Sean",
    Id: "003R0000002J2wHIAS",
  },
  {
    FirstName: "Jack",
    Id: "003R0000002J2wIIAS",
  },
];
在进行更改后按 Tab 键或单击单元格外部时,将显示数据表页脚,其中包含“取消”和“保存”按钮。若要隐藏数据表页脚,请清除该属性。将值复制到记录对象中后,事件处理程序将清除。draftValuesonsavedraftValues
调用 updateRecord(recordInput, clientOptions) 将新字段值保存到记录中。
updateRecord()只需要一条记录。为要更新其字段的每条记录传入一个对象。在此示例中,该参数包含一个对象,该对象具有多个记录的更新字段。若要同时更新多条记录,请将参数传递给 进行处理。recordInputrecordupdateRecord()
成功保存后,事件处理程序将调度事件以显示成功 Toast 消息。onsaveShowToastEvent
更新记录后,刷新 Apex 方法中的联系人列表,以便数据表始终显示最新数据。refreshApex(this.contacts)
注意
对于单个事务中的批量记录更新,我们建议使用 Apex。请参阅使用 Apex 启用内联编辑部分。
使用 Apex 启用内联编辑
对于批量记录更新,请将记录更改传递给调用数据操作语言 (DML) 操作的 Apex 控制器。在此示例中,编辑后的字段值将传递到 Apex 控制器。由于记录是由 Apex 更新的,因此您必须使用 notifyRecordUpdateAvailable(recordIds) 函数通知 Lightning 数据服务 (LDS),以便刷新 Lightning 数据服务缓存和线路。updateupdateContacts
注意
此示例基于 github.com/trailheadapps/lwc-recipes 存储库中的组件。此版本略有不同,使用不带 LDS 的 Apex。datatableInlineEditWithApex
在上一示例中创建的文件中,导入 Apex 控制器和函数。apexContactsForAccount.jsnotifyRecordUpdateAvailable
import updateContacts from "@salesforce/apex/ContactController.updateContacts";
import { notifyRecordUpdateAvailable } from "lightning/uiRecordApi";
更新函数以处理编辑的值。若要确保在通过 Apex 更新记录后调用该记录,请使用 / 模式或 Promise 链。此示例使用 /。handleSave()notifyRecordUpdateAvailable()asyncawaitasyncawait
async handleSave(event) {
    const updatedFields = event.detail.draftValues;

    // Prepare the record IDs for notifyRecordUpdateAvailable()
    const notifyChangeIds = updatedFields.map(row => { return { "recordId": row.Id } });

    try {
        // Pass edited fields to the updateContacts Apex controller
        const result = await updateContacts({data: updatedFields});
        console.log(JSON.stringify("Apex update result: "+ result));
        this.dispatchEvent(
            new ShowToastEvent({
                title: 'Success',
                message: 'Contact updated',
                variant: 'success'
            })
        );

        // Refresh LDS cache and wires
        notifyRecordUpdateAvailable(notifyChangeIds);

        // Display fresh data in the datatable
        await refreshApex(this.contacts);
            // Clear all draft values in the datatable
            this.draftValues = [];
        }
   } catch(error) {
           this.dispatchEvent(
               new ShowToastEvent({
                   title: 'Error updating or refreshing records',
                   message: error.body.message,
                   variant: 'error'
               })
         );
    };
}
Apex 控制器将包含更新字段的 JSON 字符串反序列化为 Contact 对象。它使用 DML 操作更新已更改的记录。updateContactsupdate
@AuraEnabled
public static string updateContacts(Object data) {
    List<Contact> contactsForUpdate = (List<Contact>) JSON.deserialize(
         JSON.serialize(data),
         List<Contact>.class
    );
    try {
        update contactsForUpdate;
        return 'Success: contacts updated successfully';
    }
    catch (Exception e) {
        return 'The following exception has occurred: ' + e.getMessage();
    }
}

创建自定义数据类型
组件根据您为列指定的类型设置数据格式。lightning-datatable

在创建自己的数据类型之前,请检查标准数据类型,看看是否满足您的要求。可以使用类型属性自定义多种类型的输出。标准数据类型包括:

action
boolean
button
button-icon
currency
date
date-local
email
location
number
percent
phone
text(默认)
url
有关标准数据类型及其类型属性的更多信息,请参阅 lightning-datatable 参考文档。

此外,在创建自己的数据类型之前,请考虑 SLDS 样式挂钩。SLDS 样式钩子可帮助您在影子 DOM 中自定义支持的数据类型。例如,可以使用 SLDS 样式挂钩在数据类型上应用不同的颜色。button

注意

自定义数据类型不支持调度自定义事件。

通过扩展 LightningDatatable 定义自定义类型

创建自己的数据类型来实现自定义单元格,例如删除行按钮或图像,甚至是自定义文本或数字显示。还可以为自定义数据类型上的每一行应用自定义类。

若要定义和使用自定义数据类型,请在新组件中扩展组件的类。LightningDatatablelightning-datatable

注意

您可以从 only 扩展到创建具有自定义数据类型的数据表。在所有其他情况下,不支持扩展除创建 Lightning Web 组件之外的任何类。LightningDatatableLightningElement

创建一个 Lightning Web 组件,并在组件文件夹的 HTML 模板中定义您的类型。该模板可以包含不需要 JavaScript 的简单数据类型的完整 UI。该模板还可以嵌入您在另一个文件夹中定义的组件。例如,如果要包含确定要显示的内容的逻辑,请使用单独的组件。

让我们看一下组件的文件夹结构,它定义了两种自定义类型。myCustomTypeDatatable

myCustomTypeDatatable
   ├──customName.html
   ├──customNumber.html
   ├──myCustomTypeDatatable.js
   └──myCustomTypeDatatable.js-meta.xml
在 JavaScript 文件中,扩展类并指定类型的名称和模板文件。此示例使用 和 模板创建自定义名称类型和自定义数字类型。myCustomTypeDatatable.jsLightningDatatablecustomName.htmlcustomNumber.html

注意

类型和模板的名称不必匹配。该示例同时使用类型名称和模板文件名。我们建议您导入具有不同名称的模板,以便明确指定类型名称和模板名称的位置。customName

//myCustomTypeDatatable.js
import LightningDatatable from "lightning/datatable";
import customNameTemplate from "./customName.html";
import customNumberTemplate from "./customNumber.html";

export default class MyCustomTypeDatatable extends LightningDatatable {
  static customTypes = {
    customName: {
      template: customNameTemplate,
      standardCellLayout: true,
      typeAttributes: ["accountName"],
    },
    customNumber: {
      template: customNumberTemplate,
      standardCellLayout: false,
      typeAttributes: ["status"],
    },
    // Other types here
  };
}
注意

您可以从 only 扩展到创建自定义数据类型。LightningDatatable

将以下属性传递给对象。customTypes

自定义类型属性	类型	描述
template	字符串	键入的导入 HTML 模板的名称。
typeAttributes	数组	要传递给自定义数据模板的属性的逗号分隔列表。使用语法访问数据。typeAttributes.attributeName
standardCellLayout	布尔	指定是否使用标准布局。默认值为 false。所有标准数据类型都使用标准布局。自定义数据类型的默认布局是裸布局。请参阅自定义数据类型布局和样式。您可以使用自定义数据类型的单元格样式,使其看起来与标准数据类型相似。还支持辅助功能和键盘导航。standardCellLayoutstandardCellLayout
创建自定义数据模板

在自定义数据模板中,添加数据类型的标记。此示例创建一个自定义类型,该类型使用组件呈现文本标签。customName.htmllightning-badge

<!--customName.html-->
<template>
  <lightning-badge label={typeAttributes.accountName} icon-name="standard:account">
  </lightning-badge>
</template>
该模板使用默认的裸布局,因为 设置为 .您可以添加自己的样式。以下示例在单元格周围添加一个小填充,并将数字浮动到右侧。如果数字与数据定义中指定的条件匹配,则会显示一个图标。customNumber.htmlmyCustomTypeDatatable.jsstandardCellLayout: falsecustomNumber

<!--customNumber.html-->
<template>
  <div class="slds-p-around_x-small">
    <lightning-formatted-number
      value={value}
      class="slds-float_right"
    ></lightning-formatted-number>
    <lightning-icon
      icon-name={typeAttributes.status}
      alternative-text="Employer Status"
    ></lightning-icon>
  </div>
</template>
提示

这些示例自定义数据类型很简单,只能用 HTML 表示。如果自定义类型更复杂,请使用 JavaScript、HTML 模板和 XML 配置文件创建单独的组件。使用自定义数据 HTML 模板作为组件的容器。自定义数据类型的编辑模板示例中使用了一个单独的组件。

使用自定义类型实现数据表

让我们实现一个使用自定义类型的数据表。第一列使用我们在上一节中创建的自定义类型显示帐户名称。该属性与帐户对象上的字段匹配。fieldNameName

使用自定义类型记录数据表中显示的数据

使用 Apex 控制器在数据表中显示 10 条帐户记录。

public with sharing class AccountController {
    @AuraEnabled(cacheable=true)
    public static List<Account> getAccountList() {
        return [SELECT Id, Name, Industry, NumberOfEmployees FROM Account WITH SECURITY_ENFORCED LIMIT 10];
    }
}
要实现自定义类型 datatable,请创建一个包装组件以包含扩展的 datatable 组件,定义数据表的列,然后获取数据。这里我们用作包装器。myDatatable

定义列时,可以使用该属性传入 SLDS 实用程序类或您自己的类。cellAttributes

/* myDatatable.js */
import { LightningElement, wire, track } from "lwc";
import getAccountList from "@salesforce/apex/AccountController.getAccountList";

const COLS = [
  {
    label: "Account Name",
    type: "customName",
    typeAttributes: {
      accountName: { fieldName: "Name" },
    },
  },
  {
    label: "Industry",
    fieldName: "Industry",
    cellAttributes: {
      class: { fieldName: "industryColor" },
    },
  },
  {
    label: "Employees",
    type: "customNumber",
    fieldName: "NumberOfEmployees",
    typeAttributes: {
      status: { fieldName: "status" },
    },
    cellAttributes: {
      class: "slds-theme_alert-texture",
    },
  },
];

export default class MyDatatable extends LightningElement {
  columns = COLS;
  @track accounts = [];

  @wire(getAccountList)
  wiredAccounts({ error, data }) {
    if (error) {
      // Handle error
    } else if (data) {
      // Process record data
      this.accounts = data.map((record) => {
        let industryColor = record.Industry === "Energy" ? "slds-text-color_success" : "";
        let status = record.NumberOfEmployees > 10000 ? "utility:ribbon" : "";
        return { ...record, industryColor: industryColor, status: status };
      });
    }
  }
}
myDatatable.js演示了在自定义单元格上应用样式的几种方法。仅当字段值匹配时,该列才使用该类。该列在该列的所有行上使用该类。此外,用于列的类型包括直接在标记中实现的布局和填充类。Industryslds-text-color_successEnergyNumberOfEmployeesslds-theme_alert-texturecustomNumberNumberOfEmployeescustomNumber.html

接下来,将 Apex 控制器返回的数据传递给自定义类型 datatable 组件中的属性。getAccountListdata

<!--myDatatable.html-->
<template>
  <c-my-custom-type-datatable
    key-field="Id"
    data={accounts}
    columns={columns}
    show-row-number-column
  >
  </c-my-custom-type-datatable>
</template>
提示

lwc-recipes 存储库中的组件为 创建自定义数据类型。datatableCustomDataTypelightning-datatable
自定义数据类型布局和样式
您可以自定义使用自定义数据类型的单元格的外观。lightning-datatable
使用自定义数据类型的布局
自定义单元格可以使用标准布局或裸布局。
标准布局:
- 将内容均匀地分布在单元格中,第一个项目与左边框齐平,最后一个项目与右边框齐平
- 将文本向左对齐,垂直向中对齐
- 在内容的左侧和右侧添加一个小填充
- 支持可编辑类型的辅助功能和键盘导航
裸布局,这是自定义单元格的默认布局:
- 将文本向左对齐,垂直向中对齐
- 删除内容左侧和右侧的填充
- 不支持可编辑类型的辅助功能和键盘导航
所有支持的标准数据类型都使用标准布局。lightning-datatable
若要使用标准布局,请指定定义自定义类型的时间。standardCellLayout: true
static customTypes = { customName: { template: customNameTemplate, standardCellLayout: true,
typeAttributes: ['accountName'], }, // Other types here }
请参阅创建自定义数据类型。
创建自定义数据类型并使用默认裸布局时,可以应用自己的样式、对齐列中的内容、配置文本换行和剪辑。
在列上应用样式
若要将样式应用于列中的所有行,请在列配置中将 CSS 类传递给。cellAttributes
const COLS = [
  {
    label: "Employees",
    type: "number",
    fieldName: "NumberOfEmployees",
    cellAttributes: {
      class: "slds-theme_shade slds-theme_alert-texture",
    },
  },
];
若要将样式应用于特定行,请使用该属性将 CSS 类连接到数据定义。此示例使用该属性将蓝色文本应用于“能源”行业的行。fieldNamefieldNameindustryClass
/* myDatatable.js */
import { LightningElement, wire, track } from 'lwc';
import getAccountList from '@salesforce/apex/AccountController.getAccountList';

const COLS = [{
    label: 'Industry', fieldName: 'Industry',
    cellAttributes: {
        class: { fieldName: 'industryClass' },
    }
}, // Other columns here
];

export default class MyDatatable extends LightningElement {
    columns = COLS;
    @track accounts = [];

    @wire(getAccountList)
    wiredAccounts({error, data}) {
        if (error) {
            // Handle error
        } else if (data) {
            // Process record data
            this.accounts = data.map((record) => {
                let industryClass = record.Industry === 'Energy' ? 'blueText': 'defaultText';
                return {...record, 'industryClass: industryClass}
            });

        }
    }
对齐自定义单元格中的内容
您可以对齐使用自定义数据类型标准布局的列中的内容。在定义中,传入属性。cellAttributesalignment
const COLS = [
  {
    label: "Account Name",
    type: "customName",
    fieldName: "Name",
    cellAttributes: {
      alignment: "right",
    },
  },
];
支持的值为 、 和 。alignmentleftcenterright
默认情况下,标准数字类型向右对齐。标准数字类型包括 、 和 数据类型。currencynumberpercent
文本换行和剪裁
创建自定义数据类型时,请使用 SLDS 实用程序类和 实现文本换行和剪裁。这些类使自定义数据单元格能够在用户更改数据表列标题中的自动换行选择时正确显示。文本换行会垂直展开行以显示更多内容。文本剪裁会将内容截断为列中的一行。slds-hyphenateslds-truncate
假设您有一个显示帐户名称的自定义数据类型模板。默认情况下,该列显示的文本被剪裁,这会截断带有尾随省略号的内容。
<template>
  <template lwc:if={wrapText}>
    <div class="slds-hyphenate">{typeAttributes.accountName}</div>
  </template>
  <template lwc:else>
    <div class="slds-truncate">{typeAttributes.accountName}</div>
  </template>
</template>
您还可以创建一个 getter,该 getter 根据该值返回 SLDS 实用程序类。wrapText
若要显示换行文本,请从列标题的下拉菜单中选择换行文本。
或者,若要在加载数据表时在列上显示换行文本,请传入列定义。wrapText: true
const COLS = [
  {
    label: "Account Name",
    type: "customText",
    wrapText: true,
    typeAttributes: {
      accountName: { fieldName: "Name" },
    },
  },
];您可以控制换行列内容时显示的行数。在扩展数据表组件中设置,以在隐藏其余行之前显示多行。数据表应用行位以允许多行文本截断。wrap-text-max-lines
<template>
  <c-my-custom-type-datatable
    key-field="id"
    data={accounts}
    columns={columns}
    wrap-text-max-lines="2"
  >
  </c-my-custom-type-datatable>
</template>
注意
wrap-text-max-linesInternet Explorer 11 不支持。如果为 true,则显示列中的整个文本。wrapText
使自定义数据类型可编辑
若要使自定义数据类型可在 中编辑,请创建一个附加模板来实现用于内联编辑数据类型的 UI。lightning-datatable
这些高级步骤增加了内联编辑功能。
- 创建编辑模板。
- 将编辑模板添加到自定义类型定义中。
- 使自定义类型在列定义中可编辑。
让我们通过扩展 LightningDatatable 定义自定义类型中的示例中的类型实现内联编辑。customNumber
创建编辑模板
在定义自定义类型模板的同一文件夹中,创建用于编辑自定义类型的模板。customNumberEdit.htmlcustomNumber.html
myCustomTypeDatatable
   ├──customName.html
   ├──customNumber.html
   ├──customNumberEdit.html
   ├──myCustomTypeDatatable.js
└──myCustomTypeDatatable.js-meta.xml自定义类型的编辑模板使用与自定义类型模板中的输出组件匹配的输入组件。建议使用该组件。在示例中,输出组件在模板中使用,因此我们在其编辑模板中使用。该组件使用户能够更改自定义类型单元格中的数字。lightning-inputlightning-formatted-numbercustomNumberlightning-input type="number"lightning-input type="number"
提示
有关可在编辑模板中使用的组件的信息,请参阅本页后面的自定义类型的内联编辑注意事项。
<!--customNumberEdit.html-->
<template>
  <div class="slds-p-around_x-small">
    <lightning-input
      type="number"
      value={editedValue}
      required={required}
      label={columnLabel}
      min={typeAttributes.min}
      data-inputable="true"
      class="slds-float_right"
    >
    </lightning-input>
  </div>
</template>
使用这些属性在输入组件和扩展数据表组件之间传递值。
| 属性 | 类型 | 描述 |
|---|---|---|
editedValue | 字符串 | 正在编辑的自定义单元格的当前值。 |
columnLabel | 字符串 | 从列定义中检索到的值。label |
required | 布尔 | 从列定义中检索到的必需值。默认值为 false。如果列定义设置为 true,则当用户与字段交互且未输入值时,该字段将显示验证错误。required |
typeAttributes | 对象 | 包含单元格的 type 属性值的对象。使用语法访问值。typeAttributes.attributeName |
该示例设置该属性,以确保用户在内联编辑自定义数字时输入非负数。在下一节中,将添加到自定义类型定义中。minmin
该属性对于标准单元格布局中的辅助功能支持是必需的。data-inputable="true"
将编辑模板添加到自定义类型定义
导入 中的编辑模板,并在对象的定义中添加属性。该属性指定用于自定义类型的内联编辑的模板。myCustomTypeDatatable.jseditTemplate: customNumberEditTemplatecustomNumbercustomTypeseditTemplate
//myCustomTypeDatatable.js
import LightningDatatable from "lightning/datatable";
import customNameTemplate from "./customName.html";
import customNumberTemplate from "./customNumber.html";
import customNumberEditTemplate from "./customNumberEdit.html";

export default class MyCustomTypeDatatable extends LightningDatatable {
  static customTypes = {
    customName: {
      template: customNameTemplate,
      standardCellLayout: true,
      typeAttributes: ["accountName"],
    },
    customNumber: {
      template: customNumberTemplate,
      editTemplate: customNumberEditTemplate,
      standardCellLayout: true,
      typeAttributes: ["status", "min"],
    },
    // Other types here
  };
}
将值更改为 true 以支持辅助功能和键盘导航。有关详细信息,请参阅本页后面的可编辑自定义类型的辅助功能。standardCellLayout
在类型定义中添加属性。mintypeAttributes
使自定义类型在列定义中可编辑
在数据表的列定义中,将属性添加到自定义类型。editable: true
在这里,我们展示了创建自定义数据类型中的使用自定义类型实现数据表的示例,该数据类型将属性应用于 Employees 列,该列使用 type .myDatatable.jseditable: truecustomNumber
/* myDatatable.js */
import { LightningElement, wire, track } from 'lwc';
import getAccountList from '@salesforce/apex/AccountController.getAccountList';

const COLS = [
    { label: 'Account Name', type: 'customName',
     typeAttributes: {
        accountName: { fieldName: 'Name' }
    },
    },
    { label: 'Industry', fieldName: 'Industry',
     cellAttributes: {
        class: {fieldName: 'industryColor'},
    }
    },
    { label: 'Employees', type: 'customNumber', fieldName: 'NumberOfEmployees', editable: true,
     typeAttributes: {
            status: {fieldName: 'status'},
            min: 0
    },
    cellAttributes: {
        class: 'slds-theme_alert-texture'
    }
}];
如果在编辑模板中向输入组件添加属性,请将它们也添加到列定义中。在这里,我们为 Employees 列添加了属性。mintypeAttributes
处理自定义类型的更改值
与标准数据类型一样,自定义类型的编辑字段以黄色突出显示显示。单元格的更改值临时存储在属性中。editedValue
使用 action 和 attribute 保留数据表中更改的值,就像对标准类型所做的那样。请参阅 lightning-datatable 参考文档中的使用内联编辑在表中显示数据和使用内联编辑部分。onsavedraft-values
可编辑自定义类型的辅助功能
要支持辅助功能,例如可编辑自定义数据类型的键盘导航,请执行以下操作:
- 将属性添加到编辑模板中的输入组件。
data-inputable="true" - 为 中的自定义类型定义设置。
standardCellLayout: truecustomTypes
这些属性使数据表的操作模式和导航模式能够处理您的自定义数据类型。通过在显示可编辑的自定义数据类型的单元格上按 Enter 键或空格键进入操作模式。在导航模式下,当您在数据表中按 Tab 键时,您可以导航到显示可编辑自定义数据类型的单元格,因为它们是可操作的。
该属性使用该属性的值应用于输入组件。aria-labellabel
自定义类型的已编辑单元格的验证和错误处理
该组件为您处理基本的客户端输入验证。例如,如果为数字输入指定 、 或属性,则组件会根据这些属性值验证输入,如果输入无效,则返回错误。还可以对自定义类型执行更复杂的客户端验证。lightning-inputstepminmax
若要在客户端上进一步验证自定义类型的用户输入,请在自定义编辑模板中使用子组件。
在输入组件上设置,并在其 JS 中包含 getter,以公开输入组件的有效性 API。data-inputable="true"validity()
@api
get validity() {
    return this.customInput.validity;
}在编辑模板中公开输入组件中的方法,以便自定义数据类型可以在更改的数据无效时显示自定义消息。showHelpMessageifInvalid()
@api
showHelpMessageIfInvalid() {
    this.customInput.showHelpMessageIfInvalid()
}
有关详细信息,请参阅 lightning-input 的参考文档。
自定义类型的内联编辑注意事项
- 在自定义编辑模板中,仅支持将具有单个输入字段的 Lightning 基本组件作为输入组件。还支持具有多个输入的组件,其 API 计算结果为单个输入。
lightning-input type="datetime" - 该组件仅设计用于数据表,不支持在数据表中使用。请改用。
lightning-input-fieldlightning-record-edit-formlightning-input - 自定义数据类型尚不支持服务器端验证规则。
自定义数据类型的编辑模板示例
此示例显示了一个自定义数据类型,其模板包含组件而不是简单的标记。
注意
lwc-recipes 存储库具有多个组件,用于演示使用 Apex 和模块进行内联编辑。查找名称以 开头的组件。lightning/uiRecordApidatatableInline
此示例创建一个具有 Amount 自定义数据类型的数据表。
这是初始加载时的数据表。
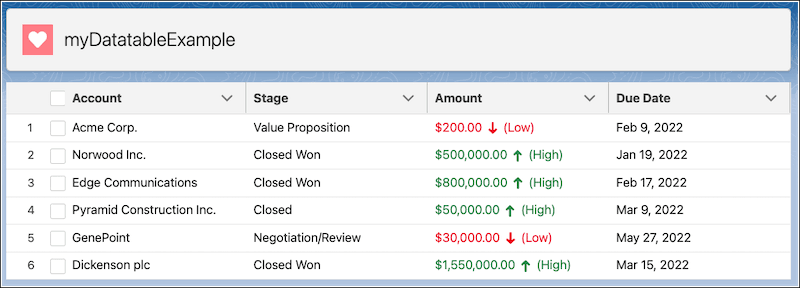
该组件包含定义自定义类型的扩展数据表组件。myDatatableWrapper
/* myDatatableWrapper.html */

<template>
  <c-my-custom-type-datatable columns={COLS} key-field="id" data={data}>
  </c-my-custom-type-datatable>
</template>
// myDatatableWrapper.js
import { LightningElement } from 'lwc';
export default class MyDatatableWrapper extends LightningElement {
COLS = [
{ label: 'Account', type: 'text', fieldName: 'account', editable: false, displayReadOnlyIcon: true},
{ label: 'Stage', type: 'text', fieldName: 'stage', editable: false, displayReadOnlyIcon: true},
{ label: 'Amount', type: 'customNumber', fieldName: 'amount', editable: true,
typeAttributes: {
status: {fieldName: 'status'},
step: {fieldName: 'step'}
}
},
{ label: 'Due Date', type: 'date', fieldName: 'date', editable: false, displayReadOnlyIcon: true}
];
data = [
{account: 'Acme Corp.', amount: '200.00', status: 'action:user',
step: '0.01', stage:'Value Proposition', date: '2022-02-10T00:00:00Z'},
{account: 'Norwood Inc.', amount: '500000.00', status: 'action:user',
step: '0.01', stage:'Closed Won', date: '2022-01-20T00:00:00Z'},
{account: 'Edge Communications', amount: '800000.00', status: 'action:user',
step: '0.01', stage:'Closed Won', date: '2022-02-18T00:00:00Z'},
{account: 'Pyramid Construction Inc.', amount: '50000.00', status: 'action:user',
step: '0.01', stage:'Closed ', date: '2022-03-10T00:00:00Z'},
{account: 'GenePoint', amount: '30000', status: 'action:user',
step: '0.01', stage:'Negotiation/Review ', date: '2022-05-28T00:00:00Z'},
{account: 'Dickenson plc', amount: '1550000.00', status: 'action:user',
step: '0.01', stage:'Closed Won', date: '2022-03-16T00:00:00Z'}
]下面是具有可编辑自定义类型的扩展数据表的文件夹。
myCustomTypeDatatable
   ├──customNumber.html
   ├──customNumberEdit.html
   ├──myCustomTypeDatatable.js
   └──myCustomTypeDatatable.js-meta.xml
编辑模板包含另一个定义内联编辑 UI 的组件。
/*customNumber.html*/
<template>
  <c-my-fancy-number value={value}> </c-my-fancy-number>
</template>
子组件定义数据类型的显示,并包含用于确定应用于数据的样式的逻辑。
该组件评估数据以应用类、图标和图标样式。myFancyNumber
/* myFancyNumber.html */

<template>
  <div class={computedClass}>
    <lightning-formatted-number format-style="currency" value={value}>
    </lightning-formatted-number>
    <lightning-icon
      class="slds-p-horizontal_xx-small"
      icon-name={computedIcon}
      size="xx-small"
      variant={iconVariant}
    >
    </lightning-icon>
    ({range})
  </div>
</template>
// myFancyNumber.js
import { LightningElement, api, track, wire } from "lwc";
export default class MyFancyNumber extends LightningElement {
@api value;
get range() {
return this.value > 50000 ? "High" : "Low";
}
get computedClass() {
return this.value > 50000 ? "slds-text-color_success" : "slds-text-color_error";
}
get computedIcon() {
return this.value > 50000 ? "utility:arrowup" : "utility:arrowdown";
}
get iconVariant() {
return this.value > 50000 ? "success" : "error";
}
}该模板使用带有 的组件。customNumberEdit.htmllightning-inputtype="number"
/* customNumberEdit.html */
<template>
  <lightning-input
    type="number"
    value={editedValue}
    label={columnLabel}
    required={required}
    step={typeAttributes.step}
    data-inputable="true"
  >
  </lightning-input>
</template>
下面是在保存表之前编辑自定义数字类型字段后的数据表。编辑后的字段以黄色突出显示。
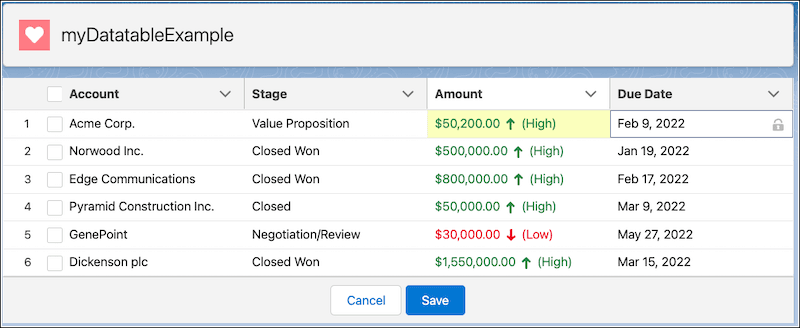
有关保存已更改数据的信息,请参阅使用内联编辑在表中显示数据。
创建记录数据的分层表
该组件显示可展开以显示子记录的数据行。lightning-tree-grid
该组件基于并支持其功能的子集。请参阅在表格中显示记录数据,以比较每个组件提供的功能。lightning-tree-gridlightning-datatable
显示记录和子记录
让我们创建一个表来显示具有关联案例的帐户。每个行级操作都允许您使用导航服务编辑客户或案例记录。
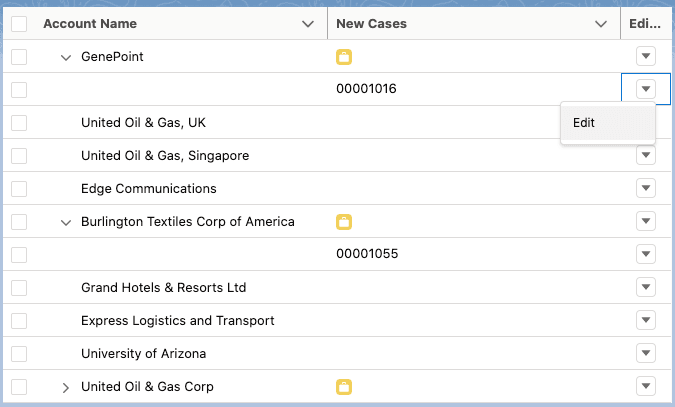
让我们使用 Apex 获取数据。在此示例中,包含一个 SOQL 语句,该语句返回帐户名称和状态为 的所有关联事例。CaseController.clsNew
//CaseController.cls
public with sharing class CaseController {
    @AuraEnabled(cacheable=true)
    public static list<Account> getNewCasesForAccounts(){
        return [SELECT Name, (
                SELECT Id, CaseNumber, Status FROM Cases WHERE toLabel(Status) = 'New')
                FROM Account WHERE Id IN (SELECT AccountId FROM Case)];
    }
}
在 JavaScript 文件中,用于调用 Apex 方法。使用键定义包含子项的行。包含子项的行显示带有 V 形按钮,用于切换子项。myTreeGrid.js@wire_children
//myTreeGrid.js
import { LightningElement, wire, track } from "lwc";
import { NavigationMixin } from "lightning/navigation";

import getNewCases from "@salesforce/apex/CaseController.getNewCasesForAccounts";

const actions = [{ label: "Edit", name: "edit_record" }];

const COLS = [
  {
    fieldName: "Name",
    label: "Account Name",
  },
  {
    fieldName: "CaseNumber",
    label: "New Cases",
    cellAttributes: {
      iconName: { fieldName: "iconName" },
    },
  },
  {
    type: "action",
    label: "Edit Record",
    typeAttributes: {
      rowActions: actions,
      menuAlignment: "right",
    },
  },
];

export default class MyTreeGrid extends NavigationMixin(LightningElement) {
  @track myData = [];
  columns = COLS;
  error;

  @wire(getNewCases)
  wiredCases({ error, data }) {
    if (error) {
      // Handle error
      this.error = error;
    } else if (data) {
      // Process record data
      var strData = JSON.parse(JSON.stringify(data));

      strData.map((row, index) => {
        if (row["Cases"]) {
          row._children = row["Cases"]; //define rows with children
          delete row.Cases;

          let iconKey = "iconName";
          row[iconKey] = "standard:case";
        }
      });
      this.myData = strData;
    }
  }

  handleRowAction(event) {
    const action = event.detail.action;
    const row = event.detail.row;
    switch (action.name) {
      case "edit_record":
        this[NavigationMixin.Navigate]({
          type: "standard__objectPage",
          attributes: {
            objectApiName: "Case",
            actionName: "edit",
            recordId: row.Id,
          },
        });
        break;
    }
  }
}
使用 创建表。lightning-tree-grid
<!--myTreeGrid.html-->
<template>
  <lightning-tree-grid
    columns={columns}
    data={myData}
    key-field="Id"
    onrowaction={handleRowAction}
  >
  </lightning-tree-grid>
</template>
更改表单显示密度
在 Lightning Experience 中,显示密度设置决定了显示内容的密度和字段标签的位置。在“设置”中为组织控制显示密度,用户还可以从其配置文件菜单中根据自己的喜好设置显示密度。
组织的舒适设置将标签放在字段的顶部,并在页面元素之间添加更多空间。相比之下,紧凑视图是更密集的视图,标签与字段位于同一行上,行与行之间的间距更小。舒适的环境类似于紧凑,但线条之间有更多的空间。
您可以将表单设计为遵循显示密度设置,或设置表单密度以覆盖显示密度设置。通过覆盖显示密度,您可以更好地控制标签位置,但不会影响间距。此外,您可以将表单中的各个字段设置为使用更改字段标签位置的变体。
在表单中使用组织的默认显示密度
lightning-record-edit-form、 ,并根据组织的显示密度进行调整,或者在您设置 时进行调整。lightning-record-view-formlightning-record-formdensity="auto"
<lightning-card icon-name="standard:contact" title="record-edit-form">
    <div class="slds-p-horizontal_small">
        <!-- Replace the record-id with your own -->
        <lightning-record-edit-form record-id="003RM0000066Y82YAE"
                                  object-api-name="Contact"
                                  density="auto">
            <lightning-messages></lightning-messages>
            <lightning-input-field field-name="FirstName"></lightning-input-field>
            <lightning-input-field field-name="LastName"></lightning-input-field>
            <lightning-input-field field-name="Email"></lightning-input-field>
            <lightning-input-field field-name="Phone"></lightning-input-field>
        </lightning-record-edit-form>
    </div>
</lightning-card>
覆盖组织的显示密度
要覆盖组织的显示密度,请指定 或 。该属性不支持该值。如果组织的显示密度设置为舒适,则默认情况下标签和字段位于同一行上。density="compact"density="comfy"cozydensity
下表列出了组织的显示密度设置,以及它们与 、 和 上的表单密度的关系。lightning-record-edit-formlightning-record-view-formlightning-record-form
| 组织显示密度 | 形态密度 | 字段标签对齐 |
|---|---|---|
| 舒适 | auto(默认)或comfy | 标签位于字段上方 |
compact | 标签和字段在同一行上 | |
| 舒适 | auto(默认)或compact | 标签和字段在同一行上 |
comfy | 标签位于字段上方 | |
| 紧凑的 | auto(默认)或compact | 标签和字段在同一行上 |
comfy | 标签位于字段上方 |
减少标签和字段之间的空间
当表单密度为 时,标签和字段对于较大区域中的单个列表单来说可能显得太远。要在表单使用紧凑密度时减小标签和字段之间的间距,请使用 on 或 上的类。compactslds-form-element_1-collightning-input-fieldlightning-output-field
<lightning-card icon-name="standard:contact" title="record-edit-form">
    <div class="slds-p-horizontal_small">
        <!-- Replace the record-id with your own -->
        <lightning-record-edit-form record-id="003RM0000066Y82YAE"
                                  object-api-name="Contact"
                                  density="compact">
            <lightning-messages></lightning-messages>
            <lightning-input-field field-name="FirstName" class="slds-form-element_1-col"></lightning-input-field>
            <lightning-input-field field-name="LastName" class="slds-form-element_1-col"></lightning-input-field>
            <lightning-input-field field-name="Email" class="slds-form-element_1-col"></lightning-input-field>
            <lightning-input-field field-name="Phone" class="slds-form-element_1-col"></lightning-input-field>

        </lightning-record-edit-form>
    </div>
</lightning-card>
在表单域上设置标签变体
如果您希望特定字段的标签和字段对齐方式与表单使用的标签和字段对齐方式不同,则可以设置变体。变体将覆盖该字段的显示密度。lightning-input-field
lightning-input-field支持以下变体:(默认)、、 和 。standardlabel-hiddenlabel-inlinelabel-stacked
此示例显示两个带有内联标签的输入字段,而其余字段的标签则由于表单密度舒适而显示在字段顶部。
<lightning-card icon-name="standard:contact" title="record-edit-form">
    <div class="slds-p-horizontal_small">
        <!-- Replace the recordId with your own -->
        <lightning-record-edit-form record-id="003RM0000066Y82YAE"
                                  object-api-name="Contact"
                                  density="comfy">
            <lightning-messages></lightning-messages>
            <lightning-input-field field-name="FirstName" variant="label-inline"></lightning-input-field>
            <lightning-input-field field-name="LastName" variant="label-inline"></lightning-input-field>
            <lightning-input-field field-name="Email"></lightning-input-field>
            <lightning-input-field field-name="Phone"></lightning-input-field>
        </lightning-record-edit-form>
    </div>
</lightning-card>lightning-output-field支持以下变体:(默认)和 .standardlabel-hidden
本示例在表单密度为 时显示不带标签的输出字段值。隐藏标签可用于辅助技术。comfy
<lightning-card icon-name="standard:contact" title="record-view-form">
    <div class="slds-p-horizontal_small">
        <!-- Replace the recordId with your own -->
        <lightning-record-view-form record-id="003RM0000066Y82YAE"
                                  object-api-name="Contact"
                                  density="comfy">
            <lightning-messages></lightning-messages>
            <lightning-output-field field-name="FirstName" variant="label-hidden"></lightning-output-field>
            <lightning-output-field field-name="LastName" variant="label-hidden"></lightning-output-field>
            <lightning-output-field field-name="Email" variant="label-hidden"></lightning-output-field>
            <lightning-output-field field-name="Phone" variant="label-hidden"></lightning-output-field>
        </lightning-record-view-form>
    </div>
</lightning-card>
此外,要在标签变体为 时减小标签和字段之间的间距,请使用 上的类。label-inlineslds-form-element_1-collightning-input-field
使用注意事项
管理员可以在“密度设置”设置页面上为组织设置默认显示密度。用户可以随时选择自己的显示密度。管理员无法覆盖用户的显示密度设置。组织的默认显示设置取决于 Salesforce 版本。密度更改不适用于 Salesforce Classic、Experience Cloud 站点或 Salesforce 移动应用程序。有关详细信息,请参阅配置用户界面设置。
使用记录的注意事项
使用基本组件处理记录后,您无需额外配置即可使用 Lightning 数据服务,但需要考虑一些自定义用例。
请考虑以下用例。
- 若要显示基于记录类型的记录窗体(包括基于记录类型的选择列表值),请获取记录类型 ID。
- 若要通知父组件记录提交成功,请调度和处理自定义事件。
获取记录类型 ID
选择列表字段根据您的记录类型显示值。使用 or 时,如果一个对象上有多个记录类型,并且没有默认记录类型,则必须提供记录类型 ID。否则,将使用默认记录类型 Id。lightning-record-formlightning-record-edit-form
若要检索记录类型信息,请使用 getObjectInfo 线路适配器。
例
示例:使用 record-type-id 属性
通过提供属性,根据记录类型显示记录创建表单。此示例显示可以放置在客户记录页上的窗体。表单显示字段,其中包括一个选择列表,其值基于给定的记录类型 ID。record-type-id
<template>
  <lightning-card title="Record Form with Record Type" icon-name="standard:account">
    <div lwc:if={objectInfo.data} class="slds-m-around_medium">
      <lightning-record-form
        object-api-name={objectApiName}
        record-type-id={recordTypeId}
        fields={fields}
      >
      </lightning-record-form>
    </div>
  </lightning-card>
</template>
导入模块和对帐户对象的引用。getter 返回与记录类型名称匹配的 Id。getObjectInforecordTypeIdSpecial Account
import { LightningElement, api, wire, track } from "lwc";
import { getObjectInfo } from "lightning/uiObjectInfoApi";
import ACCOUNT_OBJECT from "@salesforce/schema/Account";
import NAME_FIELD from "@salesforce/schema/Account.Name";
import PHONE_FIELD from "@salesforce/schema/Account.Phone";
import INDUSTRY_FIELD from "@salesforce/schema/Account.Industry";

export default class RecordFormWithRecordType extends LightningElement {
  // Flexipage provides recordId and objectApiName
  @api recordId;
  @api objectApiName;

  @track objectInfo;

  // Define fields to display in form
  // Industry field is a picklist
  fields = [NAME_FIELD, PHONE_FIELD, INDUSTRY_FIELD];

  @wire(getObjectInfo, { objectApiName: ACCOUNT_OBJECT })
  objectInfo;

  get recordTypeId() {
    const rtis = this.objectInfo.data.recordTypeInfos;
    return Object.keys(rtis).find((rti) => rtis[rti].name === "Special Account");
  }
}
该属性返回组织中可用的记录类型 ID 的映射。recordTypeInfos
处理窗体上的自定义事件
、 和 组件通过 、 和 属性进行事件处理。要将表单数据传递到容器组件,请创建自定义事件。lightning-record-formlightning-record-edit-formlightning-record-view-formonsubmitonsuccessonerror
假设你有一个容器组件,并且你的表单在组件中。让我们将新记录的 Id 传递给容器组件。在 中,创建一个 的实例。c-wrapperc-account-creatorc-wrapperc-account-creator
<!-- wrapper.html -->
<template>
  <c-account-creator onnewrecord={handleNewRecord}></c-account-creator>
</template>
成功创建记录后,处理程序将调度该事件,然后该处理程序将调用具有记录 ID 的方法。newrecordonsuccesslightning-record-formhandleNewRecord
// wrapper.js
import { LightningElement } from "lwc";

export default class Wrapper extends LightningElement {
  recordId;

  /**
   * Handles the new record event.
   */
  handleNewRecord(evt) {
    const recordId = evt.detail.data.id;
    this.recordId = recordId;
  }
}
在 中,该属性显示一条消息,其中包含新创建的记录的 ID。c-account-creatorcreateStatus
注意
该 ID 在事件中不可用。使用该事件返回 Id。submitsuccess
<!-- c-account-creator -->
<template>
  <lightning-record-form
    object-api-name={accountObject}
    fields={accountFields}
    mode="edit"
    onsuccess={handleAccountCreated}
  >
  </lightning-record-form>
  <span class="slds-m-around_small status">{createStatus}</span>
</template>该方法处理事件。handleAccountCreatedsuccess
import { LightningElement } from "lwc";
import ACCOUNT_OBJECT from "@salesforce/schema/Account";
import NAME_FIELD from "@salesforce/schema/Account.Name";
import WEBSITE_FIELD from "@salesforce/schema/Account.Website";

/**
 * Creates Account records.
 */
export default class AccountCreator extends LightningElement {
  /** Status message when creating an Account. */
  createStatus = "";

  accountObject = ACCOUNT_OBJECT;

  accountFields = [NAME_FIELD, WEBSITE_FIELD];

  /** Handles successful Account creation. */
  handleAccountCreated(evt) {
    this.createStatus = `Account record created. Id is ${evt.detail.id}.`;

    const event = new CustomEvent("newrecord", {
      detail: { data: evt.detail },
    });
    this.dispatchEvent(event);
  }
}